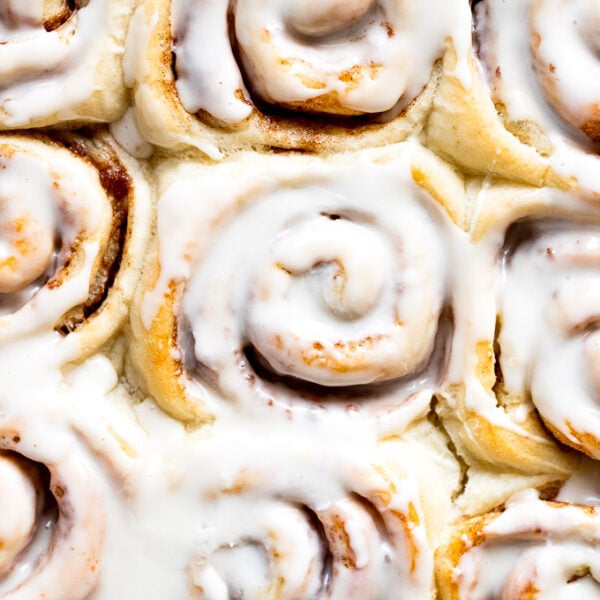

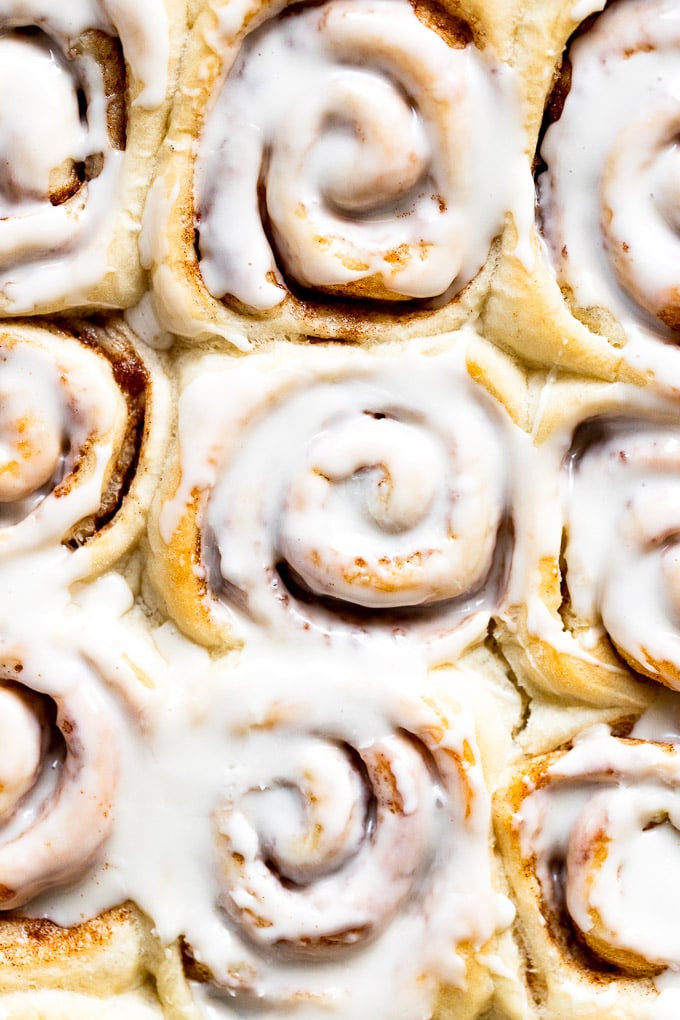
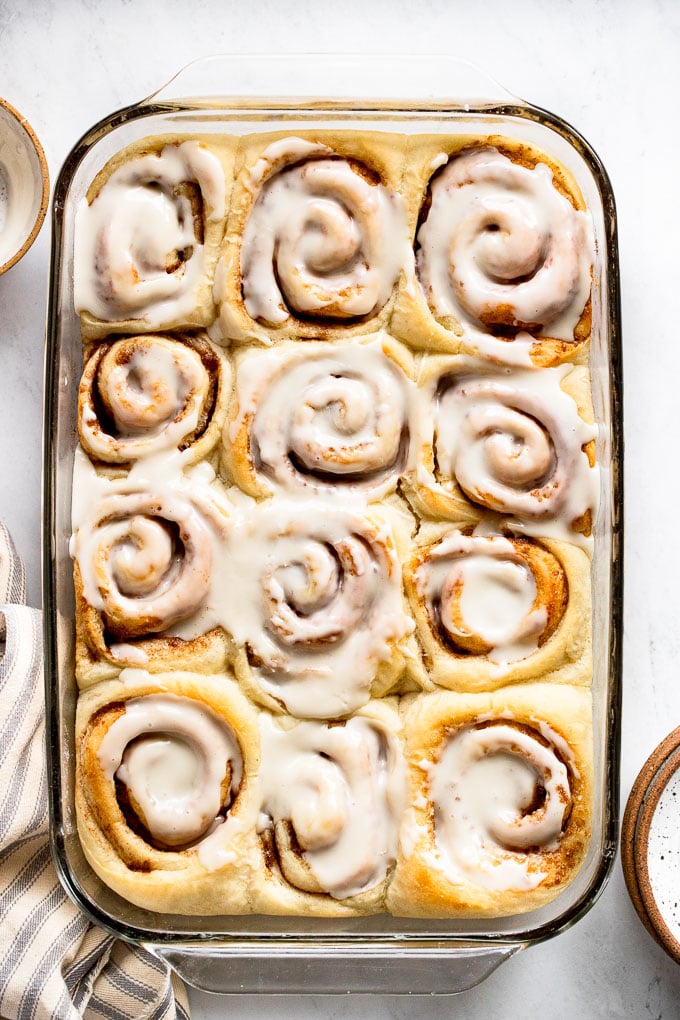
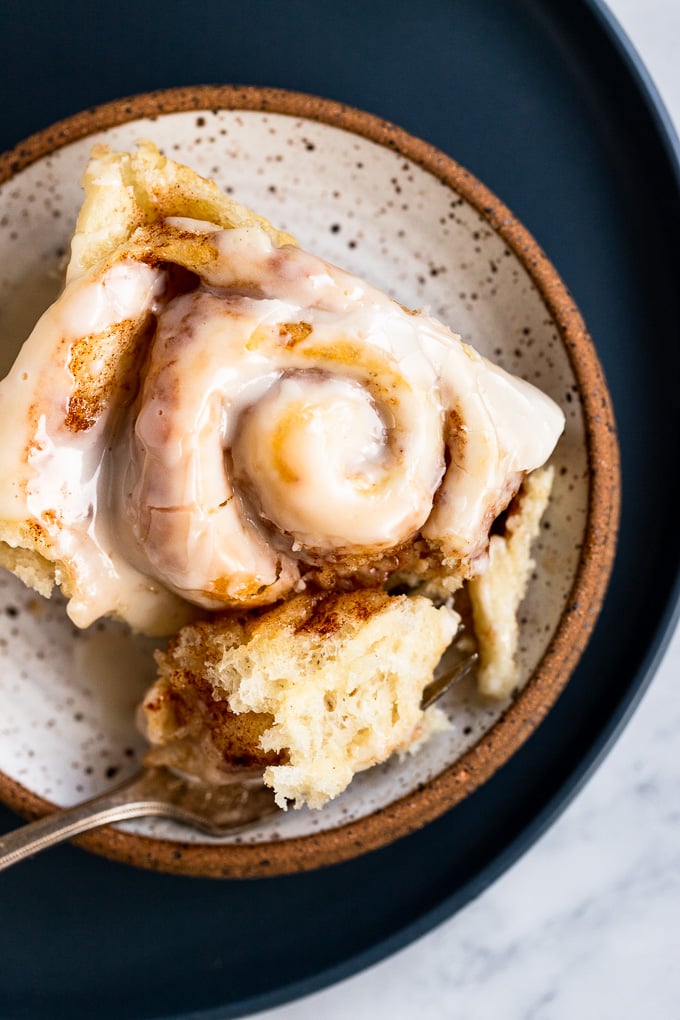
Big, light and fluffy Homemade Buttermilk Cinnamon Rolls are filled with just the right amount of cinnamon sugar and are topped with a sweet powdered sugar icing. The soft, tender, yeasty bread is the perfect texture that just melts in your mouth. They’re worth the time they take to rise and are instantly going to become part of your family tradition for holiday or weekend brunches!
There’s something about homemade cinnamon rolls that evoke overwhelming nostalgia within me, filling me with comfort and happiness.
Maybe it’s from making them with my mom in the early mornings before anyone else woke, the smell of yeasty dough wafting through the house with the sweet cinnamon sugar making my mouth water.
Or that every holiday morning we would gather around the table and begin our celebration with breakfast; enjoying these cinnamon rolls that were obviously made with copious amounts of love.
Or maybe it’s that they go back to my grandma and great-grandma. And there’s just nothing better than an old-fashioned recipe that’s passed down through the generations.
Now, I am so excited to share my love of this buttermilk cinnamon rolls recipe with you. The fluffy, soft texture of the dough is irresistible.
You’ll love their subtle sweetness with the yeast dough, how easy they really are to make in the scheme of it all (but keep in mind homemade rolls do require a little patience and practice), and how they make ordinary moments special.
Why Make Buttermilk Cinnamon Rolls
Oh, I could probably write an entire blog post on why buttermilk cinnamon rolls are truly the most superior cinnamon rolls around… but while I try to keep it short and sweet, it’s important to know what buttermilk is first, isn’t it?
What is buttermilk?
Buttermilk is cultured milk. It’s different than milk because of this; milk is a fresh dairy product and buttermilk is cultured, or fermented with active bacteria.
Historically, buttermilk is a byproduct of churning butter, the liquid that is leftover in the process. However, it is now created by taking pasteurized milk and adding cultures to it to transform it into buttermilk. It is quite acidic, thick, and tangy.
It is quite often used in baking, but some people also drink it for its probiotic nature. You can find many recipes using buttermilk, from biscuits to pancakes, cakes, and of course…cinnamon rolls.
Why use Buttermilk in a Cinnamon Rolls Recipe?
Using buttermilk in a cinnamon roll recipe yields a deliciously tender, flaky dough.
The acidity in buttermilk combines with the baking soda to add lightness and tenderness to the cinnamon rolls – that’s the perfect texture we’re talking about! These are absolutely not dense, heavy cinnamon rolls in a large part thanks to the buttermilk.
It adds richness to the dough and an ever-so-subtle tang.
Ingredients for Homemade Cinnamon Rolls
There are three parts to this recipe: the dough, the filling, and the icing. Here’s an overview of the ingredients you’ll use in all three. Be sure to see the full recipe card for all the details and specifics below.

- Active Dry Yeast – this recipe calls for 2 packets of yeast to get those big, light, and fluffy cinnamon rolls we know and love.
- Warm Water – this helps activate the yeast. Be very sure to not get it too hot, or you will kill the yeast. Use a thermometer to read the temperature of the water, and aim for a temperature around 105°-110°F.
- Buttermilk – as discussed above!
- Baking Soda – works with the buttermilk to help give a lightness to the dough, too.
- Granulated Sugar & Brown Sugar – a little granulated sugar in the dough activates the yeast, and the rest of the sugars are in the deliciously sweet cinnamon sugar filling.
- Salt – a must-have to develop flavor.
- Vegetable Oil – keepin’ things moist!
- Egg – again, helps contribute to the texture of the dough and binds everything together.
- All-Purpose Flour – stick with APF for this recipe so the dough remains soft and fluffy. Using bread flour or another substitute will result in a chewier dough.
- Be sure to measure properly, but remember, a yeasted dough will take a lot of feeling, too, so keep that in mind as you are adding flour.
- Butter – it’s what helps our cinnamon sugar filling stick to the dough and…it’s yummy.
- Cinnamon – but of course!
- Powdered Sugar – used in the icing…more on this to come!
- Maple Extract, Maple Syrup, or Vanilla Extract – again, used in the icing… keep reading!
How to Make Homemade Cinnamon Rolls From Scratch
Once you’ve made cinnamon rolls from scratch, there really isn’t any going back to store-bought. Yes, they require a little time, but the result is absolutely worth it.
You don’t need any fancy equipment or to get out that big stand mixer either. All you’ll need is a big mixing bowl (and a few smaller ones), a wooden spoon, a rolling pin, and a baking pan.
Mix the Wet Ingredients
This recipe combines three separate batches of wet ingredients because they each have a specific reaction that needs to take place before we create the dough.
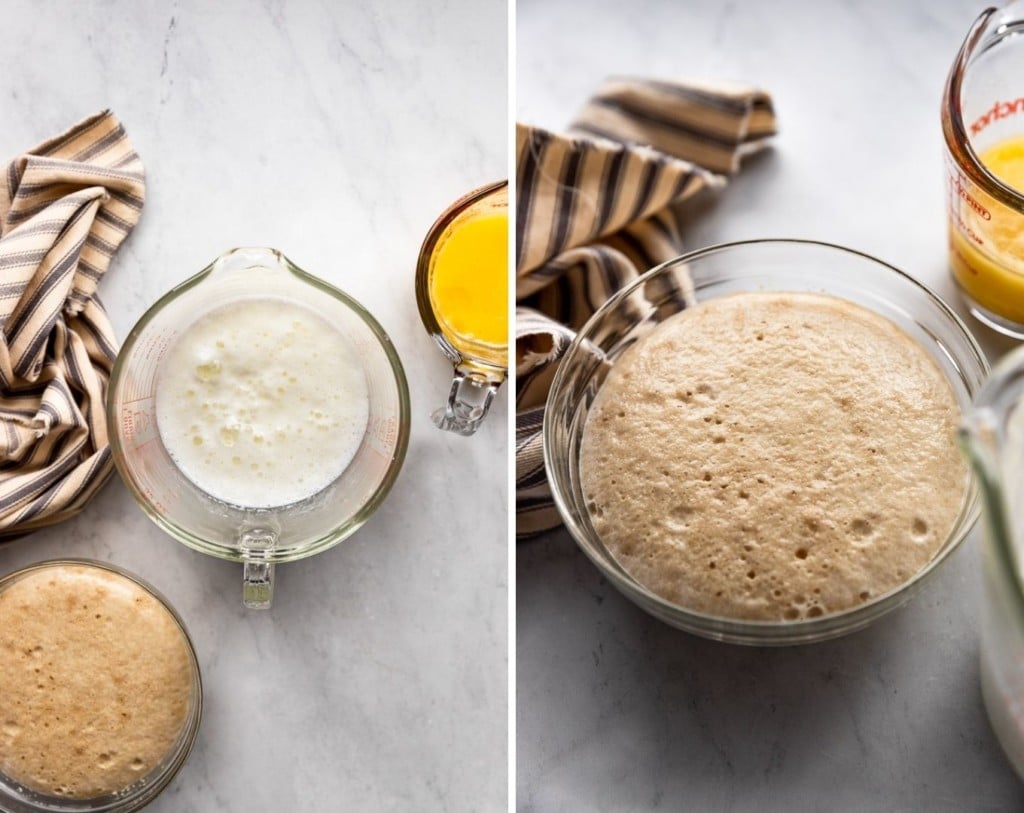
- Yeast and Warm Water – combine these two to activate the yeast. I like to also add some of the sugar that goes into the dough here to feed the yeast and give it a head start. Remember to use water that is between 105°-110°F (you can go up to 115°) to properly activate the yeast. Anything hotter will kill it, anything cooler, it will take far too long to proof the dough.
- Buttermilk and Baking Soda – these two activate each other. The acidity in the buttermilk reacts with the baking soda to create a light, fluffy texture in the dough. Mixing them together first helps jumpstart the process.
- Vegetable Oil, Egg, and Sugar – whisk them together so the egg is beaten. These are the additional wet ingredients we’ll add to the others to create the dough. P.S. if you added the sugar to the yeast and water, don’t do so here, too.
Once the yeast is proofed and the buttermilk mixture is bubbly, you can combine the three wet ingredient sets or simply add them to the flour mixture on their own.
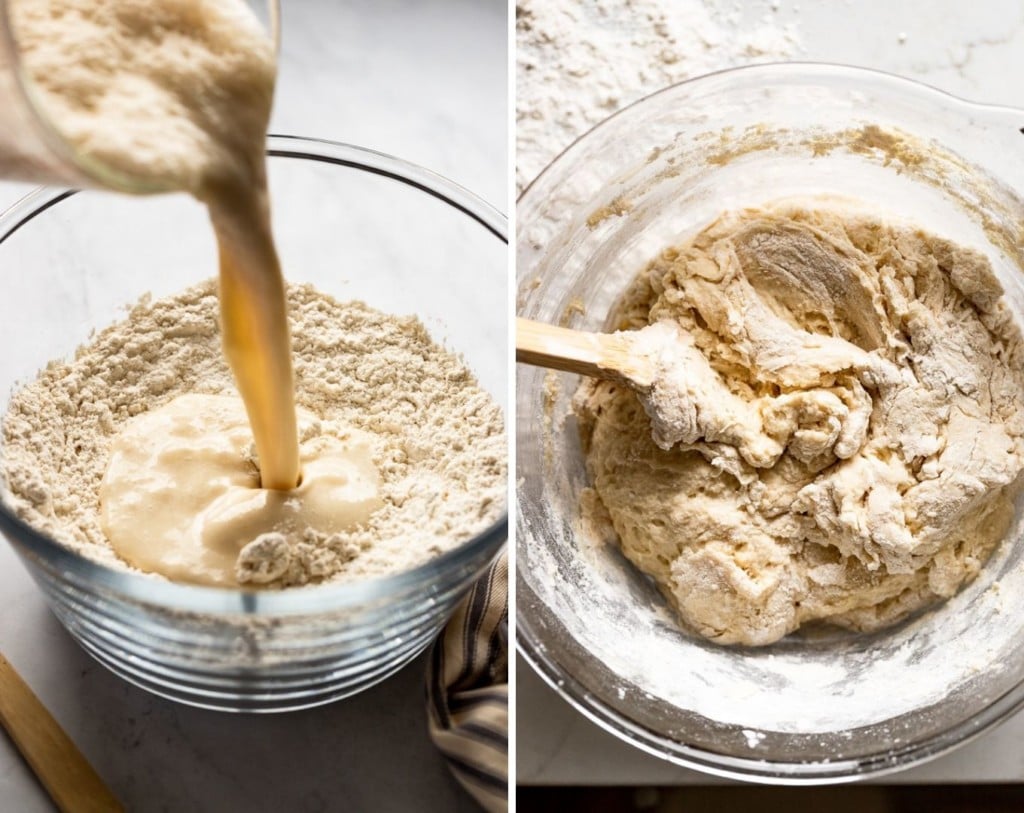
Mix the Dough
Place the first 4 cups of flour in a large mixing bowl. I highly recommend clicking the ‘metrics’ button in the recipe card and weighing out the flour to start. You will have to add more and use your judgment for when the dough is ready, regardless of weighing the dough or not, but this will give you the best head start.
Add the wet ingredients and begin stirring them into the flour until a wet mixture forms. Add additional flour, about a half cup at a time, up to 1 cup, then add in about tablespoon amounts as needed.
When adding additional flour to the dough, you are aiming for a shaggy mixture, one that isn’t too wet but still slightly sticky.
Transfer the dough to a lightly floured surface and gently knead the dough about 20 times or so, adding a little flour as needed if it is overly sticky. The dough will be slightly sticky, but shouldn’t be overly so. Gently knead the dough until it is elastic and soft.
Be careful to not add too much flour and to not overwork the dough. Both can result in tough, hard cinnamon rolls. Gently knead the dough and only add flour until it is only slightly sticky and elastic.
Place the dough in a large mixing bowl and cover with a tea towel. Let the dough rest 15-20 minutes while you prepare the filling.
Make the Cinnamon Sugar Filling
This is a simple cinnamon roll filling, made with both granulated and brown sugar, and a good helping of cinnamon. Mix them together until combined and melt the butter in a separate bowl. Each will be added to the filling on their own to make the process really easy.
Roll Out the Dough
Once the dough has rested and risen somewhat, it’s time to assemble the rolls for their final rest.
Punch down the dough to release major air bubbles, and transfer to a floured surface, either a countertop or large cutting board.
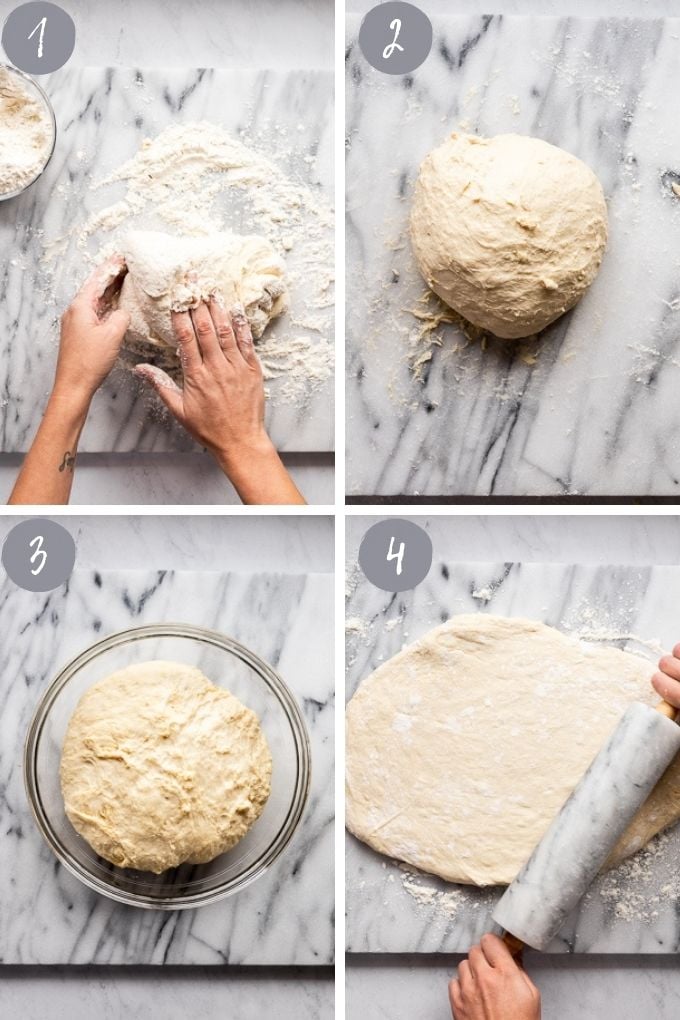
Roll out the dough into a large rectangle, one that is about 14×20 inches, or 12×24.
Keep the long side facing you for easy rolling later on. The general measurements of the rectangle will be fine, just try to roll as much of a uniform rectangle as possible. You can cut any super odd-shaped edges if needed (it does take practice and honestly, I’m still perfecting my game too!).
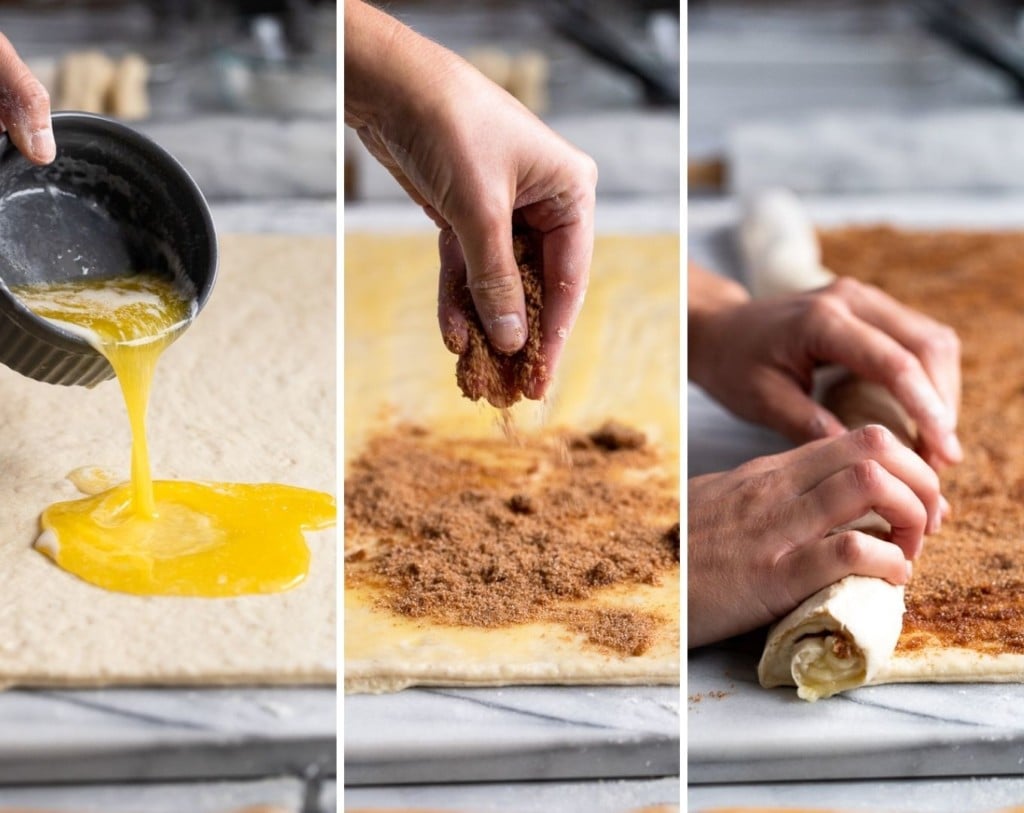
Once the dough is rolled out, use a pastry brush to brush the butter onto the surface of the dough. The melted butter is what the cinnamon-sugar mixture will stick to. If your dough is on the stickier side, it may not absorb much butter, in which case, you won’t need to use all that you melted.
Leave about 1/2 inch of raw dough around the outside edge so that it will stick together once you roll it together.
Create a thin layer of melted butter that rests on top of the dough, but it shouldn’t be soaked. It also shouldn’t all absorb straight into your dough (it’s too dry if it did that).
With the melted butter spread across, add the cinnamon-sugar mixture, spreading it evenly across and patting down carefully into the butter.
Roll the Cinnamon Roll Log
How do you make all those swirls of sweet, caramelized cinnamon sugar goodness? It’s all in rolling the dough.
Start by rolling the dough on the long edge working your way across.
You want to roll the dough tightly, so it stays together once you cut it, but not so tightly that the dough cannot rise. If it’s too loose, you can gently pull the rolled part of the dough back before you continue.
Work in as much of an even line as possible to keep the ends the most uniform (think if you are rerolling a roll of wrapping paper…it can get wonky fast!). Go slow and just do your best.
With the entire dough rolled into a log, it’s time to slice. You can pinch the edge if you desire, but I simply place the log seam side down and pinch the edge if I need to later on.
Cut Cinnamon Rolls
Now that the cinnamon roll log is ready, it’s time to slice cinnamon rolls! The edge of the log will likely be a little wonky and missing that cinnamon sugar goodness, so go ahead and first slice off a couple of inches of the end.
What should you use to slice the rolls? A serrated knife works great, but the rolls can become misshapen if you’re not careful. If you want to be really extra use unscented dental floss, place it under the roll where you want to slice, pull the edges up to slice through the dough.
I highly recommend scoring where you will cut the rolls beforehand. Don’t eyeball the rolls, or you will have drastically different sizes (trust me, I’ve tried!). You can also lay a ruler in front of the log and cut at each interval (although I will say this is kind of tricky too). Mark every 1 1/2 inches as to where you’ll cut the rolls.
Then, proceed with cutting. Again, you can use a serrated knife or the floss method. If using a serrated knife, make sure it’s sharp and gently saw back and forth, but do so somewhat quickly, to keep the dough intact.
Transfer each cinnamon roll to the prepared pan, leaving space between them to rise for about an hour, until doubled in size.
What kind of pan should I use?
I recommend using a 9×13 glass baking dish, which will fit 12 cinnamon rolls. Glass is easier to see through, ensuring the edges don’t get too dark, and it is slower to heat up in the oven, producing more even baking results for this recipe.
I have also used a quarter sheet pan with success (did you know they’re the same size as a 9×13 pan?!)…they just don’t have quite as tall of edges on them to help hold the rise.
Alternatively, you can also bake the rolls in 2 9-inch round cake pans (a tip from my grandma). The rolls won’t be as round or square, but they’ll be every bit as delicious!
Baking the Cinnamon Rolls
After the rolls have rested and doubled in size, it’s time to bake! The most exciting part! It won’t be long until you have warm cinnamon rolls ready to devour.
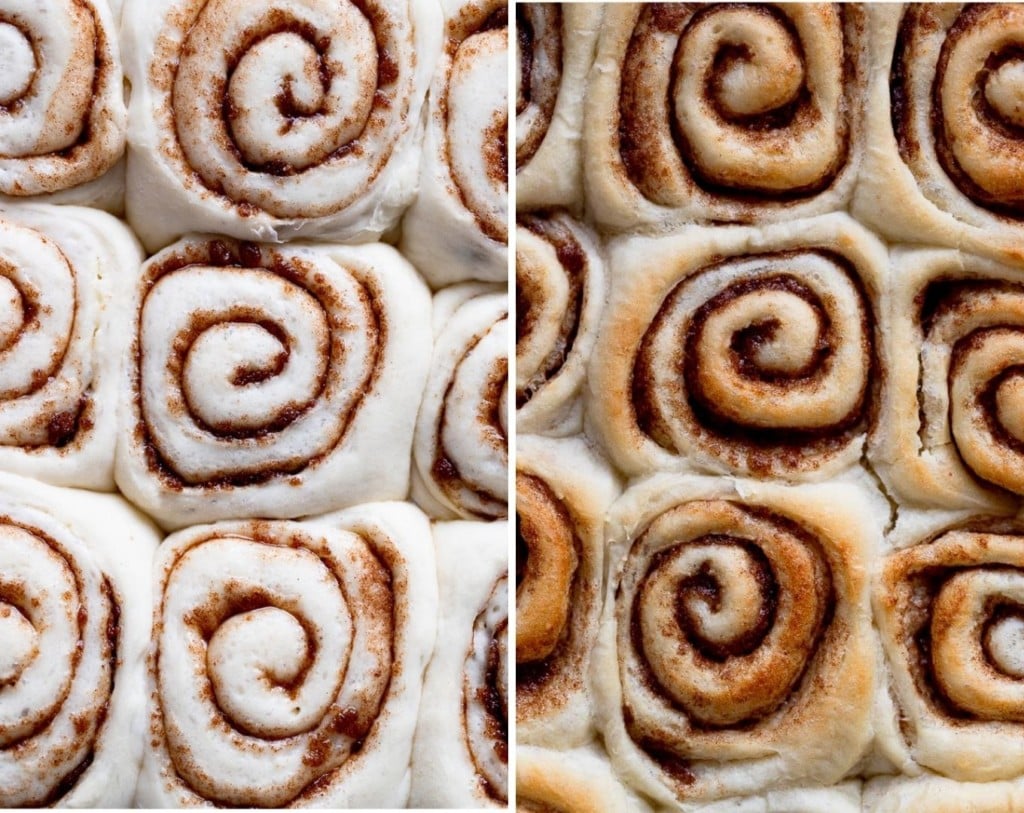
The important thing to note about baking cinnamon rolls is that once they are slightly golden brown, they’re ready. And by slightly, I mean almost pale in color still. Don’t overbake them, or you will have hard cinnamon rolls.
Remove from the oven and let them cool slightly to set up. This gives you time to prepare the icing and ensures that the icing won’t just melt right into the rolls.
Cinnamon Roll Icing
I know cream cheese frosting is like, so popular on cinnamon rolls. I get it. Who doesn’t love cream cheese frosting?! But with these delicate cinnamon rolls, we’re going for a more delicate icing — an icing without cream cheese.
It’s simple to make, again requiring no special equipment, only a bowl, and a spoon.
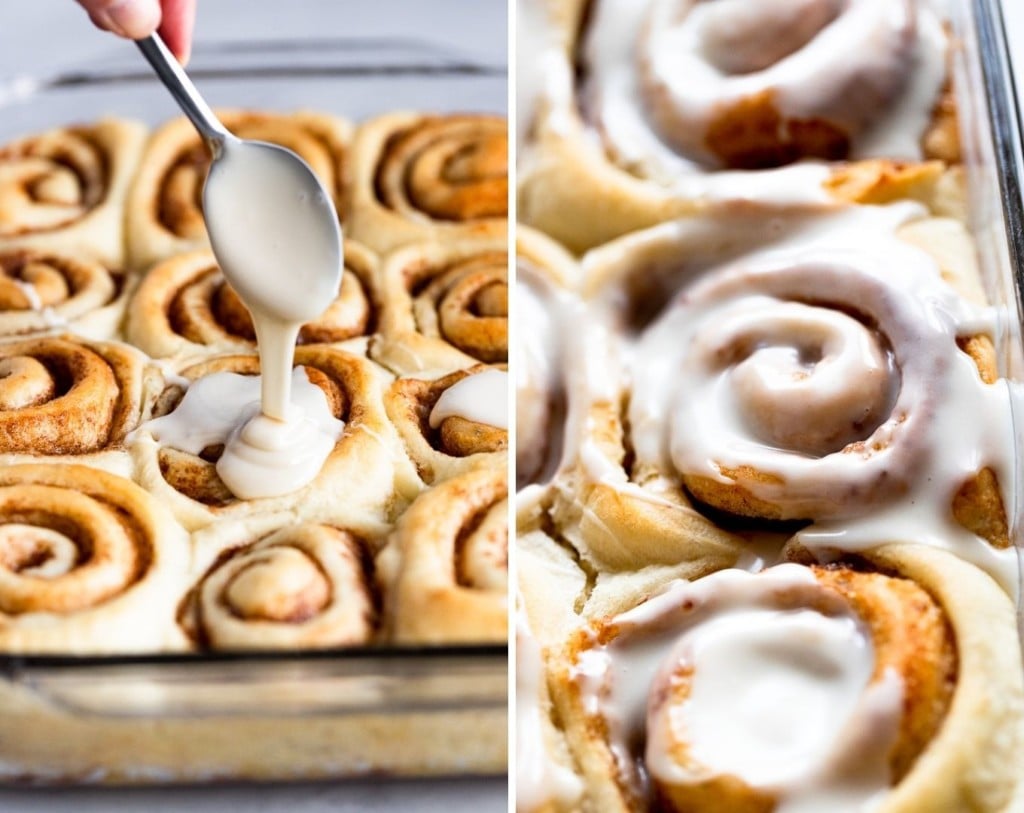
This powdered sugar icing – or glaze – is one of those old-fashioned icings that you can put on cut-out sugar cookies or muffins (or is that just my family?!). It’s simply a mixture of powdered sugar and milk. And the beauty of it is that you can adjust its thickness to your preferences.
We love using maple-flavored icing; its unique and sweet combination is really delicious!
Use a maple extract for the most maple flavor, or maple syrup in a pinch, although the maple flavor will be much more subtle with the syrup.
For a more traditional icing, use vanilla extract for a flavor burst. Maybe even add a little cinnamon in there? Or hey, ok, go ahead and try a brown sugar cream cheese frosting if you must.
If your frosting is thick and spreadable, spread it on the rolls once they’ve slightly cooled. If it’s thinner, drizzle it across the rolls. And if you’re a super icing lover, make sure there’s extra to serve alongside the rolls, too.
What to Serve with Cinnamon Rolls
Cinnamon rolls are a delicious breakfast or brunch treat on their own, or they can be part of a larger spread. On Christmas morning we serve them with savory winter strata and mimosas for an indulgent brunch.
That might be a lot if you’re making them for a lazy Saturday though, in which case they’re great when served with a side of fruit, softly scrambled eggs, or bacon for the meat-eaters.
Common Questions when Baking Cinnamon Rolls
Please be sure to leave a comment below if you have a specific question (and I love it when you review the recipe!). Be sure to see below to see if a question you might have has been answered already.
Can I let buttermilk cinnamon rolls rise overnight?
I totally get that waking up a little early to make cinnamon rolls for brunch the morning of could be an inconvenience, but I will say that making them fresh yields the very best results.
I have tested them overnight and it does work, however, the dough will have more of a fermented yeast flavor from their extended overnight rise (similar to when making sourdough).
If you’re ok with this, then yes, you can, I would just recommend keeping the overnight rise to a minimum (no longer than 12-14 hours) to prevent over-proofing.
Here’s how: prepare the cinnamon rolls to the point that they are sliced in the pan. Cover well (so no other fridge scents seep in) and place in the fridge overnight. In the morning, remove them from the fridge and let them come to room temperature while the oven preheats, allowing any additional rising that needs to happen, happen. Bake as directed.
Why is my cinnamon roll dough tough?
There are a few reasons this can happen, the two most common culprits are too much flour or too much kneading. If you overwork the dough, too much gluten develops and the dough will feel tight and tough – not soft and elastic that we want. At this point, it can’t really be fixed, so be aware when you’re kneading the dough.
Too much flour can also contribute to the tough dough and hard rolls. Only add additional flour in small increments to be sure you don’t add too much while preparing the dough.
What happens if cinnamon rolls rise too long?
If the cinnamon rolls rise too long (as can happen with the overnight rise I described above) they can ferment too much and the result is a more sour tasting dough. It can also result in a tighter crumb.
How should I store cinnamon rolls?
Cover the cinnamon rolls in the pan and store them at room temperature for 1-2 days, after that, store them in the fridge for 1-2 additional days as needed. Reheat in the microwave for 10-15 seconds for best results (longer if they’ve been chilled).
Can I freeze cinnamon rolls?
Yes, you can freeze the rolls after they have baked once they’ve completely cooled, without frosting. Wrap them tightly and place them in an airtight container in the freezer. Let thaw and warm to enjoy again.
I haven’t had success freezing the shaped cinnamon rolls before baking. The Kitchn recommends parbaking the rolls, then freezing. I haven’t tried this myself but would be curious if you do!
Did you make this recipe? Please leave a star rating and review in the form below. I appreciate your feedback, and it helps others, too!

Get the Recipe Homemade Buttermilk Cinnamon Rolls
Ingredients
Dough
- 4 ½ teaspoons dry active yeast, 2 packets
- ½ cup warm water, 105°-110°F
- 1 ½ cups lukewarm buttermilk
- ½ teaspoon baking soda
- 2 Tablespoons (25 g) granulated sugar
- ¼ cup vegetable oil
- 1 egg, room temperature
- 4 to 5 ½ cups (600 g) all-purpose flour
- 1 teaspoon fine salt
Filling
- ½ cup unsalted butter, melted
- ½ cup (100 g) granulated sugar
- ½ cup (100 g) brown sugar
- 3 teaspoons cinnamon
Icing
- 2 cups powdered sugar
- 1-2 Tablespoons whole milk
- 1 teaspoon maple extract, or 1 tablespoon pure maple syrup
- ½ teaspoon vanilla extract, optional
Instructions
Mixing the Dough
- Dissolve yeast packets into warm water in a small bowl. Set aside.
- In another bowl, combine lukewarm buttermilk and baking soda. If needed, warm the buttermilk in the microwave in 15-20 second intervals until warm to the touch, but not hot. Set aside.
- In a large bowl, add 2 Tablespoons sugar, vegetable oil, and egg, whisking until the egg is well beaten. Pour the buttermilk mixture into this bowl and stir, then add the yeast mixture and stir to combine.
- In another large mixing bowl, add 4 cups of flour and salt. Pour in the wet ingredients. Mix well using a wooden spoon or spatula. The mixture will be quite wet at this point (given that you weighed the flour properly; keep your method in mind). Add an additional ½ cup of flour, and another ½ cup if needed, to form a shaggy dough.
Shaping the Dough
- Transfer to a lightly floured surface and knead the dough gently about 20 times, adding additional flour at about 1-2 tablespoons at a time as needed if it is overly sticky. The dough should be slightly sticky, soft, and elastic once you've finished kneading.
- Shape the dough somewhat into a ball and transfer to a bowl, covered with a tea towel, for 15-30 minutes until it's slightly risen. In the meantime, lightly grease a 9×13 glass baking dish and prepare the filling by melting the butter and combining the sugars and cinnamon in a separate bowl.
- Punch dough down and transfer it onto a floured cutting board or counter. Roll dough into large rectangular around 14×20 inches, with the long edge towards you.
The Filling
- Spread the melted butter on rolled out dough, leaving about 1/2 inch edge around the dough. A thin layer of butter should rest on top of the dough. Sprinkle the cinnamon sugar mixture evenly across the dough, pressing gently into the butter.
- Begin rolling the dough into a log by starting at the long edge and rolling up in an even, tight row. Continue rolling, keeping the log somewhat tight, but not too tight, until it is in a full log.
- Use a serrated knife or unscented dental floss to slice into 1 1/2 inch pieces. Discard the small edges. Transfer sliced rolls to the prepared baking dish, placing them cut side up and leaving room between each roll for them to rise. Cover the pan with the tea towel and let the rolls rise in a warm environment (see note) for about 1 hour until they've doubled in size. If your house is cold or you've used too much flour, it could take up to an hour and a half.
- Baking: If the rolls seem to be progressing in their rise, begin preheating the oven to 350° F about 30 minutes into their rise. Once they're ready, bake for 17-20 minutes until the edges and tops are just slightly golden brown. Remove from oven and let cool slightly before frosting.
Icing
- Mix the Icing: In a bowl, combine powdered sugar, milk, and vanilla or maple flavoring (whichever you're using using). Mix to desired consistency. Spread the icing onto the slightly cooled rolls and enjoy!
- Cover leftover frosted or unfrosted rolls tightly and store at room temperature for up to 2 days or in the refrigerator for up to 5 days.
Notes
- Warm Environment: to create a warm environment, preheat your oven to 250°F or so (less is fine, too) and then turn it off. Place the dough or rolls in the off but warmed oven to proof.
- Pan: I like a glass pan best, but metal will work ok too. Try to avoid ceramic as the rolls will take longer to cook.
- Frosting: make it thicker by adding more powdered sugar, and thinner by adding more milk or cream.
- Maple Flavoring: for the most intense maple flavor, use maple extract. Maple syrup works, but it is more subtle in the icing.
- Vanilla: use a bit of vanilla extract for a traditional icing.
- Flour: please see the metric tab for weighing flour; I typically use 480 grams (perfectly measured 4 cups, but if you use a measuring cup it will likely be more) to start and end up adding about 120-130 additional grams, around 1 cup with proper measurements.
- The amount of flour you’ll need to add will depend on your environment (humidity, temperature, elevation) so use your best judgement. The dough should be elastic, slightly sticky while kneading but not overly so, and soft.
- 11/2021 Updates: increased brown sugar in the filling by 1/4 cup and cinnamon by 1/2 teaspoon.


Question about the amount of flour:
Four cups mixed with wet ingredients then add 1-1 1/2 more cups and knead. I can only work about half a cup in until I think the dough is where it should be. Does this seem right? I’m basing it on my dough not being sticky after add additional flour.
Hi Robin! That should be ok. It depends so much on humidity and elevation, so the additional amount of flour will vary location to location. How did they turn out?
These cinnamon rolls are delicious!! I will definitely be making them again. I appreciate the step by step instructions.
So glad to hear! Thanks so much!
I haven’t made them yet but willing to give it a try. My Sister use to make them and sometime share but not always. I absolutely loved them, she was a fantastic cook. Holidays and Special occasions she would go crazy cooking and baking all different things. Her Husband is Norwegian so she baked a lot of their food and Desserts. Their big dessert eaters. I can’t wait to try them. Thank You
I hope you enjoy them!
I love these cinnamon rolls
I originally used the recipe because I had buttermilkI needed to use. They were delicious. The last time I made them I left them in the mixer with the dough hook too long an they were a little tough. My fault. Won’t do that again. I also used pecans and brown sugar filling once with a brown sugar glaze. They were a little sweet but very good
Great recipe. Thank you.
I’m so glad to hear you’ve been enjoying them! Brown sugar and pecans sounds yummy. Thanks so much for sharing, Melody!
I was also looking for a recipe to use up some buttermilk. 😂
I have NEVER had cinnamon rolls turn out so well. The roll is light and fluffy – literally melts in your mouth. Not sure what I did right but this will be my go to recipe from now on. Thank you!!!
Wow, such a compliment! I am so glad to hear you loved them; I think they have just a fabulous texture if I do say so myself 😉 Thanks so much for giving them a try and leaving such a thoughtful review!
Seriously, one of the best cinnamon roll recipes I’ve made! Baked up another batch tonight, and my friend ate 2 in a row. These are light, melt-in-your-mouth rolls, with fantastic flavour. I always make my own buttermilk & weigh my flour—beautiful results every time!
This warmed my heart! I’m so glad to hear you love them…they’re so special to my family! Thanks so much, Elsa!
I only had about 1/3 cup of white sugar for the filling so I added more brown sugar. I did over proof them but they still turned out pretty good. The rolls came out of the oven perfectly golden on the outside while being perfectly soft on the inside. I tried some both with and without the icing, they are so sweet that I prefer them without the icing. Both my fiancé and I really enjoyed these and I will be saving the recipe for future use.
I’m glad you both enjoyed! Thanks so much for taking the time to leave a comment, Juliet!
I love this recipe. The cinnamon rolls are incredible… better than Cinnabon! This will be my go-to recipe from now on; The buttermilk is a key ingredient!
I did substitute the all-purpose flour for bread flour to achieve an even lighter and fluffier texture.
What a compliment! Thanks so much for taking the time to leave a review, Curtis! We appreciate you sharing your flour substitution too!
Loved it so much! So easy to make. Great instructions. They were fluffy and tender. So delish. I made cream cheese frosting for the tops. They turned out soft and flavorful. I will be using this recipe many many more times!! Thanks so much.
I’m so glad to hear you loved them as much as we do! Thanks for making them and taking the time to share how they turned out!
Love any recipes baked with buttermilk!Why do you discard the ends? Dip them into the cinnamon mixture and bake them..the ends pieces are my favourite
I love that tip – thanks so much for sharing, Erika!
Loved this recipe but I think next time I will use a 11x 17 pan as the rolls were exploding out of the 13×9 dish. Thank you for this great recipe !
Thanks for the feedback, Karen! I’m glad you enjoyed!
My beautiful wife made these delicious rolls and they are by far the best I’ve ever had! And my wife bakes ALOT!!!
Wow, that makes my day! Thank you so much, Michael, I’m so glad you loved them!
We made these tonight and they are fabulous!!
Awesome, I’m so glad you enjoyed!
Lovely instructions. They turned out great!
I’m so glad to hear! Thanks for your review, Becca!
Have you ever tried doubling the recipe?
Unfortunately I haven’t; would love to hear if you give it a try!
Fantastic. Just took my first batch out of the oven. They are wonderful.
Fabulous, I’m so glad to hear! Thanks, Dorothy!
Great recipe! It is a favorite now. Made for Easter brunch. Double batch, nice feature of the recipe. Half with raisins and pecans, other half as the recipe calls for. Thanks❤️
Yummy! Thanks for sharing, Michelle, I’m glad the double batch worked out!