

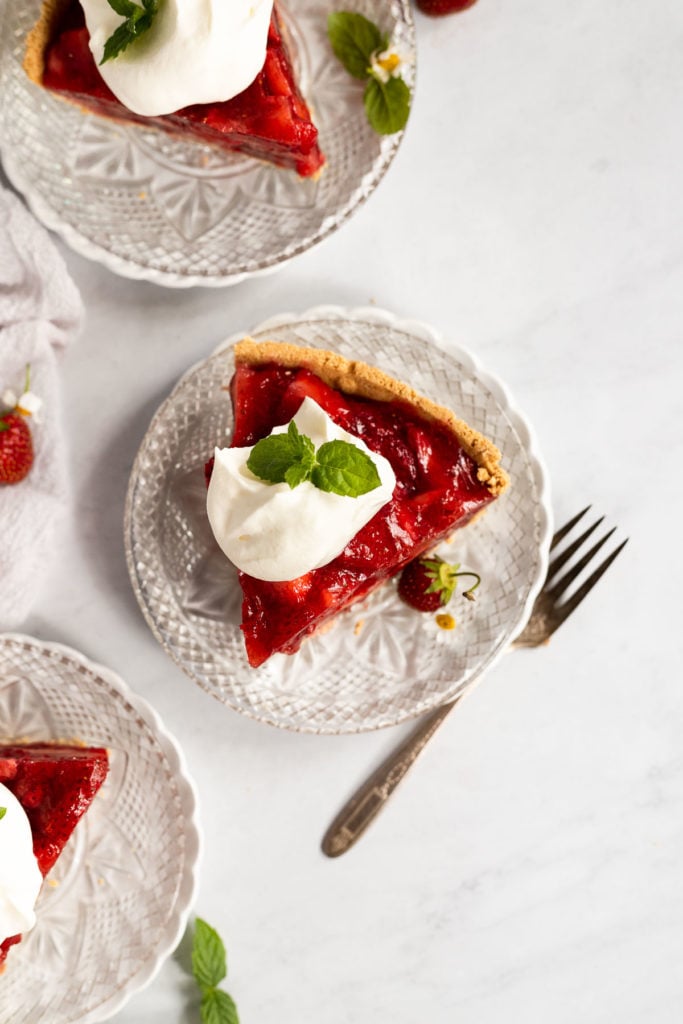
There is nothing better than a graham cracker crust. Fill it with a creamy chocolate filling, a no-bake cheesecake, or my personal favorite, fresh strawberries, and you’re on your way to pie heaven.

Whether you need a crust for no-bake bars, pies, or other favorite easy homemade dessert recipes, this graham cracker crust is quickly going to become your go-to for no-bake desserts.
Making your own homemade graham cracker crust is indefinitely better than buying a premade one from the store. Homemade graham cracker crust is buttery, crisp, and crunchy, and bursting with that iconic honey graham cracker flavor we know and love.
And what is it that makes graham crackers taste just so darn delicious when made into a pie crust? I may never know, but I do know that graham crackers hold their place in far more arenas than the s’more.
But I mean, we could make a s’more pie with this crust so… I digress. Let’s whip up this super quick and easy homemade crust. It comes together in less than 10 minutes. The hardest part is just waiting for it to set up in the fridge!
How to Make Graham Cracker Crust
Why make a pie crust from scratch when you can easily get one at the store?
Well, I totally understand why buying a store-bought flakey, buttery pie crust is sometimes the route to go for traditional pies. They can be overly complicated to get right from the chilling to the rolling to the baking… and on and on. You don’t always have time for that.
But a DIY graham cracker crust?! You’ve totally got this.
It’s easy to do and you don’t need any fancy kitchen equipment (although a food processor does help). You can’t beat the simplicity of it, and quite frankly, the homemade version packs so much more flavor and texture than store-bought varieties.
Let’s get to it!
Make Graham Cracker Crumbs
First, start by making graham cracker crumbs. Grind graham crackers in a food processor until fine crumb forms.
If you don’t have a food processor, place the crackers in a ziplock bag and use a rolling pin or meat mallet to grind them up.
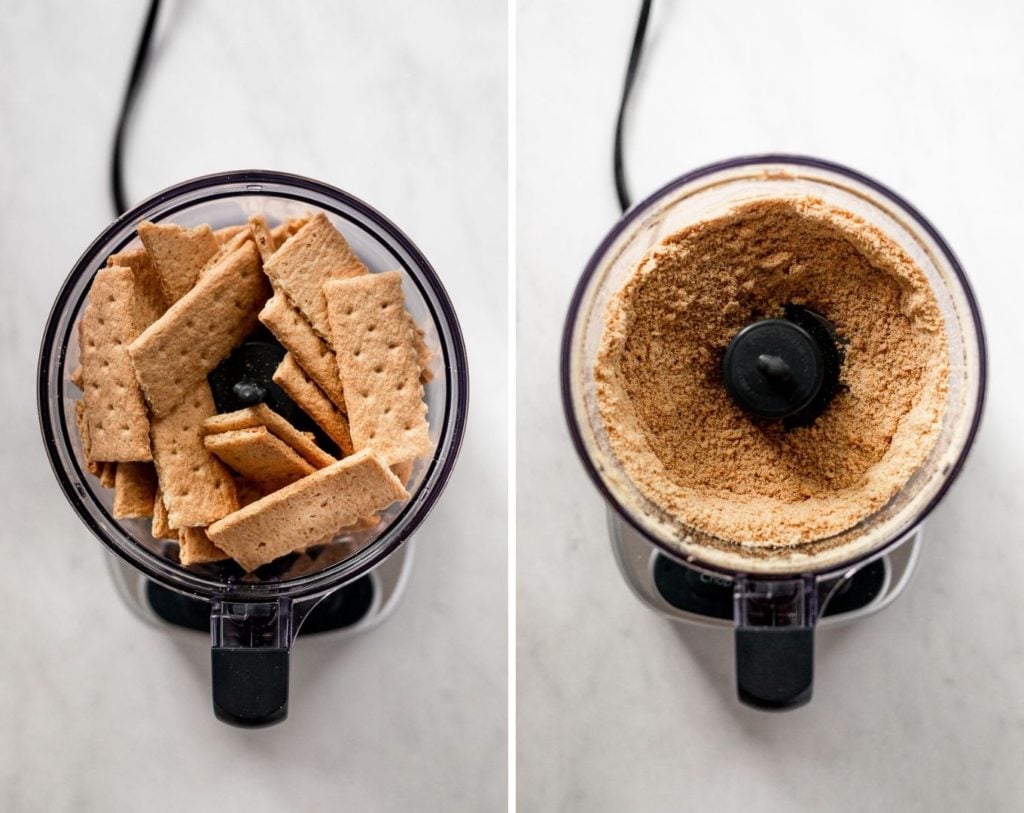
Use about 10 full sheets of graham crackers. By full sheet of graham cracker I mean don’t break it up on those little perforated lines, use the full sheet that comes straight out of the package.
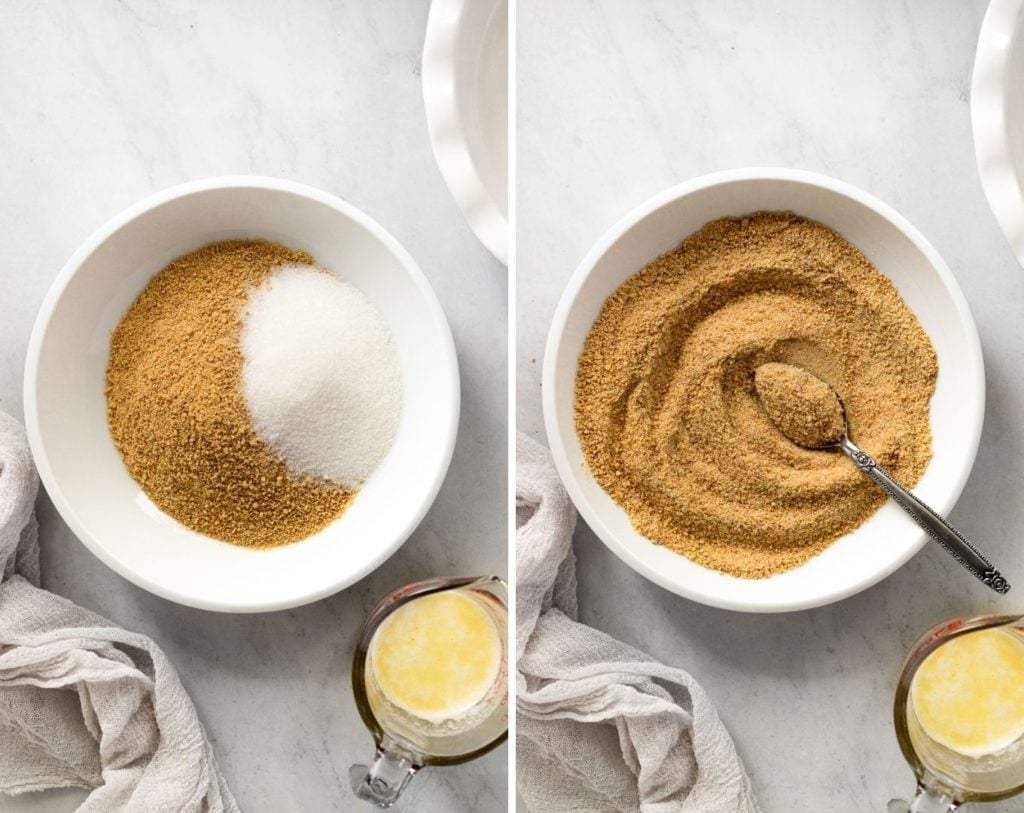
Once you have a fine crumb, combine it with granulated sugar.
The sugar helps to crystallize the butter and holds the crust together, especially when it’s being used in a no-bake recipe. Stirring the dry ingredients first makes sure they’re both incorporated before we add the butter.
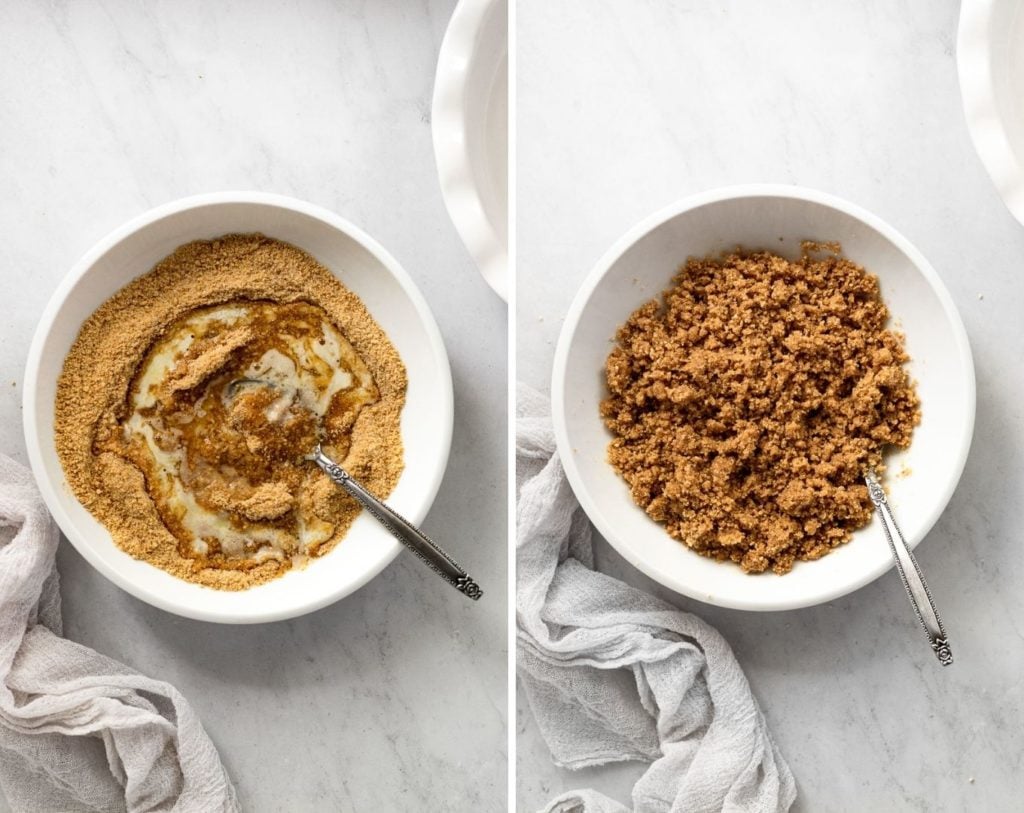
Next stir in melted butter. I recommend using unsalted butter, but if you have salted, it will work too, it will just add a touch of salt to the crust itself. Once the mixture is wet and sandy, it’s time to form it into our crust.
9 or 10 Inch Pie Crust
This unbaked graham cracker crust recipe works great for a 9 or 10-inch pie plate. In a pinch, you could even use an 8-inch if that’s what you have, the crust will just be a bit thicker.
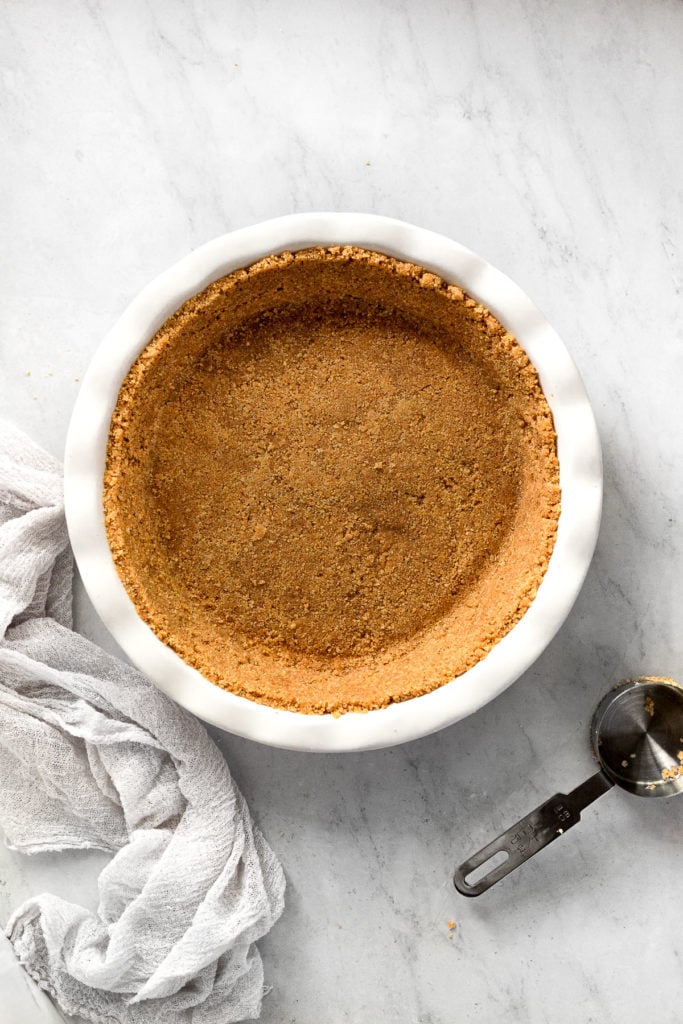
Once the crust is mixed together and has the appearance of sand, it’s time to press it into the pie plate. I highly recommend using a flat bottomed measuring spoon or drinking glass to firmly press down the crust.
Making a firm crust base is one of the most important parts of this no-bake recipe, and ensures it holds together when you cut into the crust. Pressing the crumbs down tightly creates a crust that won’t crumble into pieces.
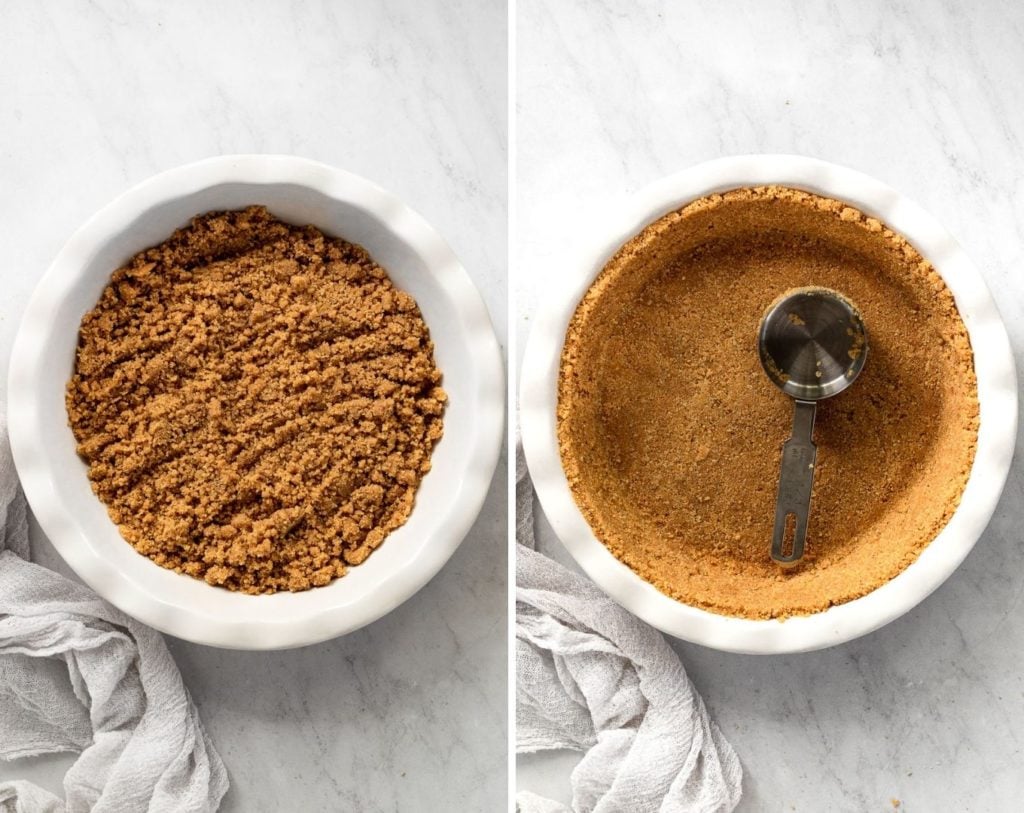
Press the crumbs evenly across the bottom and up on the sides to your desired height. I like to use my fingers to go around the top to create a somewhat flat-topped crust edge, however, you can absolutely leave it more rustic. Either way, it’s worth repeating: make sure you’ve firmly pressed the crust down; it needs to be compact and tight.
Do I Need To Bake This Crust?
No, you don’t, this recipe works well as a no-bake crust. Yes, it’s true, you can make a pie without an oven! If you’re not baking it, you do need to chill it.
To use in a no-bake recipe, chill the crust in the fridge for 1-2 hours. This allows the butter to firm up and gives the sugar time to crystalize in the mixture. Both processes help keep the crust intact. This is essential, don’t skip the chill time!
But, if your recipe calls for it, you can bake it.
For a baked pie, par-bake the crust at 350°F for 7-9 minutes, then continue filling the pie and baking according to the pie directions. You can also bake the crust for a chilled no-bake filling, too.
Recipe Variations
- Gluten-Free: Use gluten-free graham crackers to make this crust easily gluten-free!
- Vegan: Check the graham cracker ingredients to ensure they are vegan and use vegan butter to make this recipe vegan-friendly.
- Flavored Graham Crackers: Change up the flavor of the crust by using cinnamon or chocolate graham crackers; the possiblities are endless!
- No Graham Crackers? If you’re outside of the U.S. and do not have graham crackers, you can use digestive biscuits in their place.
Common Questions
Yes, this is a great recipe to make ahead of time! Prepare the crust 1-2 days in advance and keep it in the fridge until you are ready to make your dessert.
Yes, you can prepare and then freeze the crust for 2-3 months in advance. Do not bake the crust before freezing, however. Be sure to thaw the crust completely before using it to make a pie.
This crust works perfectly in a 9-inch pie pan. It will also work in an 8 or 10-inch pie pan with varying thicknesses. Similarly, a springform pan of the same size will work for cheesecake recipes. I haven’t tried it myself, but doubling the recipe for a 9×13 pan (like for no-bake cheesecake bars) should work, too.
You can substitute digestive biscuits for the graham crackers in this recipe.
I like to use unsalted butter which is what I would recommend since salt amounts can vary when using salted butter. However, if all you have is salted butter, you can use it.
Did you make this recipe? Please leave a star rating and review in the form below. I appreciate your feedback, and it helps others, too!
Get the Recipe No-Bake Homemade Graham Cracker Pie Crust
Ingredients
- 1 1/2 cup graham cracker crumbs, 9-10 full cracker sheets
- 1/3 cup granulated sugar
- 6 Tablespoon unsalted butter, melted
Instructions
- Place graham crackers in a food processor and pulse until fine crumb forms. Alternatively, place them in a large ziplock bag and roll with a rolling pin or another heavy object until fine crumbs form.
- Stir sugar and graham cracker crumbs together. Mix in melted butter until fully combined and all crumbs are wet, like sand.
- Press firmly into a 9-inch pie pan using the bottom of a flat measuring cup or glass. Refrigerate for 1-2 hours until firm for a no-bake recipe. To bake, preheat oven to 350°F and bake the crust for 7-9 minutes, then continue with the recipe directions.
Notes
- Gluten-Free: Use gluten-free graham crackers to make this crust easily gluten-free!
- Vegan: Check the graham cracker ingredients to ensure they are vegan and use vegan butter to make this recipe vegan-friendly!
- Flavored Graham Crackers: Change up the flavor of the crust by using cinnamon or chocolate graham crackers; the possibilities are endless!
- Make-Ahead Instructions: prepare the crust as directed 1-2 days in advance. Keep it in the fridge until ready to use in your recipe.
- Freezing: you can freeze the unbaked pie crust for up to 3 months. Thaw completely before using in a recipe.


