Making homemade ravioli is one of my favorite cooking activities for date night at home or a fun girls’ night. We turn up the tunes while we roll, fill, and most importantly, eat all the ravioli our hearts (or rather, stomachs) can handle.
I like to call it a “project” cooking night because it does take a little bit of time, and it’s a lot of fun to make in an assembly-style fashion with friends and family.
But despite the time, I assure you it’s rather quite easy to do. Once you learn how to make ravioli at home, you’ll be whipping up batches left and right. Not to mention all those ravioli fillings you’ll be trying out…
Here’s what we’ll cover in this guide for how to make fresh ravioli. Feel free to jump to a specific section or scroll, learn, and prepare to get hungry!
What is Ravioli?
Ravioli is a delicious filled pasta! They play a large role in Italian tradition, especially in Northern Italy.
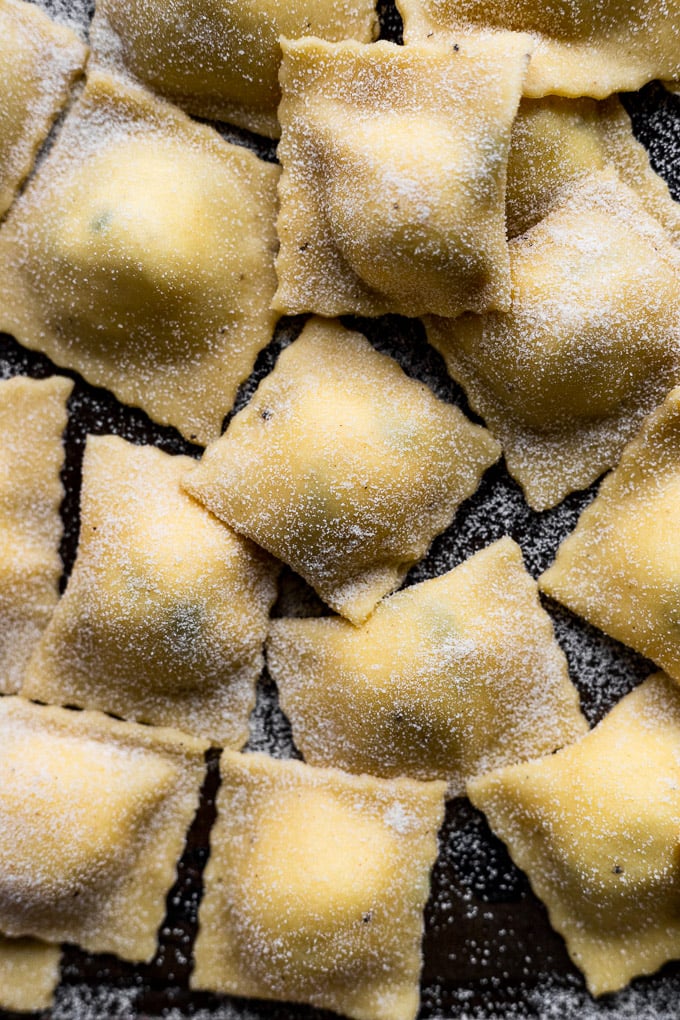
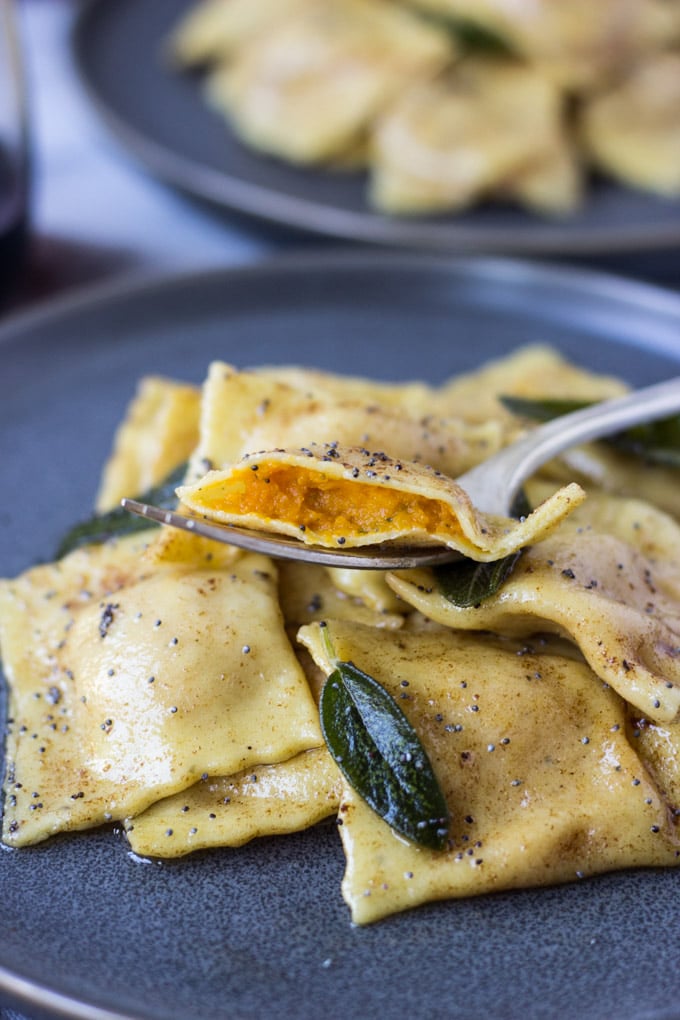
Ravioli consists of two sheets of very thin egg pasta that are wrapped around a filling and sealed, then cut into various shapes, most commonly, squares. Ravioli can be filled with a variety of fillings ranging from meat and seafood to cheeses, and vegetables.
Tools to Make Ravioli
I have some excellent news my friend: you don’t actually need any special equipment to make ravioli!
There are a few tools that will make the process easier if you decide it’s something you want to invest in. But in the meantime, if you’re just starting out, all you’ll need is a rolling pin, a pizza cutter, and some muscle.
If you have one available, I do recommend using a pasta machine to roll the sheets of fresh pasta dough. It makes the process go quicker and ensures that each sheet is rolled equally. You can use either a manual pasta maker or an electric one, like a KitchenAid pasta roller attachment.
Other tools that are helpful, but not required:
- Pasta Wheel: similar to a pizza cutter, but smaller, and the fluted edges are fun!
- Mini Rolling Pin: this is helpful for rolling out the ball of dough before starting it in the machine.
- Scoop: a small cookie scoop is helpful for adding the filling.
My favorite way to form the ravioli also doesn’t require any equipment. I’m team rustic ravioli!
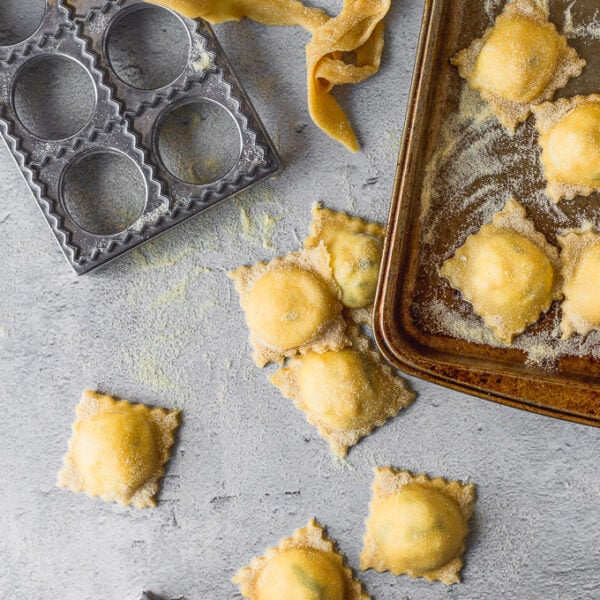
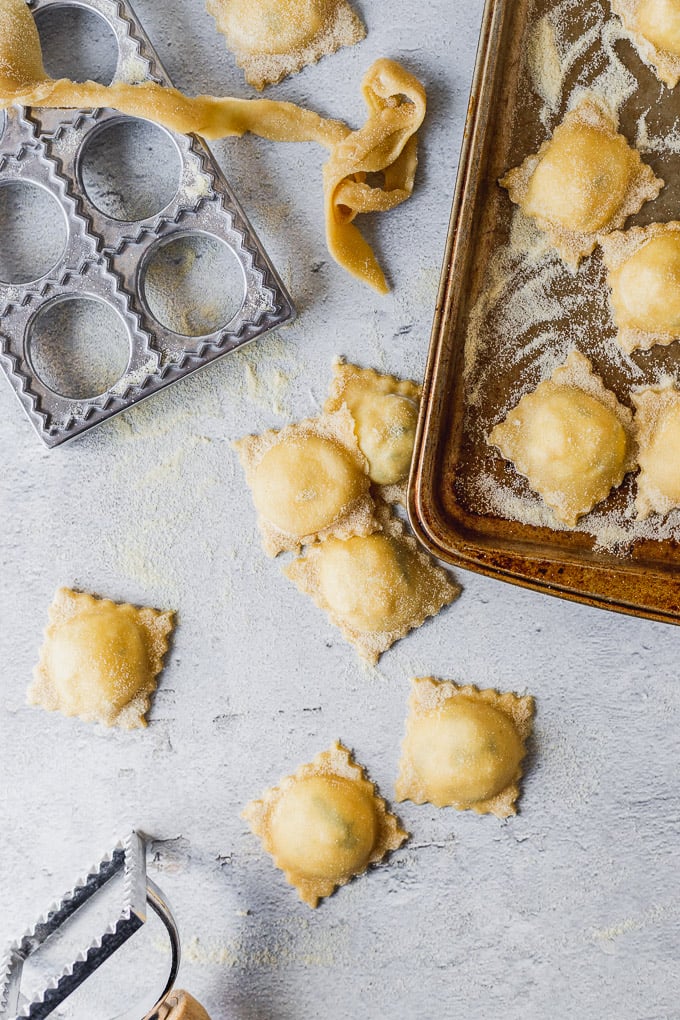
I will show you how to use a ravioli maker as well though, Using one results in the perfect ravioli shape every time. You can also use a ravioli stamp, but make sure it’s sharp because I haven’t had much luck with them.
Homemade Pasta Dough
The first thing to do to make homemade ravioli is to make fresh pasta dough. I suggest reading all the tips and tricks here: how to make homemade pasta dough.
This homemade pasta recipe is the base for this ravioli recipe and is my go-to fresh pasta recipe. It is important that you have all the backend knowledge for making fresh pasta dough before starting (hint: it includes slightly tacky, but not sticky, pasta dough!).
Ingredients
For the homemade pasta dough, you’ll need the following ingredients:
- All-Purpose Flour – or use a specialty 00, fine pasta flour for an even smoother texture.
- Semolina Flour – lends a little heartiness to the pasta dough.
- Eggs
- Water and Olive Oil
- Salt and Pepper – salt is a must for flavor, and black pepper is a fun addition, just make sure it’s finely ground.
Again, be sure to check out my guide to homemade pasta dough for an in-depth look at each pasta-making step. For now, we’ll go through the steps you’ll follow to get the dough, and then head straight into making ravioli with it!
Steps to Make Pasta Dough
Start with a blend of semolina and all-purpose flour.
This combination results in a firm, yet melt-in-your-mouth textured pasta. Oh, and I like to add some fresh ground black pepper to the dough for a little bite and texture, too. Of course, if you’re not so into that, you can easily leave it out.
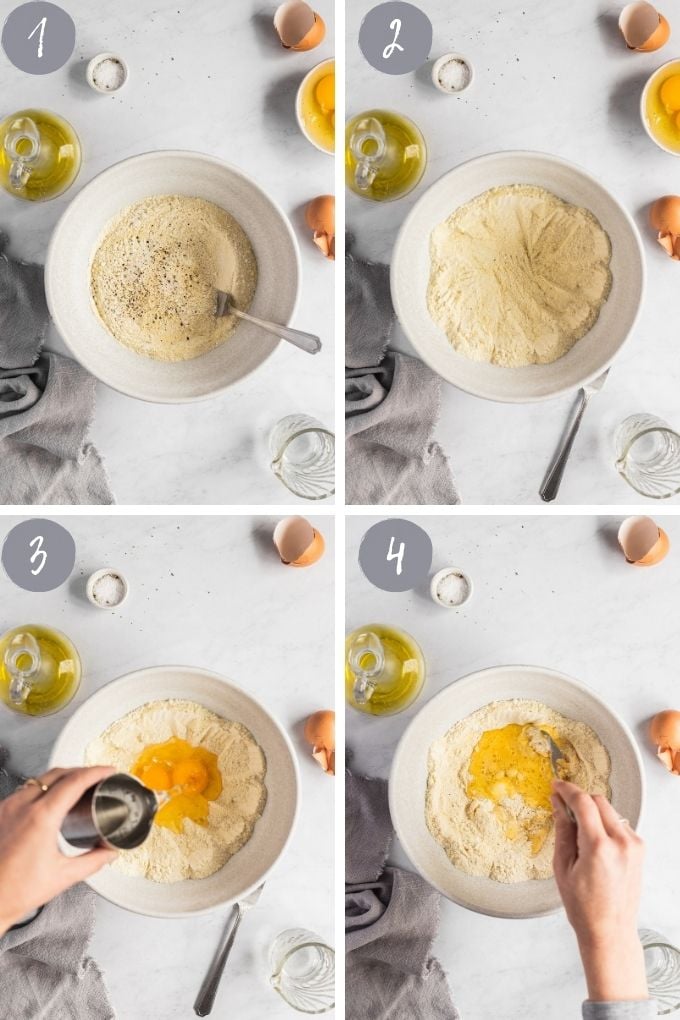
Next, whisk in the eggs, olive oil, and water.
It works best to make a well in the center of the dry ingredients, then use a fork to whisk the egg and liquids into the dry ingredients, working your way around the inside as it all comes together. Using both the eggs and oil creates a dough that is flexible enough to withstand making ravioli.
Once a shaggy dough has formed, begin to knead it together.
Using your hands, knead the dough for 3-4 minutes until it is smooth and tacky, but does not aggressively stick to your hands. If it is sticking too much, you can add a little more flour as needed, but be careful to not add too much. This is the “art” of pasta making, and you’ll get a better feel for it the more pasta you make.
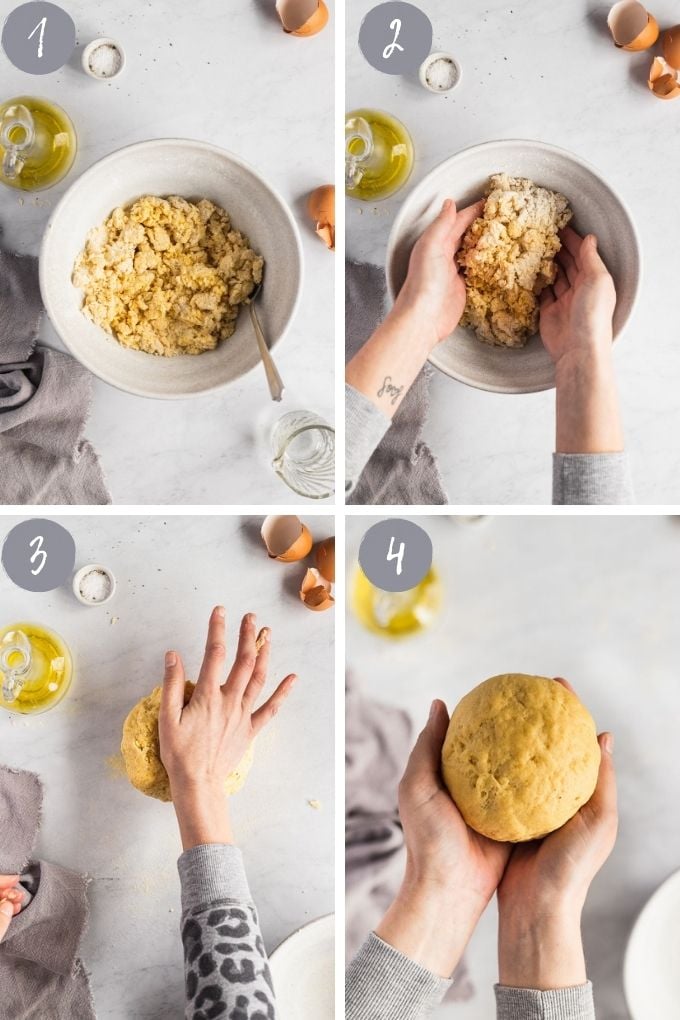
Once the pasta has been kneaded and the desired texture is reached, let the dough rest for at least 30 minutes to allow it to hydrate and the gluten to relax.
You can make the dough a day ahead and store it in the fridge or make it earlier in the day, too, and let it rest until you’re ready to make the ravioli.
Once the dough has rested, you’re ready to start the ravioli process!
Do I have to make my own pasta dough?
I highly recommend making your own homemade pasta dough, however, you can often find fresh pasta sheets, rolled specifically for ravioli, in your grocery store.
Depending on your location, they may be harder to find at general grocery stores, however, Whole Foods is a great option. Look in the refrigerated or specialty sections to find them. There are also gluten-free options for fresh pasta dough, like Taste Republic and Cappello’s.
Ravioli Filling Ideas
While the homemade pasta dough rests, it’s a great time to begin preparing your ravioli filling.
Of course, the time needed for the filling will depend on the exact filling you’ll use, and you may need to begin it first. You want to find the just-right balance between not too wet and not too chunky.
- Ricotta Cheese Filling – add in spinach!
- …or mix it up with a variety of cheeses from mozzarella, gruyere, goat cheese, and more!
- Butternut Squash
- Fresh Sweet Corn
- Other veggies, like a mixture of chopped and sauteed mushrooms, eggplant, or onions and leeks
- Ground meat: beef, chicken, or pork
- Seafood: lobster, crab, or shrimp
How to Make Ravioli without a Press
I’m going to share with you my favorite, and in my opinion, the simplest, way to make the ravioli pockets. I’ve been making them equipment-free with this fold-over technique for years and years, and it never fails me.
The pockets come out looking more rustic and clearly homemade, too, which I love. Let’s get to it!
First: Roll Out Pasta Sheets
Step one: divide the pasta into 2 or 4 sections to proceed with rolling them into long, thin sheets.
To make this process truly equipment free, use a rolling pin and some muscles to roll the pasta into long sheets.
If you have one available, use your pasta machine for the best results, because it will ensure the pasta sheets are the same size, and thin enough.
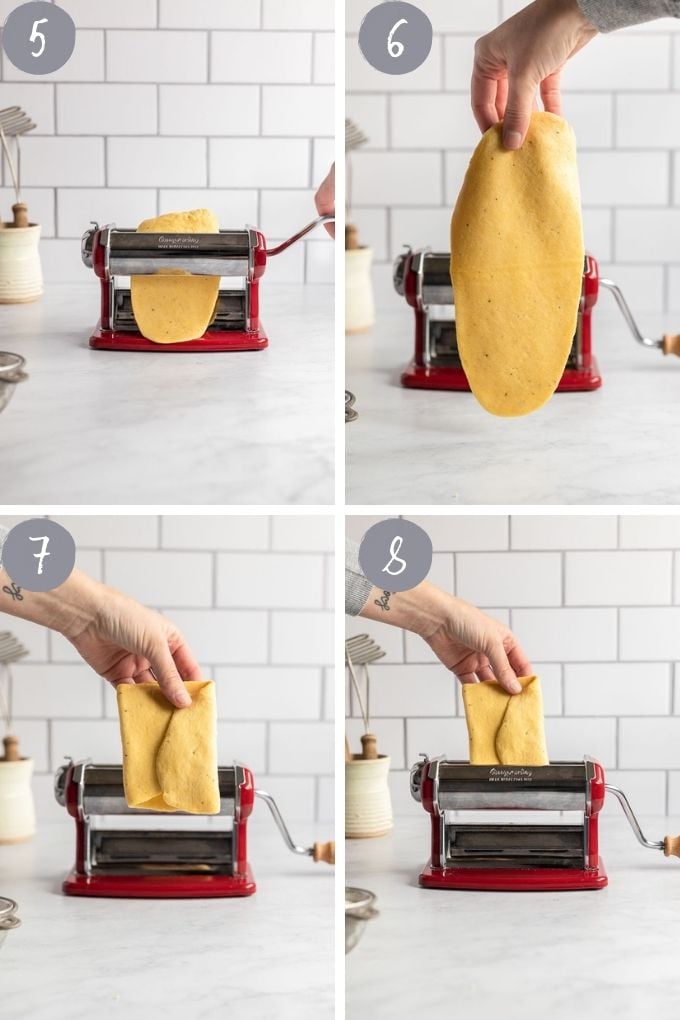
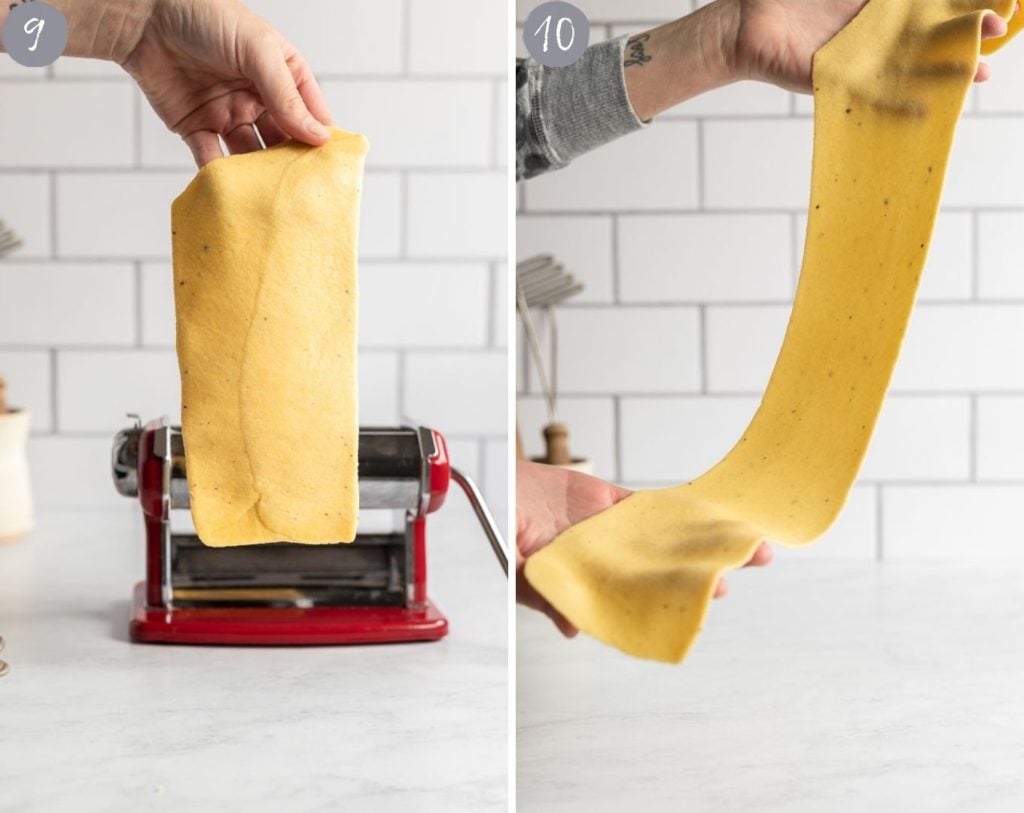
Before adding the section of dough to the pasta machine, form the section into a small rectangle using your hands or the small pasta rolling pin. Make it thin enough so that you can begin to thread it through the pasta roller (photos 1-3). You’ll start with your pasta roller on the largest (widest) setting. This doesn’t have to be perfect, you just want to start encouraging the pasta to roll into a rectangular shape (photo 4).
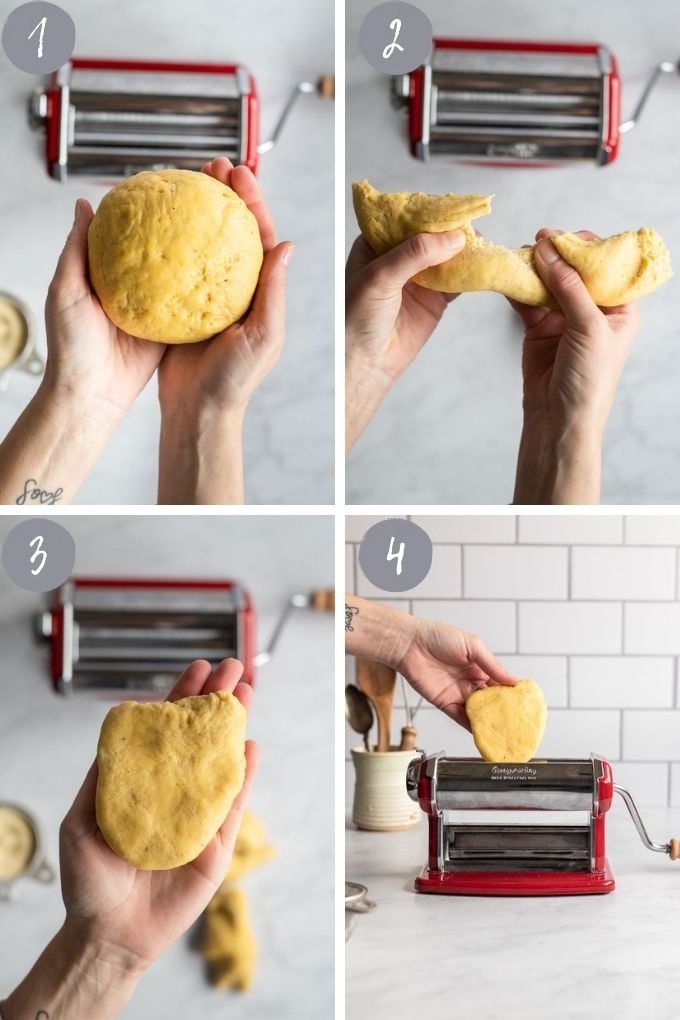
Roll out the pasta dough on that widest setting, then fold it into a rectangular shape again, as needed, and roll again.
Each time you roll out the rectangle, it will expand depending on how it was placed into the roller. Making the section into a uniform rectangle will help you later on (photos 5-8).
Once you’ve gone through the largest setting a couple of times and have a solid ‘rectangle type base’, thread the dough through each smaller setting, one by one until you’ve reached the desired thickness.
I like to end with the second-to-last thinnest setting, however, if you’re really brave, you can go as thin as possible. Keep in mind if you do use the thinnest setting, the sheet will be more delicate to work with.
Stopping at the second to last smallest setting makes it a little easier to work with less risk of tearing. I also find the slightly thicker ravioli gives me more pasta bite, which I love. Again, use your preference and keep in mind the size will vary, depending on the exact machine you have.
Next: Fill and Form the Ravioli Free Hand
This is where the rustic, equipment-free ravioli forming comes into play. This method doesn’t require ravioli mold. If you’re curious about using a ravioli though, keep reading, we’re covering that next!
Be sure to sprinkle all-purpose or semolina flour on your countertop before beginning, so the ravioli do not stick.
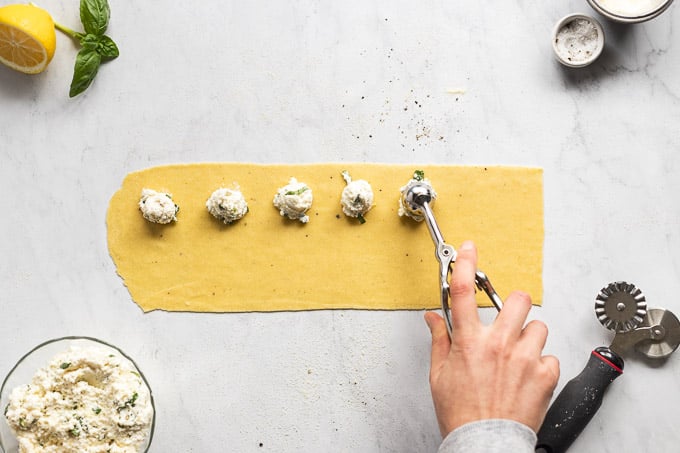
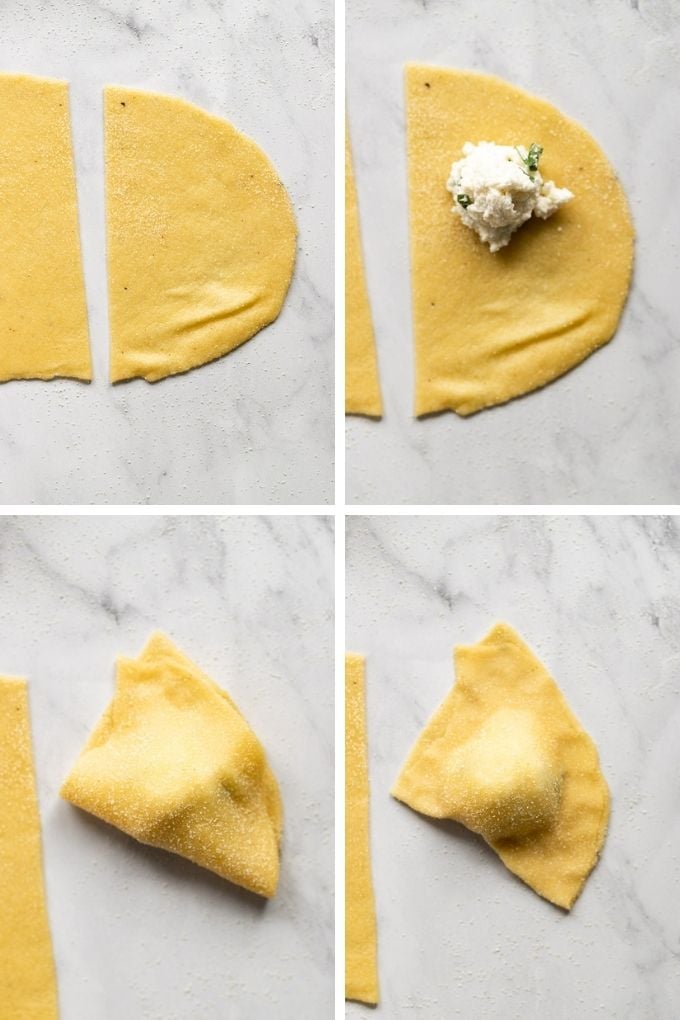
Once the dough is fully rolled out in a long rectangle, place dollops of the filling spaced about 1 to 1 1/2 inches apart on one half of the dough.
You want to place it on one side because we will be folding it up to create the ravioli pockets. I like using a small cookie scoop to place the filling so I have an equal amount for each pocket.
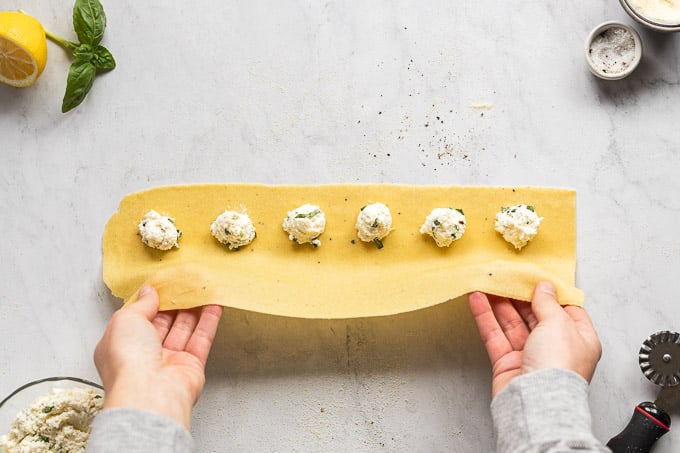
Step three: once you have the filling spaced on the entire length of your pasta sheet, fold the other half of the dough on top of the filling.
It helps to dip your finger in water and run it around the pasta edges before folding. This can help the dough stick to itself if it seems a little dry, but isn’t usually necessary if the dough is the right texture.
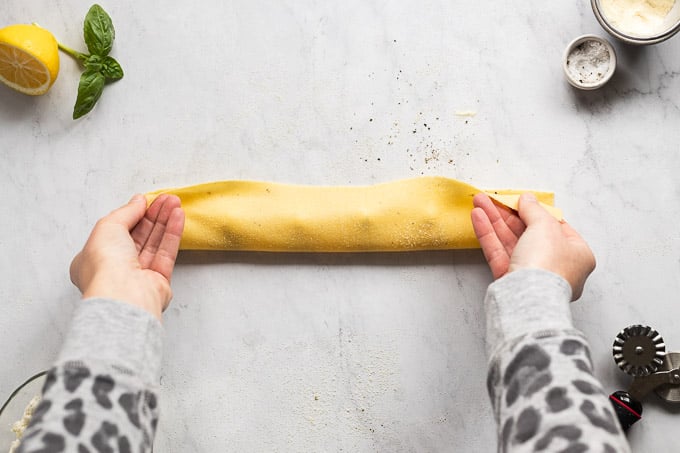
Step four: gently press the dough around each filling to create the beginning of each pocket.
As you press the pasta around the filling, the edges will stick together. You want to be gentle, yet firm, to ensure that it begins to stick together.
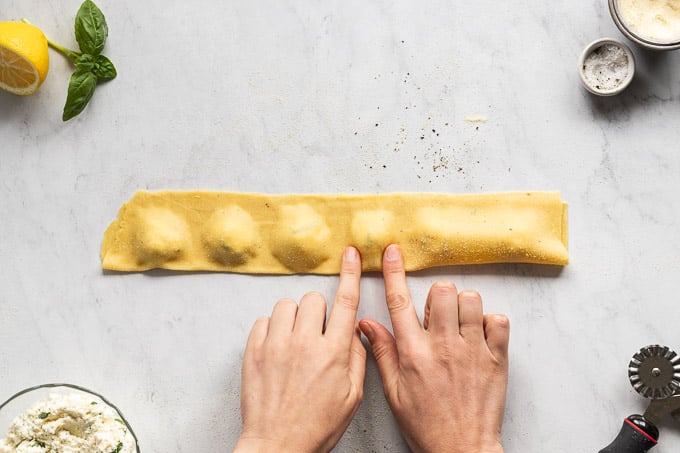
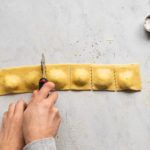
Step five: now that you’ve pressed the dough down and you can see where each pocket will be, use a pizza cutter or pasta wheel to cut between each pocket. A knife will work, too.
Once the pockets are cut apart, again press the edges down as needed, or use a fork to make sure they are fully pressed together if you’re concerned they won’t stick together. This is my go-to method for making sure the ravioli is sealed, especially since we aren’t using any fancy equipment.
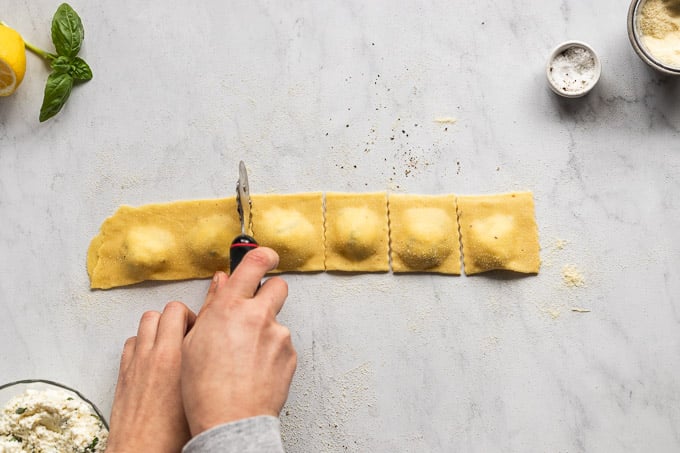
Use a fork to crimp the edges of the uncut side to ensure it remains sealed.
Now that you have each pocket formed, gently lift them from your counter and place them on a semolina flour-lined plate or baking sheet until ready to cook. Continue the steps with the remaining sheets of pasta dough before you get to cooking!
At this point, I would recommend starting a pot of salted water so it can come to a boil and is ready to cook the ravioli when you are finished forming all of the pockets.
What about the rounded ends on the pasta sheets?
If your pasta sheets aren’t totally uniform, there’s no need to worry! If one sheet is a little wonky, you can still roll with it (no pun intended ;)).
Simply work with it and place the filling in the spaces you know you can fold the dough over to create a pocket-type shape.
And those rounded ends? Use them! No pasta waste here!
Place some filling in the center and fold it up into your own strange-looking ravioli pocket, because no pasta shall be wasted. I’ll forever stand by that.
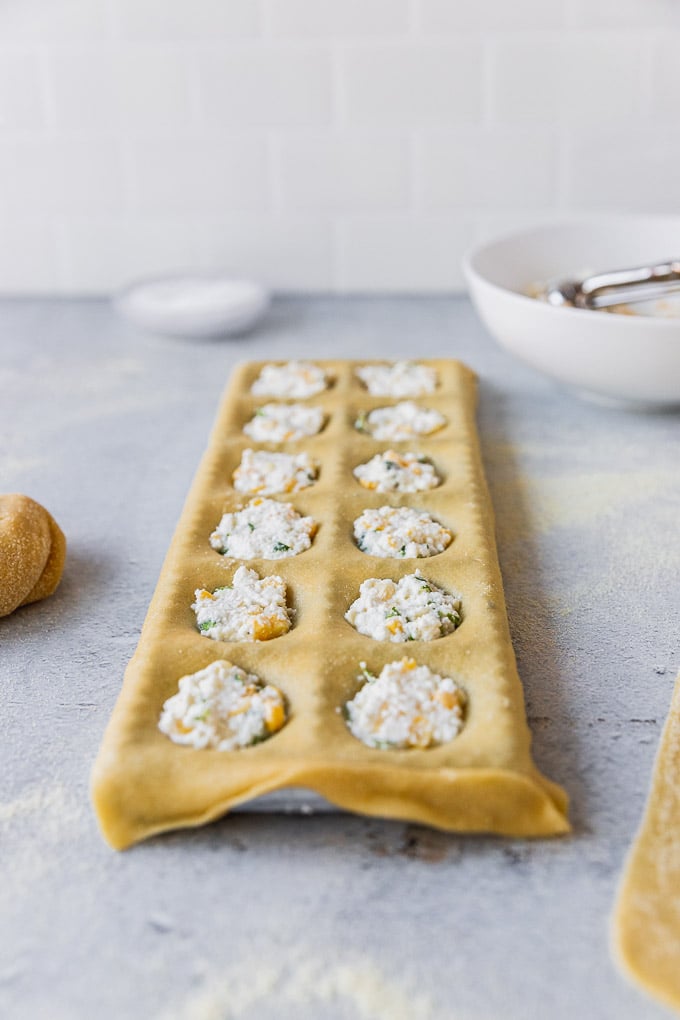
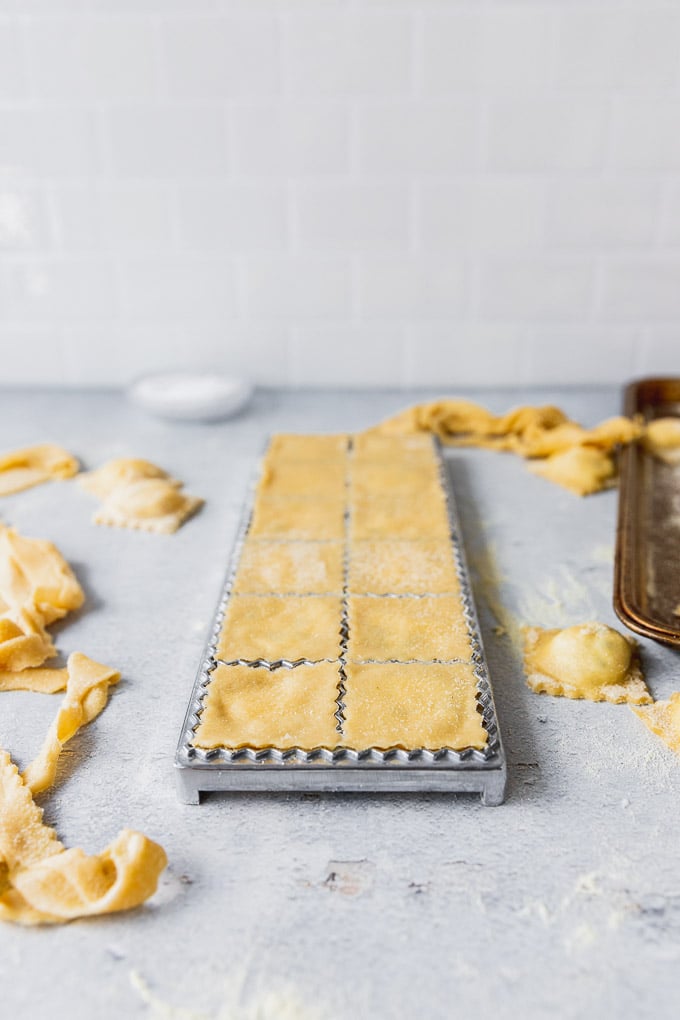
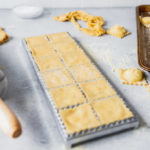
How to Use a Ravioli Maker
When I first used my ravioli maker, I was completely confused. Since figuring it out, I’ve been loving it! It makes perfectly sized ravioli each and every time and is quite easy to use once you get the hang of it. It’s an excellent gift for the ravioli lover in your life.
To use a ravioli maker with a press, follow these steps:
- Sprinkle semolina flour along the metal portion. This is what will cut the ravioli pockets, so it’s important the dough doesn’t stick.
- Place the thin sheet of pasta over the metal piece, making sure the dough hangs over the sides so there is enough in place once it’s weighted down from the filling.
- Place the plastic piece with the divets on top of the pasta sheet, gently pressing down to stretch the dough and create space for the ricotta ravioli filling.
- Remove the plastic piece and fill the space with about 2 teaspoons of filling (depending on the size of your molds).
- Lightly rub water along the edges of the pasta sheet, around the filling. This helps the pasta stick together. But be careful, don’t add too much or it will get gummy.
- Take the second sheet of pasta dough and spread it across the top of the filled ravioli sheet.
- Using a rolling pin, roll over the ravioli maker. With the pressure of this, the metal piece will “cut out” the ravioli.
- Flip over the mold and out will pop your ravioli (you may need to gently coax them depending on how well you dusted the mold with flour).
Et voila! Perfectly formed ravioli for you to enjoy. Place them on a baking sheet lined with semolina flour while you continue preparing the rest of the ravioli.
Tips for First-Time Ravioli Makers
So you’re a beginner, but never fear! We are going to give you all the tips and tricks to make sure you have success making ravioli at home even for the first time!
There is a bit of an art to making homemade pasta dough, so take your time and be willing to adapt and adjust as you move through the process.
- Make sure the dough is neither too wet nor too dry. If it’s too wet, it will stick in the pasta machine, and if it’s too dry, it will tear. It’s easy to adjust though with a little water, flour, and extra kneading.
- Remember: the dough should feel tacky, but it shouldn’t stick to your hands.
- Don’t overfill ravioli or you increase the chances of bursting. Yes, you can make large ravioli, just make sure there’s enough pasta to fold over the filling.
- On that note, don’t try to go too thin when rolling pasta the first time. Stop on the 2nd or 3rd to the thinnest setting on your machine.
- Relax, breathe, and have fun!
Cooking Ravioli
There’s no need to dry fresh ravioli. Once the ravioli are formed, it’s time to cook! This is good news, because, after all that preparation, you’ll be hungry.
As I mentioned before, bring a large pot of salted water to a boil. Begin this early, because it will take time to come to temperature.
Working in batches, add the ravioli to the pot and allow them to cook for around 2-4 minutes. The time will vary depending on the thickness of your pasta and the size of the ravioli you made.
Once they’re ready, remove the pockets using a spider-like strainer with a handle to easily remove them without the risk of burning yourself. If needed, a slotted spoon will do, too.
Then transfer the ravioli pockets directly into your sauce. It’s ok if a little water transfers over, too, because pasta water helps the sauce adhere to the pasta!
Tips for Cooking Time
- Notice when the ravioli float. This can be a good indicator that they’re done cooking.
- Then, test a ravioli and note the time it cooked for. This will give you the best indicator of how long the ravioli will need to cook.
- Start with just 1 ravioli to be precise.
- Cook them just shy of al dente if you’re going to finish cooking them in the sauce. This ensures they don’t overcook.
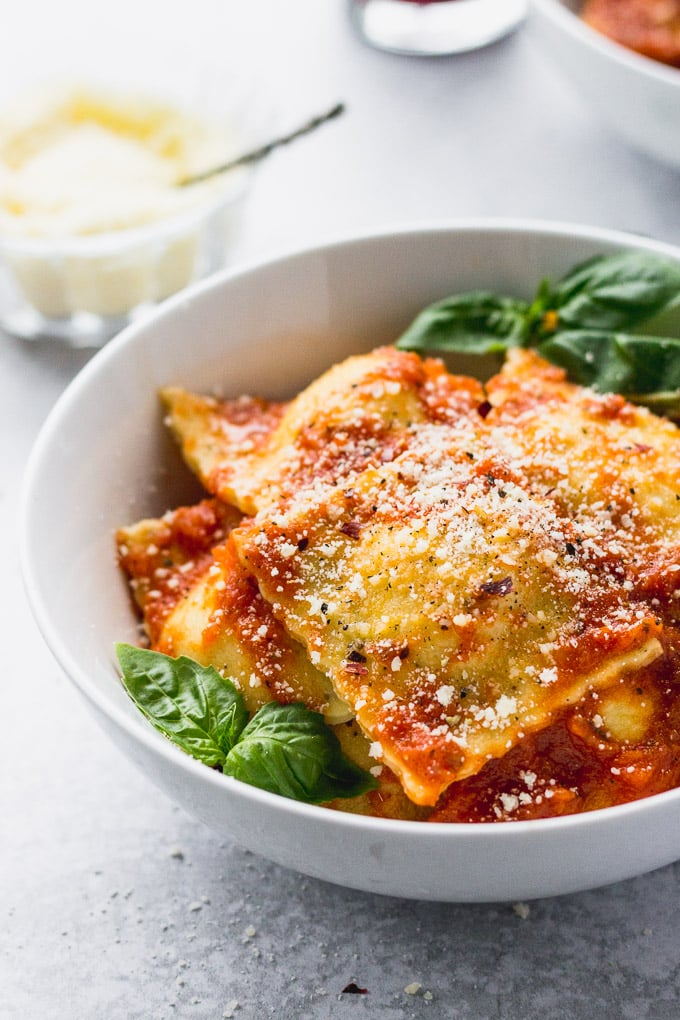
Choosing the Best Sauce
Because the ravioli are truly the stars, most ravioli pair well with simple sauces. Consider the flavors of the filling, and work from there.
- Brown butter sauces – pair well with squash, pumpkin, or seafood ravioli
- Simple tomato sauce – pairs well with cheese or meat ravioli
- Cream sauces – like garlic cream sauce or alfredo sauce pair well with vegetable, spinach, or seafood ravioli
Make-Ahead and Freezing Tips
Homemade ravioli is best if prepared the day it’s made, however, I totally get wanting to have a stash waiting for you when the craving for homemade pasta strikes. When that happens, there’s no going back.
If you are making the ravioli the same day you prepared them, store them in the fridge on the flour-coated baking sheet until ready to boil.
You can also make the homemade pasta up to 3 days ahead of time, and store it in the fridge, wrapped well in plastic wrap. Then, proceed to make the ravioli when you’re ready.
To freeze the ravioli pockets, place the sheet pan in the freezer for several hours until the pockets are frozen, then, transfer them to a freezer-safe bag (I love my Stasher bags!) and store them in the freezer for up to two months. When you’re ready to use them, simply boil them from frozen until they’re floating, generally 2-3 additional minutes. Serve them as you would with sauce.
Did you make this recipe? Please leave a star rating and review in the form below. I appreciate your feedback, and it helps others, too!

Get the Recipe How to Make Ravioli (without equipment)
Ingredients
- 1 pound Fresh Pasta Dough*
- semolina flour, for dusting
- filing of choice, see notes
- sauce of choice, see notes
Equipment
- #60 Cookie Scoop or smaller
Instructions
Preparation
- Make the fresh pasta dough and let it rest as directed. Prepare a baking sheet or plate by sprinkling it with additional semolina flour. Set aside; it will hold the ravioli once they're made.
- If needed, begin preparing the filling while the pasta rests, or before making the pasta.
- Bring a large pot of salted water to a boil, because this will take a while, I like to start it before or while forming the pasta so it's ready once the ravioli is formed.
Rolling the Dough into Pasta Sheets
- Divide the dough into 2-4 sections (4 sections will be easier to work with). Using your hands or a small rolling pin, form it into a rectangular shape, just thick enough that it will fit into the largest setting on your pasta machine. Use a pasta machine for the best results. If you don't have one, use a rolling pin to roll each section following the next steps.
- Roll it out on the largest setting, adjusting and folding the sheet into a rectangular shape again, as needed. Each time you roll it out, it will expand how it was placed in, so making it a uniform rectangle as much as possible will help you later on.
 Once you've gone through the largest setting and have a solid 'rectangle type base', thread the dough through each smaller setting, one by one, until you've reached your desired thickness. I like to go with the second to last thinnest setting, however, if you're really brave you can go as thin as possible. Place the rolled-out sheet on the countertop dusted with semolina flour to prevent sticking.

No-Equipment Method (Rustic Freestyle!)
- With the pasta sheet laid out on the semolina-dusted countertop, place approximately 1 to 1.5 teaspoons of the filling, spaced about 1 1/2 inches apart, on one half of the sheet. You want to place it on one half because we will be folding the dough up to create the ravioli pockets. I find that a small cookie scoop to place the filling gives the perfect equal amount for each pocket.
- With the filling spaced on the entire length of your pasta sheet, fold over the other half of the dough on top of the filling.
- Gently press the pasta around each dollop of filling to create the beginning of each pocket.
- Use a pizza cutter or pasta wheel to cut between each pocket. Press the edges down as needed, or use a fork to make sure they are fully sealed.
- Place the pockets on your prepared baking sheet and continue forming ravioli with the remaining pasta sheets.


Ravioli Maker Method
- Sprinkle semolina flour along the metal portion. This is what will cut the ravioli pockets, so it's important the dough doesn't stick. Place the thin sheet of pasta over the metal piece, making sure the dough hangs over the sides so there is enough in place once it's weighted down from the filling.
- Place the plastic piece with the divets on top of the pasta sheet, gently pressing down to stretch the dough and create space for the ricotta ravioli filling. Remove the plastic piece and fill the space with about 2 teaspoons of filling (depending on the size of your molds).
- Optional: Lightly rub water along the edges of the pasta sheet, around the filling. This helps the pasta stick together. But be careful, don't add too much or it will get gummy.
- Take the second sheet of pasta dough and spread it across the top of the filled ravioli sheet. Using a rolling pin, roll over the ravioli maker. With the pressure of this, the metal piece will “cut out” the ravioli. Flip over the mold and out will pop your ravioli (you may need to gently coax them depending on how well you dusted the mold with flour).

Cooking Ravioli
- Once the water is at a rolling boil, add the ravioli pockets in batches. Be sure to not overcrowd the pan. The ravioli pockets will take approximately 2-4 minutes to cook to al dente, depending on the size of the ravioli. A good indicator they're done is that they'll float, but I do recommend testing one from the first batch to see how long it takes.
- If you're going to finish them in the sauce for longer than a minute or so, you may want to remove them slightly early and let them finish cooking completely in the sauce.
- Serve immediately in the sauce of choice and garnish as desired. Enjoy your creation!
Notes
- This recipe makes approximately 48, 1 1/2-inch ravioli pieces.
- Filling Ideas:
- Ricotta Cheese Filling or a variety of cheeses and herbs
- Butternut Squash or pumpkin
- Fresh Sweet Corn
- Other veggies, like a mixture of chopped spinach and sauteed mushrooms, eggplant, or onions and leeks
- Ground meat: beef, chicken, or pork
- Seafood: lobster, crab, or shrimp
- Sauce Ideas:
- Brown butter sauces – pair well with squash, pumpkin, or seafood ravioli
- Simple tomato sauce – pairs well with cheese or meat ravioli
- Cream sauces – pair well with vegetable, spinach, or seafood ravioli
- To freeze ravioli: place fresh ravioli on a parchment paper-lined baking sheet. Place in the freezer until completely frozen, then transfer the ravioli to a freezer bag. When ready to use, boil as directed above for about 2-3 minutes longer.


