

If you’re anything like me, then you’ve been obsessed with bagels for as long as you can remember. Which also means you’re in the exact right place.
This post was originally published in April 2019, the text, photos, and video were added in March 2021, along with weight measurements. The recipe change is noted in the recipe card.
Table of Contents
Do you remember when your bagel obsession began? For me, it was my teenage years and Cinnamon Crunch bagels at Panera. But something happened over the years.
Maybe it’s what they call “growing up”. The sweet tooth has (somewhat) subsided and now more than ever, I’m reaching for savory breakfast items over the belly-achingly sweet ones.
Where do you fall? Sweet? Savory? Just give you a deliciously good bagel and everything in life is grand? Yeah, I think that one.
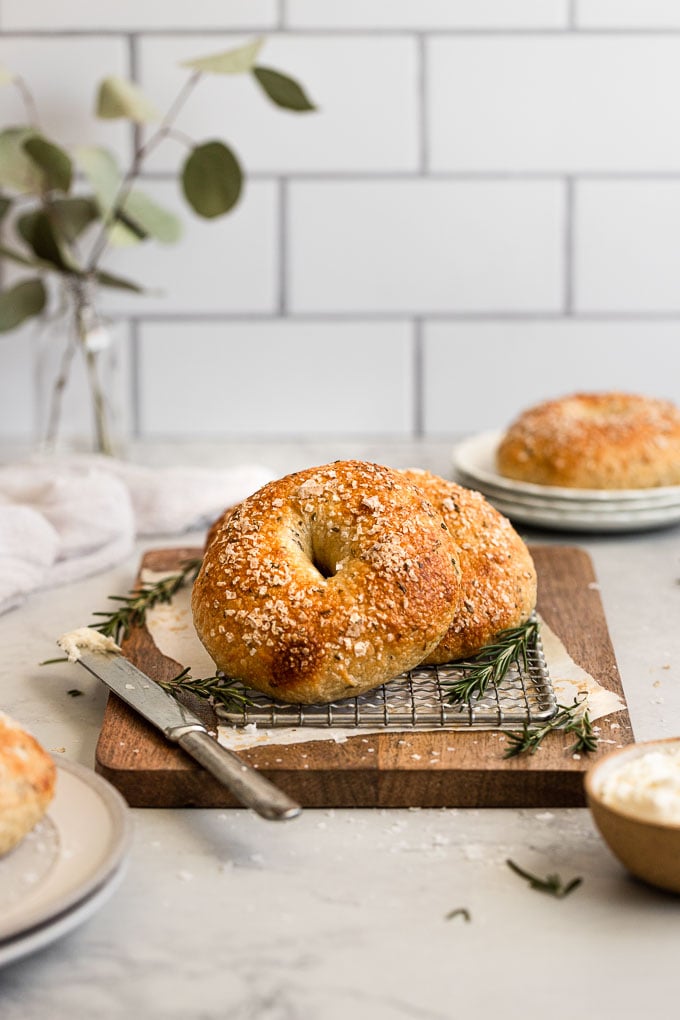
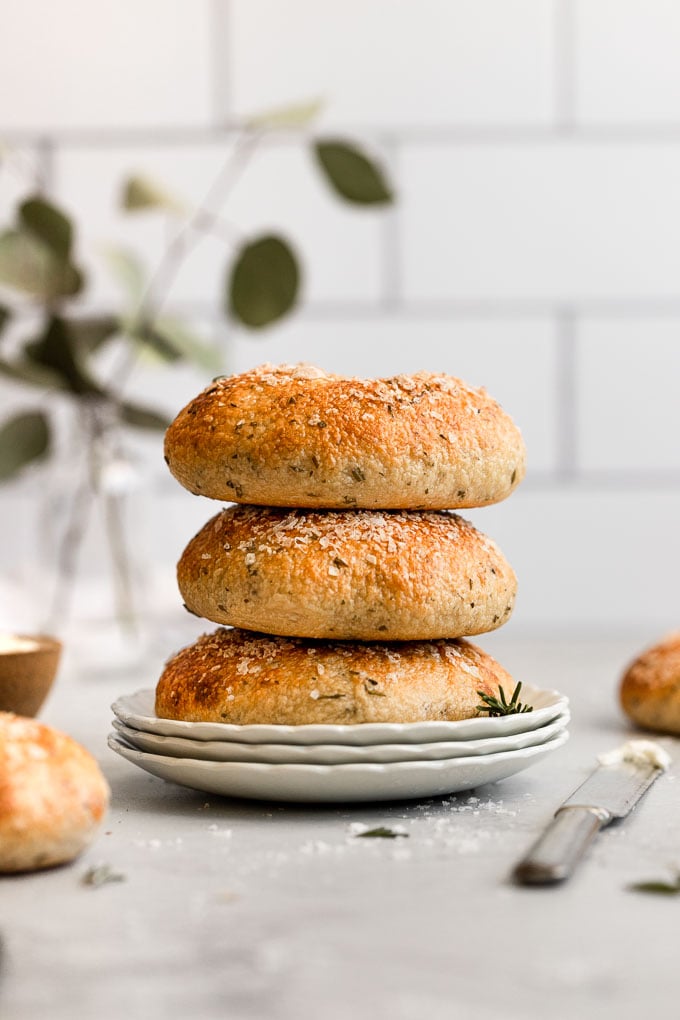
And these rosemary bagels…not to sound dramatic or anything… but… THEY ARE LIFE-CHANGING. Once you succeed at making homemade bagels, they’re going to be part of your vegetarian breakfast recipe repertoire for all time.
And when I say ‘once you succeed’, I’m really just talking about the first time you try, because I am going to walk you through it step-by-step! You will never look back. They are fan-freakin’-tastic. And dangerously delicious.
Dangerous, because if you’re anything like me, you’re going to eat, oh, about 3.75 bagels before realizing that you maybe should save some for later.
It’s ok, I support living a little (or, ahem, a lot). And carbs are life, right?
Now, let’s get to baking! It’s a multi-day process to make bagels that have developed flavor, and a perfectly chewy exterior and soft interior. This means making the bagels requires just a little bit of planning, in the best way possible.
How to Make Homemade Bagels
First things first do not, I repeat, do not be afraid.
I know homemade bread, let alone bagels, can be intimidating at first. I get it. But once you make them (and realize how easy it really is) you’re going to be high-fiving yourself with every bite. It truly is worth it.
I am going to walk you through the process step-by-step, explaining the reasoning behind certain steps (like the overnight rise), and inserting tips along the way. Please be sure to read thoroughly, or watch the video process. My goal is to help you be successful the very first time you make rosemary bagels at home!
Step 1: Proof the Yeast
You can use instant or active dry yeast in this recipe because we’re going to proof the yeast and let the dough rise. If using active dry yeast as opposed to instant, you may need to let the dough rise longer. For example, closer to two hours versus the hour to an hour and a half with instant yeast.
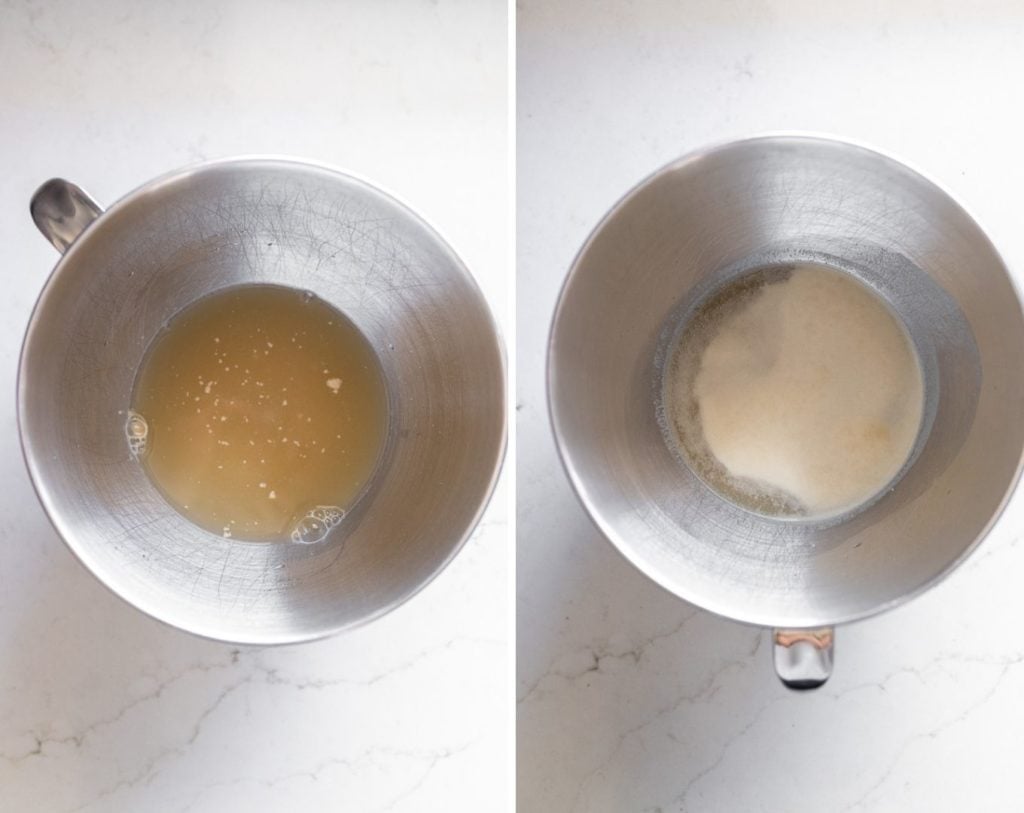
In the bowl of a stand mixer, combine the yeast, sugar, and warm water. The water should be between 100°-110°F (38°-43°C). Let it sit for about 5 minutes until the yeast has a foamy appearance. This means it’s active and ready to work its magic in your dough.
Step 2: Measure the Flour
This is so, so, so important: use a kitchen scale to measure your flour. To ensure you get proper results the first time, and that you’re able to best replicate this recipe time after time, weighing your flour is a crucial step.
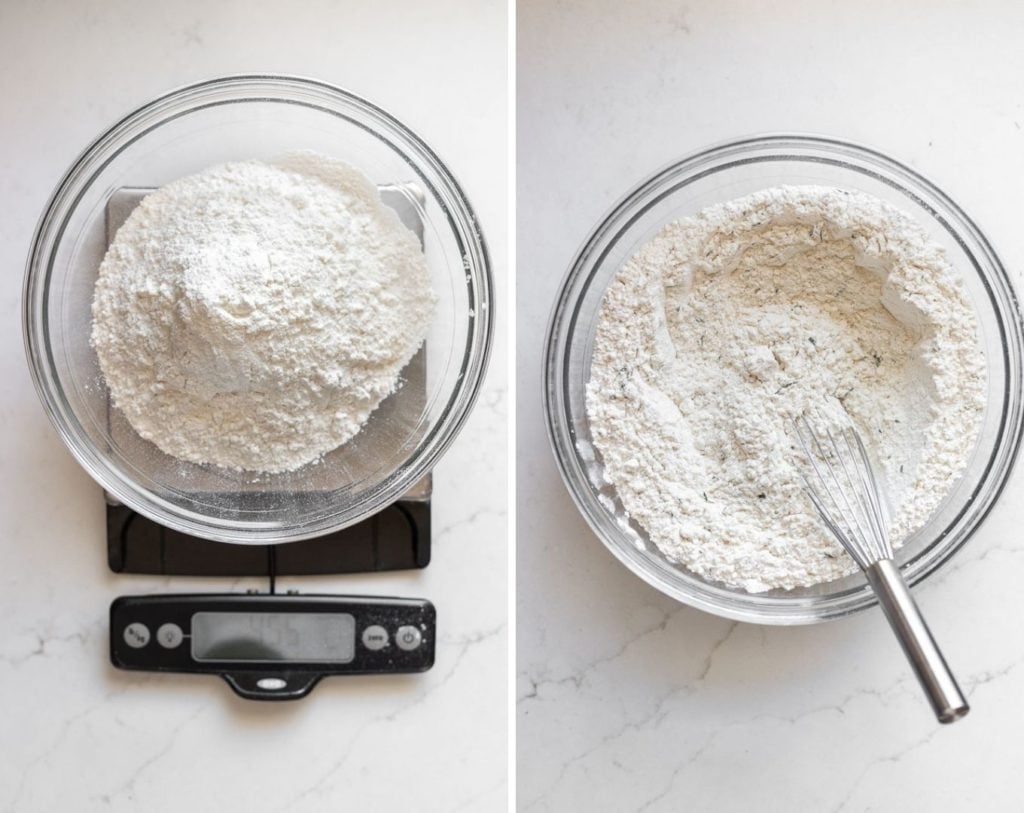
Storytime: In 2020, I began to realize the importance (and honestly the ease) of weighing ingredients in baked goods. Fast forward to updating this recipe to be the best it could be, I obviously needed weight measurements.
I fluffed and scooped my flour into my measuring cups, and weighed them because simply doing the math to convert to weight hadn’t worked in previous tests. The measured flour weighed over a half-cup more than the recipe needed.
Moral of the story: weigh your flour to ensure you have the right amount!
Back to the flour. Later on, in the mixing process, you will have to use your best baker’s judgment as to if you need to add a tablespoon or two more. Just like baking bread, baking bagels and the rise time is going to be affected by the humidity and temperature of your home.
Now that you’ve properly measured flour, in goes the chopped rosemary. I recommend chopping it pretty fine because it is such a hearty herb. However, it’s totally up to you and how large you’d like the rosemary to be throughout the bagels.
Step 3: Mix and Knead the Dough
Full disclosure: I do this entire step with my stand mixer and the bread hook. Some will tell you that the dough is too stiff to knead with it, and they recommend doing so by hand. Because this is a smaller batch (we’re making 6 bagels as opposed to a dozen), I find that it works just fine in the stand mixer.
If you are worried about your mixer motor, once it’s combined, remove the dough from the bowl and knead by hand.
Now that the yeast is ready and the flour is properly measured, you will combine the two. Add the flour, salt, and rosemary to the yeast mixture in the bowl of your stand mixer. Begin mixing on low until combined, then increase the speed to 2-4.
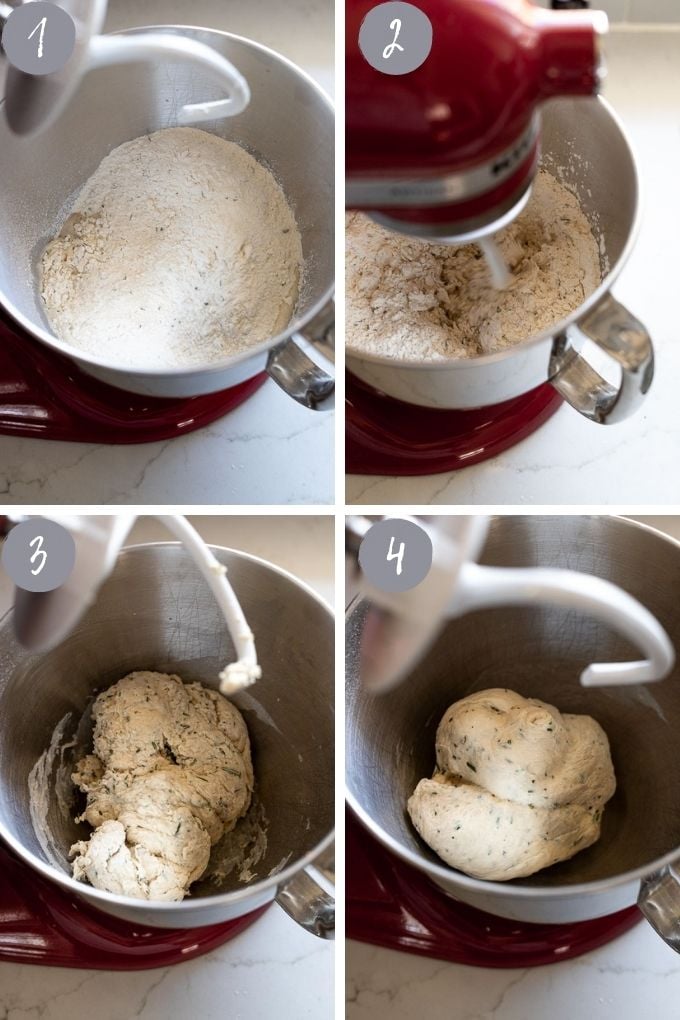
Previously, I mixed on high for 8 or so minutes. I’ve since learned, and read my KitchenAid manual (thanks, BF), that when making dough using the bread hook, it’s recommended to use speed two, as anything higher may cause damage to the motor, and anything less will not effectively knead the dough.
I now recommend kneading the dough between speeds 2 and 3, for about 3-5 minutes, until the dough has formed into a ball and it has ‘cleaned’ the sides of the mixing bowl. The dough will be tacky, but not stubbornly sticky.
If the dough is stubbornly sticking to your hands, you can add one (1) tablespoon of flour at a time. If kneading by hand, work quickly to prevent the dough from sticking.
Another kneading option: mix the ingredients in the stand mixer and then remove the combined dough and knead by hand until the dough is smooth and soft (likely around 10 minutes).
I don’t have a stand mixer, can I do it all by hand? Yes, you can! It will take a little more arm work kneading the dough the entire time, but it can be done! Knead for around 10 minutes and see how it feels.
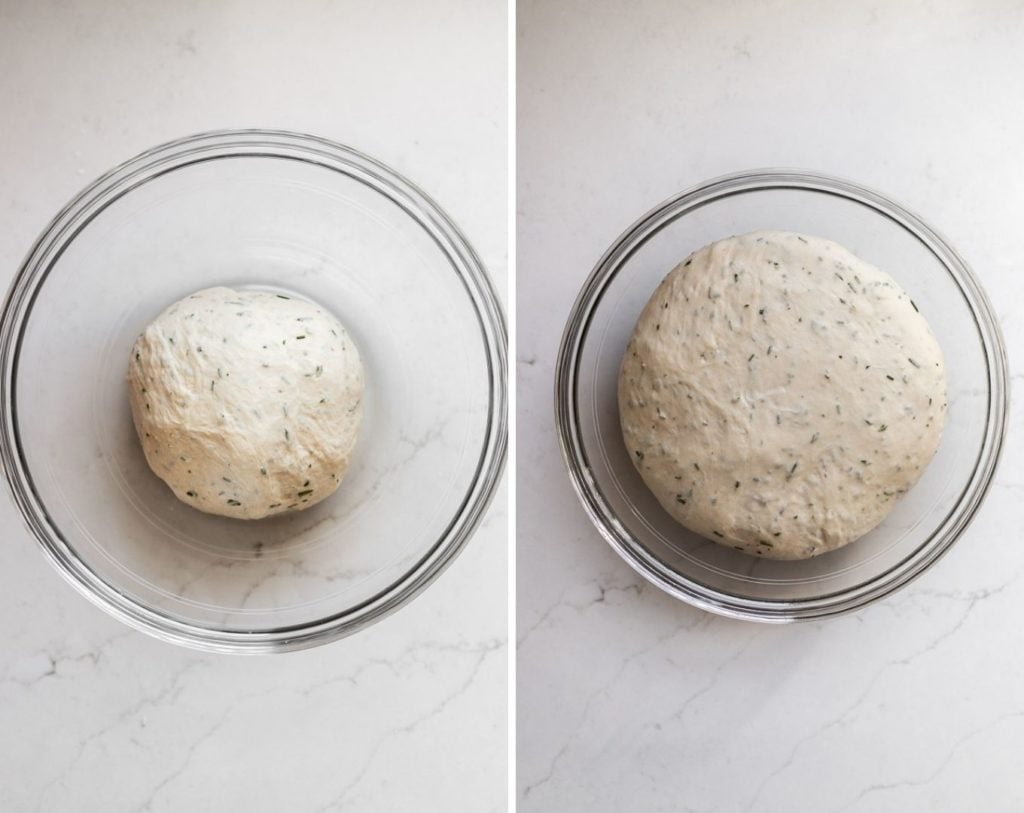
Step 4: The Rise
After kneading, place the dough in a clean mixing bowl and cover with a damp towel. The damp towel helps keep some moisture and humidity around the dough.
Place it in a warm environment for 1-2 hours. Remember, the rise will depend on the yeast you used, and the temperature of your home. The dough will have doubled in size, with a smooth, puffy top when it’s ready.
How to create a warm environment: If needed, preheat your oven to its lowest temperature. Then turn it off and allow some of the heat to escape (you don’t want it too hot). Place the dough in the warmed but off oven to rise.
Alternatively, some suggest placing it in a cold oven with the light on to create the perfect temperature. I find my light doesn’t seem to give off enough heat for this. If yours does, this is a perfect solution!
Step 5: Shaping Part One: Making the Bagel Balls
Once the dough has doubled in size, deflate it if desired, and remove it from the bowl onto an unfloured surface, preferably a countertop.
Keeping the surface unfloured helps to create tension in the surface of the dough while we shape the bagels. Flouring the surface would add more to the dough, too, which we don’t want.
First, divide the dough into six parts. If you want smaller bagels, divide the dough into 7 or 8 pieces.
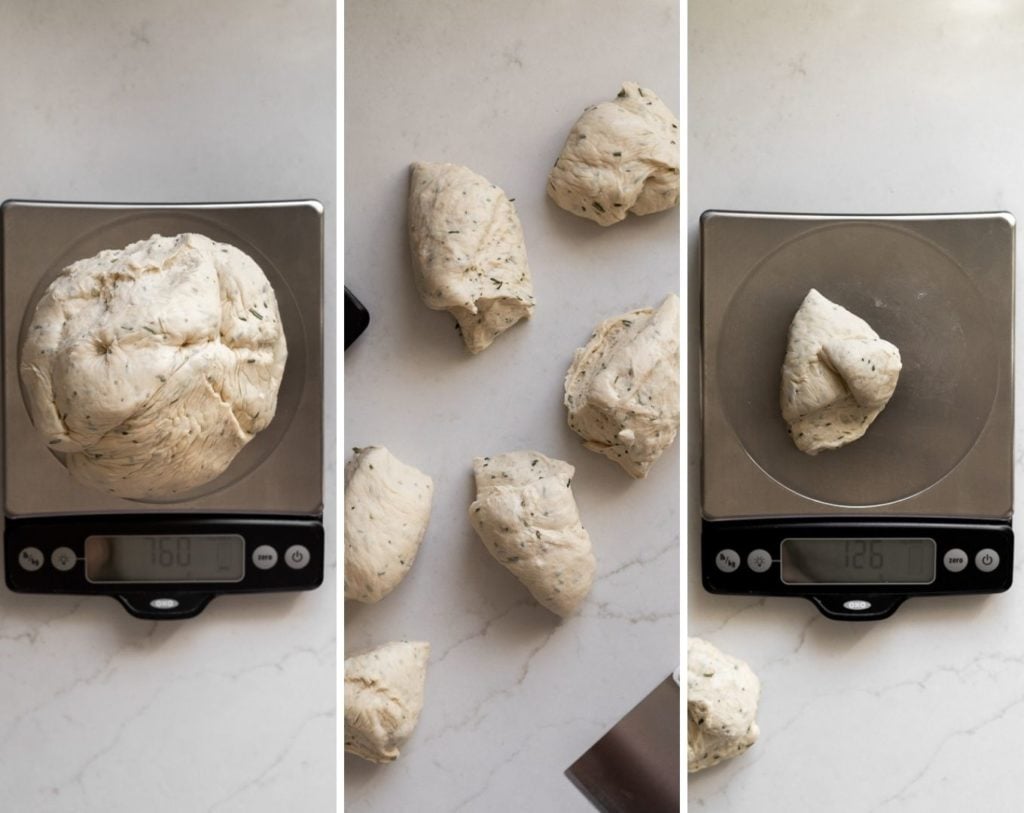
Because I already have my scale out from measuring the flour (hint hint), I weigh the dough in its entirety, ask my Google assistant what that number is divided by 6, and then eyeball equal amounts to start. I weigh each section, then divide the dough between them until they are fairly equal.
Do I ever get them exact? No, I definitely don’t, so please don’t feel like you have to obsess over getting them EXACTLY the same weight. I aim for anywhere between 4-6 grams difference and call it good.
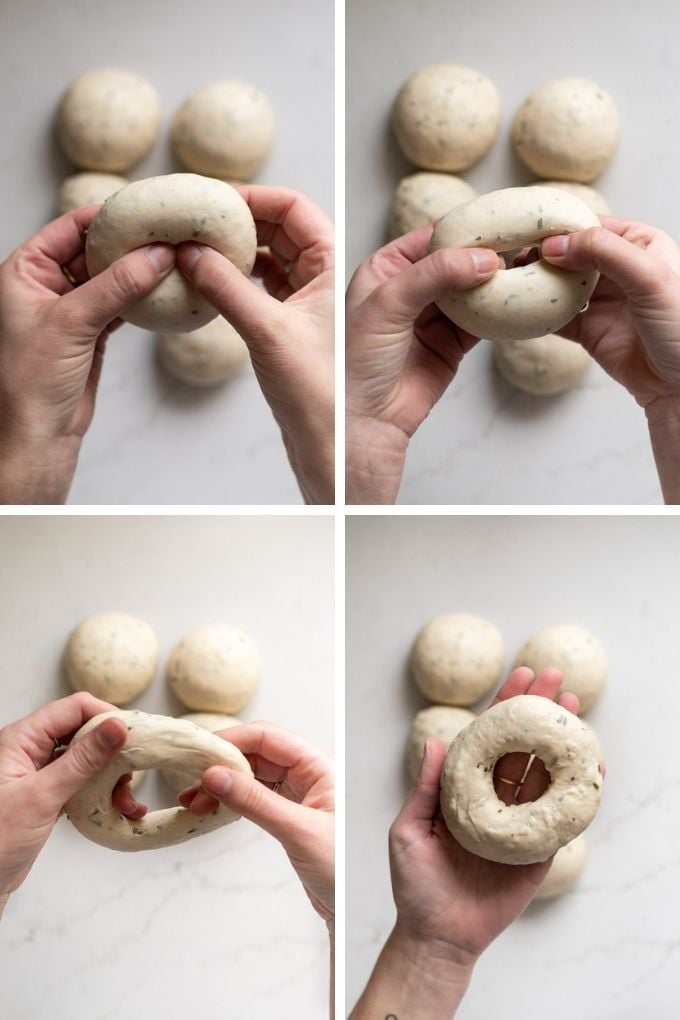
Once the sections are divided out, you will form balls. Forming the balls is our first step to shaping the dough, and it’s going to help create tension on the top and help the bagels keep their shape.
Pinch the edges of the dough down, towards the center on the “bottom”, pinching them together as best you can. This is the start of our ball and may look like an upside-down teardrop at this point. Remember, see the video for reference as needed.
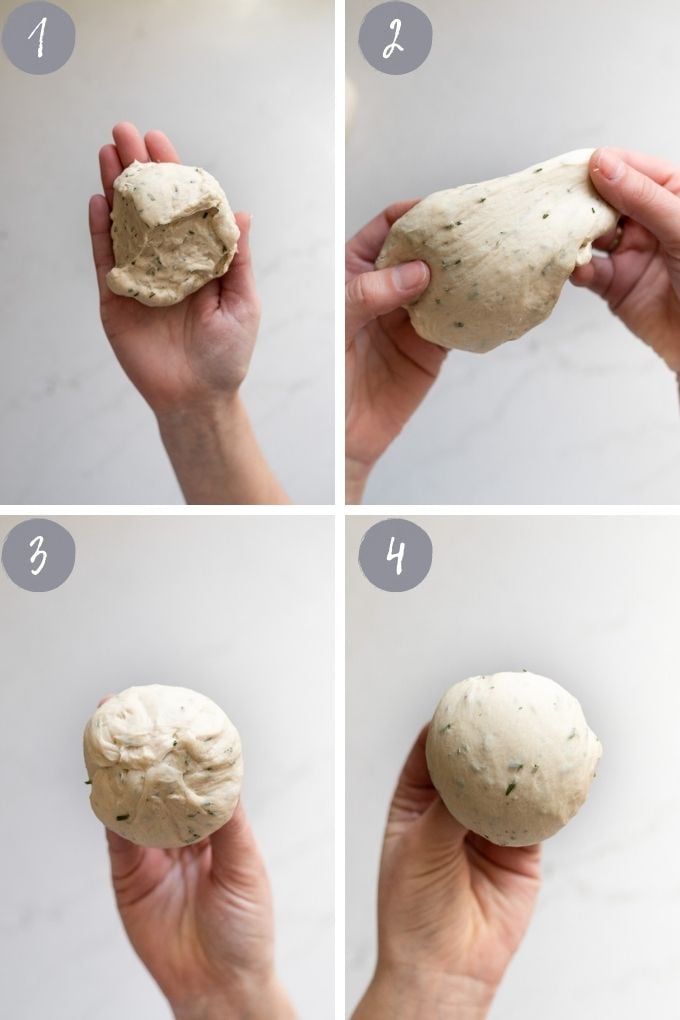
Then, place the “bottom” where you’ve gathered the edges on the counter. Make a large ‘C’ shape with your hand, kind of like a claw, and place it over the dough ball.
Quickly move your hand over the dough ball in a circular motion. You’ll notice the ball moves with you and you can see it shaping into a ball and forming a smooth top.
Once you’ve done this for 15 – 30 seconds or so (I always tend to go on the longer side to make sure it’s ready), set the ball aside and continue with the remaining ones.
After all the balls have been formed, cover with your damp towel and let them rest for 10-15 minutes before shaping further.
Step 6: Shape the Bagels
Before you dive into shaping the bagels, it will be helpful to prepare a large baking sheet with parchment and a spray of oil.
Spraying the parchment paper with a bit of oil ensures that the bagels don’t stick at all after the overnight rise. The last thing you want is to be fighting dough off of the paper and ruining your beautiful bagel shapes.
Ok, now to shape those babies!
There are two primary ways to go about shaping the bagels. My favorite, and the way I’ve found to be most effective and fool-proof, is the “thumb way”.
Take the rested dough ball and gently press your thumbs into the middle of the ball, creating a hole.
Gently stretch out the dough from the inside of the hole, moving it in a circular motion until the bagel shape has formed and is approximately 4 inches in diameter.
The second, more finicky way (in my opinion) is to take each section and roll it out into a rope that is approximately 9 inches long. In this method, use more pressure at the end of the rope so they are tapered.
Place one end inside your fingers, and wrap the other end around to meet it, overlapping the two about an inch and rolling and pressing the edges together.
If you’re still reading and have made it this far, you can check out what happened when I tried to show you the rope method in my one very poor-looking bagel in the video. When you see it, let me know (and I’ll know you’re a super reader ready to excel at bagel-making!).
That’s your evidence, that I, for whatever reason, don’t do the best at the rope method. Play around and see which method works better for you.
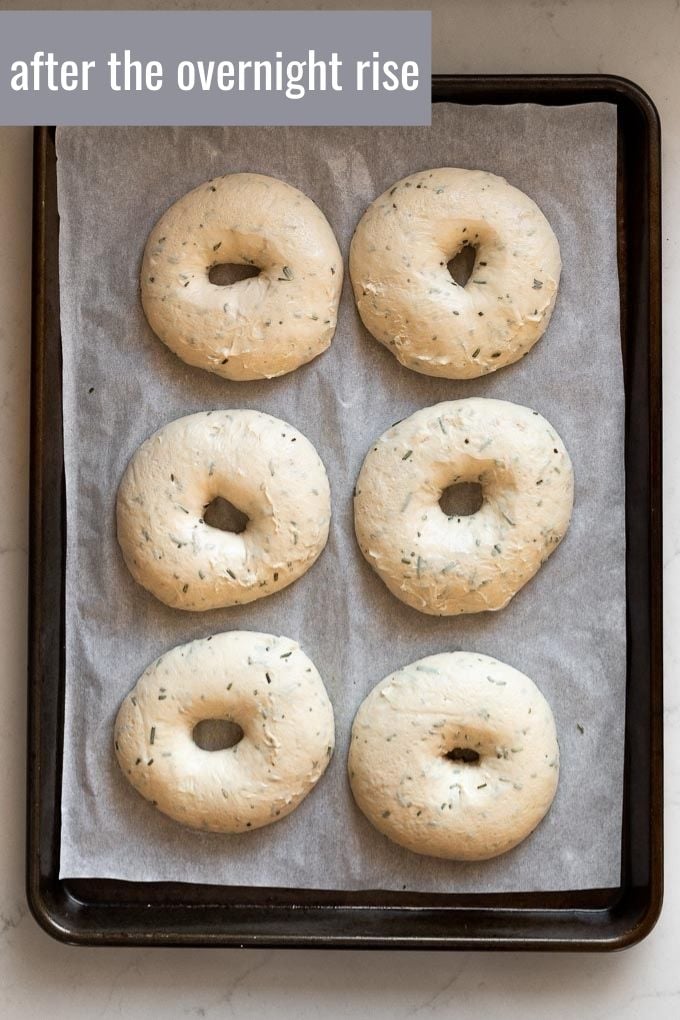
Once you’ve shaped the bagels and they’re on the baking sheet, cover them with plastic wrap and then a damp towel on top.
Step 7: The Overnight Rise
The overnight rise allows the bagels to slowly ferment, which means it’s where the flavor develops and helps with the bubbly texture in the bagels. It’s honestly going to give you the best outcome.
Can you skip it? While I don’t personally recommend it, yes, you can, just let the bagels rise on the counter until they’re a little less than doubled in size and puffy.
Simply place the covered baking sheet in your fridge, in a safe space where nothing will be set on top of the rosemary bagels, and leave them in there until the next morning.
Step 8: Preheat the Oven
Why would I bother writing this step out in the notes? Because it’s not just about preheating the oven. You should also take the bagels out of the fridge at this point to allow them to come to room temperature.
Don’t move on to the next step – boiling the bagels – with cold bagels. They need to be at room temperature for best results.
Preheat the oven to 500°F to get it piping hot in the meantime. Then, when it’s time to bake, lower the temperature to 450°F.
Step 9: Boiling Rosemary Bagels
Boiling bagels is quite common in the bagel world, but a concept that took me a minute to wrap my head around. You too? Let’s take a look at it.
First thing: it’s not just boiling the bagels in water. Usually, b is added to the water, although there are substitutions like in this case, honey, maple syrup, or even baking soda. I use honey because I always have it on hand (all about using non-obscure ingredients when possible!) and it’s always achieved good results for me.
There are a couple of reasons for boiling the bagels in one of these mixtures. First and foremost, it helps create the chewy outer layer – or crust, if you will – on the bagels. It also helps to give it a nice golden sheen.
Be sure to bring the water to a complete boil before adding bagels, and do not crowd the pot when adding them. My stockpot allows for about two bagels in each boiling batch. After each batch, be sure to let the water return to a full boil before adding more bagels.
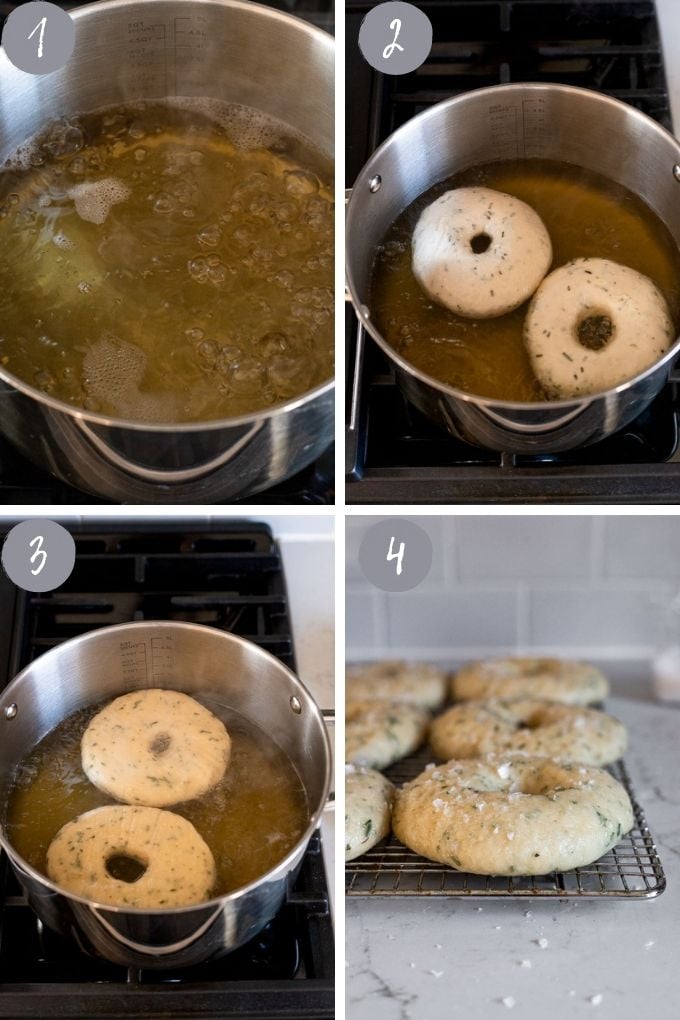
How long? The sweet spot for boiling times is about 30 seconds on each side.
You can go up to about 45 seconds on each side if you want. Keep in mind, the longer the bagel is boiled, the more the crust will form, which means the bagel won’t rise as much in the oven because it won’t have as much space. Think of the crust as a jacket – if it’s too tight, the bagel dough inside can’t move as much. This would be ideal if you like more dense, flat bagels.
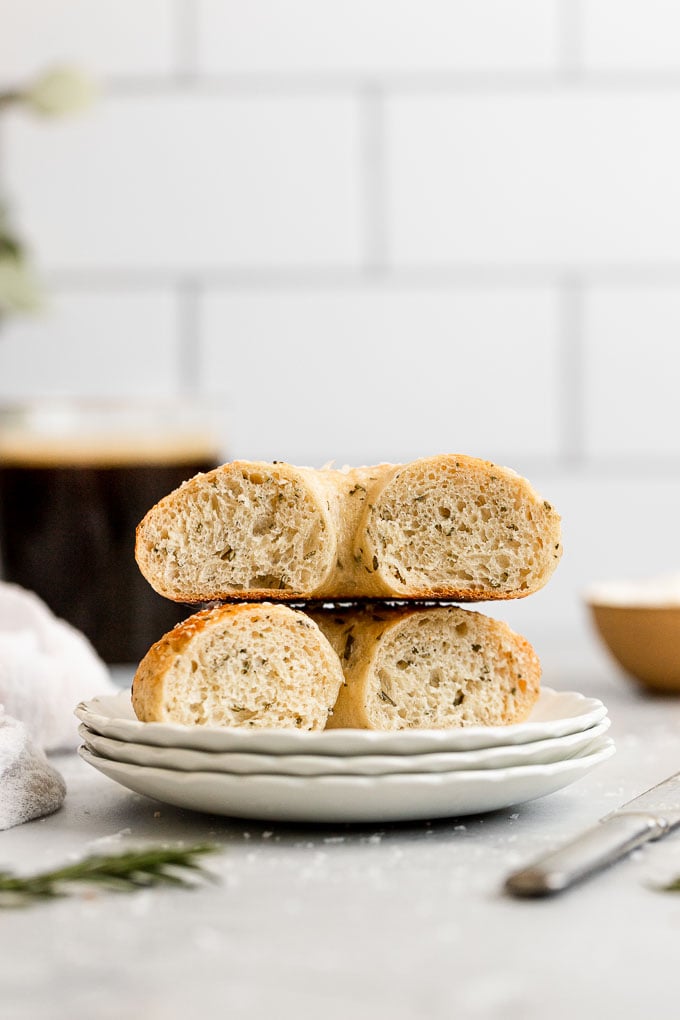
Boiling the bagels for about 1 minute total creates a beautiful chewy golden crust, and still allows the bagel to do quite a bit of rising in the oven, resulting in a soft, pillowy bagel inside and a chewy crust.
Don’t forget to flip the bagels so that each side gets the golden treatment – I find a ‘spider strainer’ works best (affiliate link to the one I have).
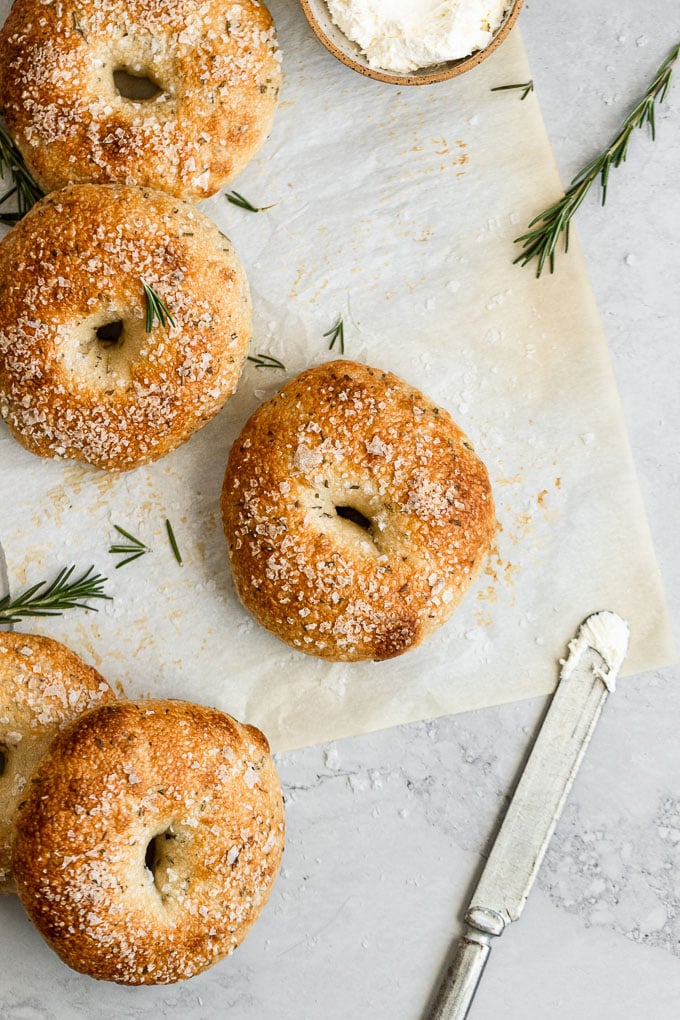
Remove the bagels from the water and place them on a cooling rack to allow any excess water to drain off. Sprinkle flaky sea salt (or coarse kosher salt if you don’t have any, then go get some flakes, friend!) on the warm bagels.
Try to be efficient throughout the entire boiling process, as it’s best if the bagels go into the oven while still warm from the boil to allow for the best oven rise.
Step 10: The Bake
Remember to reduce the oven temperature to 450°F once you put the bagels inside. Then, bake them for 15-20 minutes until the bagels are golden brown. Depending on your oven, you may want to turn the pan halfway through the cooking time.
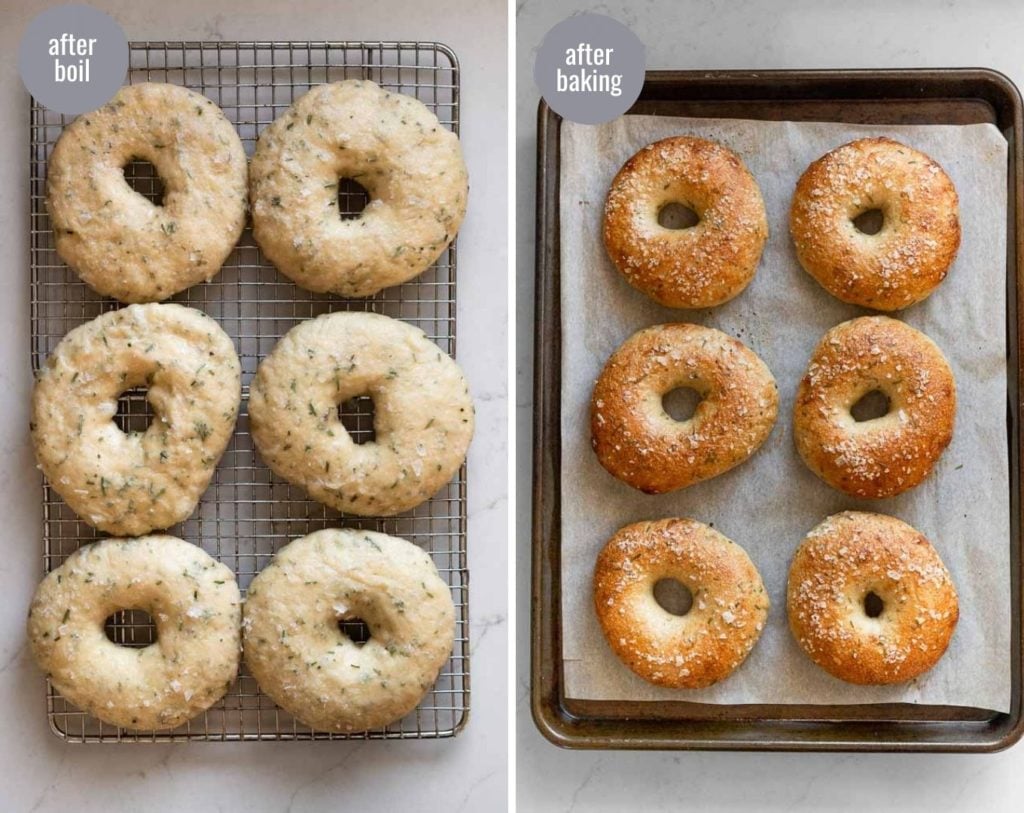
Once they’re done baking, transfer the bagels to a cooling rack and let them cool for at least 15 minutes before cutting into them.
This allows the crumb to set up, otherwise, when you cut into it, it will be gummy. Trust me: I know the waiting is the hardest part.
Frequently Asked Questions
Do I have to use bread flour? Can I use all-purpose flour? High gluten flour is best, and bread flour is the most common higher gluten flour. For the classic texture, chew, and tight crumb, definitely stick with bread flour. You can make them with all-purpose flour in a pinch, but the bagels just won’t quite have that chewy texture.
Is there a way to see if my bagel dough is ready? If you’re curious if your bagels have risen enough, there is a float test to see if they’re ready. First, they should have about doubled in size from their initial shaping and they will feel lighter. You can place the bagel in a bowl of water, if it floats, it’s ready to proceed with boiling and baking. If it sinks, let it rest longer. Some people do recommend just doing this with a little bit of dough instead of the whole bagel, but I find that to ruin its shape.
Can I make different kinds of bagels with this recipe? Absolutely! If you omit the rosemary, they easily become salt bagels with flakey sea salt on top. Make them into everything bagels with everything seasoning on top (again, omitting the rosemary to do so). Add in some freshly ground black pepper for a more savory take. We have also used the dough to make asiago cheese bagels with jalapenos on top.
How should I store leftover bagels? What is this leftover thing you speak of? Just kidding…kind of. If you’re going to eat them within a few days, store the bagels in an airtight container at room temperature – I love Stasher bags for this reason (and more!). Note: the salt will lose its classy flaky crunch once stored.
What about freezing? They freeze wonderfully! I recommend slicing the bagels before freezing, that way when you’re ready to eat them, you can just pop them straight into the toaster to thaw out.
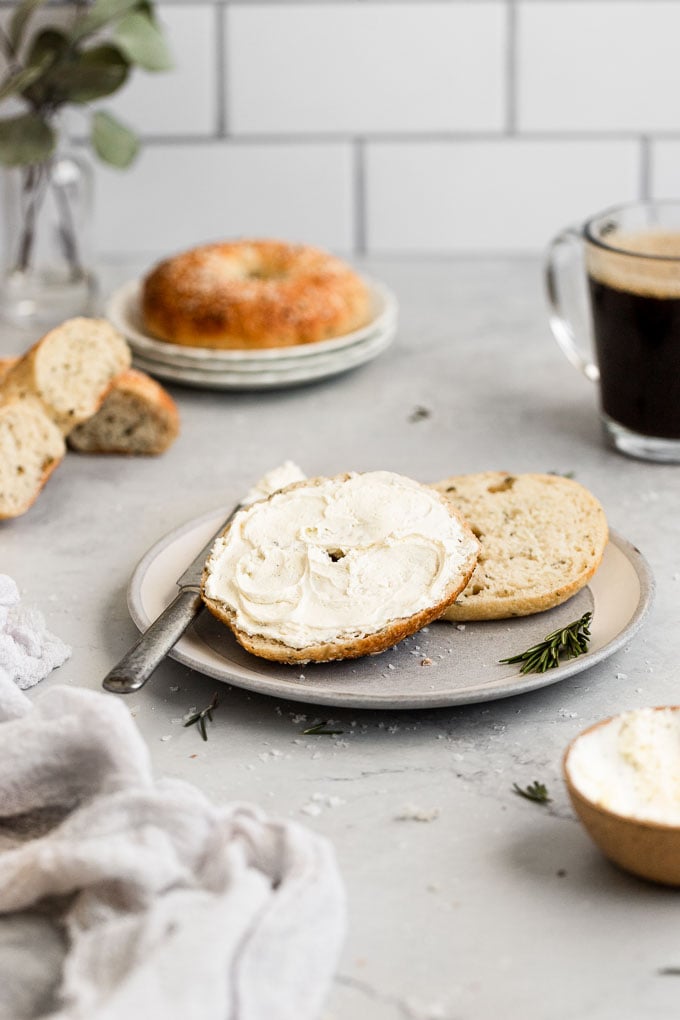
Love bagel sandwiches? Try a Romesco Bagel Sandwich or serve Rosemary Bagels alongside a Burrata Breakfast Board!

Get the Recipe Rosemary Bagels
Ingredients
- 1 ¼ tsp (4 g) instant active yeast*
- 1 Tablespoon (16 g) brown sugar
- 1 ¼ cup warm water, 100°-110°F/38°-43°C
- 455 grams bread flour*
- 2 Tablespoons (10 g) fresh rosemary (5-6 sprigs), finely chopped
- 2 ½ tsp (14 g) kosher salt
- 2-3 quarts of water, for boiling
- 2 Tablespoons honey*
- Sea salt flakes, for topping
Instructions
- Proof Yeast: In the bowl of a stand mixer, with a bread hook attachment, add yeast, brown sugar, and water. Stir on low until combined; let sit about 5 minutes until foamy.
- Mixing: Once the yeast has proofed, add the properly measured flour, rosemary, and salt to the mixing bowl with the yeast. Stir on the lowest setting of your mixer until the ingredients start to combine. Then, increase the speed to 2-3. As the dough comes together, allow the bread hook to knead the dough for 3-6 minutes. A smooth ball will have formed, and it should have "cleaned" the bowl. The dough will feel tacky, but should not be stubbornly sticky. If it is excessively sticking to your hands, add 1 TBSP of flour at a time until fully incorporated.
- First Rise: Transfer the kneaded dough to a clean mixing bowl. Cover with a damp towel and place in a warm environment to rise until doubled in size, approximately 1 ½ hours (time may vary depending on the yeast you used – instant yeast will likely rise quicker, and active will likely take longer – and the temperature of your home).
- Once the dough has doubled in size and is puffy and soft on top, deflate it and transfer to an unfloured countertop workspace. Use a kitchen scale to divide the dough into equally weighted sections (it's ok if they're not perfectly exact!).
- Shaping Part 1: Take one section at a time and form it into a ball. Do so by pulling the edges of each section down, gathering at the bottom, into a somewhat upside-down teardrop shape. You'll notice the top is beginning to look more like a ball when you do this. Once this teardrop/semi-ball shape is formed, place the bottom directly on the countertop. Make your hand into a claw shape, like a C with your fingers spread apart, and place it over the ball. Quickly move your hand around in a circular motion, bringing the ball with you, allowing the counter to also pull the dough, creating tension across the surface. Once the ball has formed, continue on with the rest of the sections. Let the dough balls rest, covered with a damp towel for 10-15 minutes before proceeding to shaping.
- While the dough balls rest, prepare the baking sheet by placing a piece of parchment paper on the bottom, then spraying it with oil. This ensures the bagels will not stick when you remove them the next day.
- Shaping Part 2: To form the bagels, take one of the rested dough balls and place your thumbs in the center and poke a hole, then pull out to stretch the dough into a bagel shape. Continue gently stretching the dough until you've reached around a 4-inch diameter. Place the shaped bagel on the prepared baking sheet and continue until all bagels are formed.
- Cover the bagels with plastic wrap and then a damp towel. Place in the fridge and let them slowly ferment and rise in the fridge overnight (12-18 hours).
- The next morning: Remove the bagels from the fridge approximately 1 hour before baking to allow them to come to room temperature. In the meantime, preheat the oven to 500°F and prepare the water for boiling.
- The Boil: Add the water to a large stockpot and stir in the honey. Bring to a full boil before adding the bagels (remember, make sure the bagels are at room temperature at this point). Add a couple of bagels at a time, depending on how much your pot has room for, being sure to not overcrowd the pan. Keep the water at a full boil, and boil on each side for 30 seconds to 45 seconds (around 1 minute total). Continue until all bagels have been boiled, letting the water return to a boil before adding the next batch.
- Once you remove the boiled bagels from the stockpot using a strainer, transfer them to a cooling rack and sprinkle them with sea salt flakes immediately.
- Replace the old parchment paper with a new sheet and transfer the boiled bagels to the newly prepared baking sheet. Place the bagels in the oven and reduce the oven temperature to 450°F. Bake the bagels for 15-20 minutes until golden brown. You may want to rotate the pan halfway through, depending on your oven.
- Let the bagels sit for at least 15 minutes before slicing (torture, I know!). This will ensure the crumb is set and they aren't a mess when you cut into them. Spread on your favorite bagel toppings and enjoy!
Notes
- Yeast: you can use either instant active yeast or active dry yeast for this recipe. The rise time may vary slightly (shorter for instant yeast).
- Bread Flour: The original recipe called for 3 1/4 cups of flour. However, the reality was more because of the inaccuracy of measuring flour using volume. I highly encourage you to weigh the flour.
- Honey: you can also use malt barley syrup, molasses, or baking soda.
- Same Day Baking: The flavor won’t be as developed, but if you must bake them the same day, let the formed bagels rise in a warm area for 1 – 1 1/2 hours until doubled in size. Following the rest of the directions as written.
- Storage: Store bagels in an airtight container at room temperature for 2-3 days; do note the salt will soften. Want to freeze them? Slice the bagels, wrap, and freeze them in a sealed container, then pop the slices in the toaster when you’re ready to enjoy.


Girl these look seriously professional! Rosemary bagels are one of my very favorite kinds – especially with that flakey sea salt on top. TRYING ASAP!
Thanks, Liz! The flakey sea salt is definitely next level!
The salt doesn’t increase when I use the scale up option for 2x or 3x – didn’t notice this until after I made my dough just now. Hope it’s salty enough, I made a double batch.
That’s super weird, thanks for letting me know, I’ll definitely be checking into it (it’s happening on my end too!). The salt flakes on top will help. 🙂
Looks like I got it resolved, Meaghan. Thanks again for letting me know, I’m so sorry it didn’t work for you!
I’ll be baking the bagels in the AM – fingers crossed they taste okay with half the salt in the dough! Definitely putting salt on top either way lol
These are the BEST homemade bagels I have ever eaten. They’re not difficult to make, and everything tastes better when you make it from scratch! It works well that rosemary is the only herb I didn’t kill off this summer. 🙂
Everything DOES taste better when made from scratch, doesn’t it?! 🙂 I’m so glad you enjoyed these, they’re one of my favorites! Thanks for commenting!
These are perfect for a day of quarantine baking!
100%! I plan to get baking ASAP!
Outstanding recipe.
I had high expectations from reading the short list of ingredients that typically pare well, and the straightforward instructions. And my expectations were exceeded by the final result.
Fresh rosemary from the garden was a perfect flavor for the dough. Complemented with lemon/thyme Aegean sea salt flakes for the topping.
Thanks!
I’m so glad you enjoyed, Jeffery! Those sea salt flakes sound fabulous!
I made these yesterday and they are so good. The over night rise was worth the wait. Thanks to COVID-19 and the Stay Home order, I don’t have to share with anyone! The rosemary/salt combo is amazing! I did not master the art of a pretty bagel (mine looked like they were shaped by a toddler), but in the grand scheme of things it’s nbd. I will definitely make these again!
Not having to share is the best part of this ordeal 😉 I’m so glad you enjoyed them, Molly!
Currently making these, my dough didn’t come together into a ball when using the dough hook. It stayed flakey and separate, I added a little more water and it helped some but I still had to take the dough out and knead by hand. It is very tough but tacky. I put it in the oiled bowl to see if it rises. Any ideas as to why the dough didn’t form in the mixer?
Hi Jessica – sorry to hear it didn’t come together in the mixer! How long did you mix/knead it in the mixer? It sounds like there possibly wasn’t enough liquid (which is why I assume you added more :)), did you start with 1 & 1/4 cup of lukewarm water? Another thought, there could have been too much flour. How did you measure out the flour? I recommend scooping the flour into the measuring cup so it’s not packed in. Hopefully we can figure it out together!
I think either the water was too hot or there was too much flour. Going to try it again today to see if I can figure it out!
These were LOVELY!
I made a batch (took your advice and let them rise overnight) and they turned out beautifully; squishy and soft with a crusty brown exterior which complements the muted green sprigs of rosemary scattered throughout the bagels.
Thank you for sharing this wonderful recipe.
I’m so glad you enjoyed them! There’s nothing like homemade bagels! Thanks for commenting, Kelly!
by far my favorite bagel recipe around. I would recommend using olive oil when you let the dough rise, go a little heavier on the rosemary and to sprinkle salt on the top. These are just amazing,. I even tried to freeze the dough once they’re in bagel shape, and it worked great to thawing them out the night before and cooking them later on.
Thanks so much, Jennifer! LOVE the freezing tip! Now I’m wondering why I haven’t tried that yet… bagels anytime I need them! Haha!
These are the most incredible bagels ever. Store bought can’t beat these. Even artisanal bakeries can’t beat these. Literally the perfect recipe. I cannot live without this recipe!!
Thank you so much, Meaghan! I’m so glad you love them as much as I do! 🙂
Hi Diana – letting the bagels rest in the fridge overnight develops the flavor of the dough, since it allows the dough to slowly ferment. You can absolutely skip this step if you’d like, as noted in the recipe card. The boiling process does help them puff up, too. Let me know how they turn out next time!
I’ve made these three times, and every time they get better and better! Super simple, great to freeze…. a home run!
Yay! I’m so glad you love them. I love making sure I have some on hand in the freezer, too! 🙂
PERFECTION! perfect weekend breakfast. Absolutely wonderful. I followed the recipe exactly and wouldn’t change a thing.
I’m so so glad you enjoyed them! They truly are the perfect weekend breakfast. Thanks, Samantha!
Oh sweet Jesus, Mary and Joseph in the Garden!!! These are absolutely to die for!!
Easy to follow instructions and a cute video to boot!
You MUST MAKE THESE!!
I will be making these here on out from now on!!
Thank you so much Becca for this amazing recipe!
It’ turned out beautifully fir me with the crunchy exterior and super yummy chewyness inside 🙂
I made sure they were at room temp before boiling them.
The boiling is the trick here folks…don’t skip it.
My Sundays for the rest of the year are complete!
Sherry Lyn! This is the best! Thank you so so much, I’m so glad you enjoyed!
This recipe was so easy to follow and all the care you put into the little details gave me the confidence to give this a try. And wow they are amazing! Savory and soft with the right amount of crunch on the outside. Definitely recommend anyone trying the recipe for the first time read through the whole post to get all your helpful tips. And then watching the video as I went was a great way to make sure I was doing things (especially the shaping) properly. Going to share these recipe with so many people!
Loved these! I used some to make breakfast sandwiches which was fabulous but they are also scrumptious on their own. The recipe was detailed and easy to follow for my first time making bagels! Absolutely will be making these again!
The yummiest breakfast sandwiches! Thanks, Grace, I’m so glad you enjoyed!
Great recipe. I wanted to let people know that I made my dough with a bread machine (I know, the horror but my mixer was in use with something else)! I put in all the ingredients, hit the timer for 1.5 hours and then continued on with the shaping and the rest of the ingredients and they came out perfect!
That’s great to know! Thank you so much, Margaret!
These are fool-proof thanks to Becca’s thoughtful updates and tips. I always struggled shaping the bagels, but now they’re perfect!
I’m so glad everything was helpful! Thanks, Jesse!
This is a fantastic recipe. Bagels were perfect texture and delicious.
So glad you love it! Thanks so much for your review, Elisa!
Can I mix and knead by hand if I don’t have a mixer?
Hi Alexa – yes, you can, it will just take more work. You’ll likely need to knead the dough for about 10 minutes and see how it feels. Let me know how it turns out if you try it!
These look delicious and I can’t wait to taste them! I was wondering if I could wait till the next evening instead of the morning to bake them, or will the extra time be too long?
Hi Haneen! Generally I recommend 12-16 hours to prevent the risk of over-proofing the dough. I haven’t tested 24 hours myself, however, a lot of recipes do go up to 24 hours. I’d recommend keeping the bagels on the bottom shelf of your fridge where it’s coldest, and set it to a pretty cold setting if you can – this will slow the ferment even more and reduce the risk of overproofing. I look forward to hearing how they turn out!
Thank you Becca! Thankfully they stayed cold enough and weren’t over proofed. They turned out amazing, they had such a good depth of flavor. Truly one of the best bagels I’ve had. Will definitely use this recipe as a base recipe for many other bagels I make in the future:)
YAY! I am sooo glad to hear that! Thanks, Haneen!
This recipe looks delicious and like something I could easily tackle but I’m a bit worried about the oven temp. My oven only goes up to 450 (it’s a small convection oven/microwave combo unit for space-saving), and that 450 is likely more around 440. Any idea how I can get around needing the high heat or should I just accept that bagel making is not in my near future?
Thanks in advance!
Hi Ellie! Great question…I think you’ll be ok, especially if it’s convection. The outside of the bagels just may not be quite as chewy with that crisp texture. I’d recommend just baking them a few minutes longer if anything, just keep an eye on the color to reach a beautiful golden brown. Would love to hear how they turn out!
I just made these and oh my gosh, these are so good. Crackly, crispy exterior with chewy insides. It is absolutely fantastic with the rosemary and sea salt flakes I could eat them plain. Made bagels for the first time and Becca’s guide and video was really helpful!
I’m so glad to hear you loved them! I’m also so glad the guide and video were helpful 💃 thanks, Kel!
The bagels looked great until I put them in the water and they turned all wrinkled and deflated. Any ideas?
Hi Kat – if this happens they likely over-proofed. I’d recommend a shorter rise time and/or cooler temperature depending on your situation. Hope this helps!