
For as long as I can remember, Oreo cookies have been a favorite of mine. And how could they not be?! With those crisp chocolate cookies and creamy vanilla frosting, it’s a match made in dessert bar destiny.
In my younger years, we would make the boxed version of Oreo cheesecake bars from Jell-O, and I truly couldn’t get enough of them, with the creamy filling and thick Oreo crust.
But nowadays, I make these homemade oreo cheesecake bars, with just a few simple ingredients (6 in total) and all the extra cookies on top that my heart desires. It’s just as easy, and if I do say so, much, much more delicious. Little Becca is happy beyond belief, and you will be too once you bake these bars…er, don’t bake, just make!
This no-bake cheesecake recipe is not only the best for childhood-like cravings, but will quickly become a favorite at summertime potlucks, BBQs, and dinner parties when you need a quick and easy no-bake dessert bar!
6 Simple Ingredients
Clearly there’s a lot to love about this recipe, and it’s not just that it’s so easy to make. It only requires 6 simple ingredients!
- Oreo Cookies: you can’t have a delicious Oreo-filled dessert without the Oreos themselves. You can use another brand of similar sandwich cookies, but I go with the name brand here for the most authentic flavor.
- Butter: to bind together the crust
- Cream Cheese: even though it’s a no-bake cheesecake filling, it wouldn’t be complete without cream cheese. Be sure to bring the brick to room temperature so it’s easy to whip up.
- Heavy Cream: for homemade whipped cream, it gives volume and lightness to the cream cheese filling.
- Vanilla Extract: just a little for flavor.
- Powdered Sugar: again, a little for sweetness. There’s not a lot, because the Oreos themselves are sweet, and we don’t want to mask the tanginess of the cream cheese. Go ahead and use granulated sugar if you need to, just be sure to whip it well into the cream cheese so there is no graininess.
Let’s Make Oreo Bars!
There are just 3 simple steps to this recipe, and the hardest part is waiting for them to set up in the fridge before enjoying them. Of course, I won’t be the one to stop you if you decide to skip that though (just know they will be quite soft).
Please see the full recipe card below for all the details!
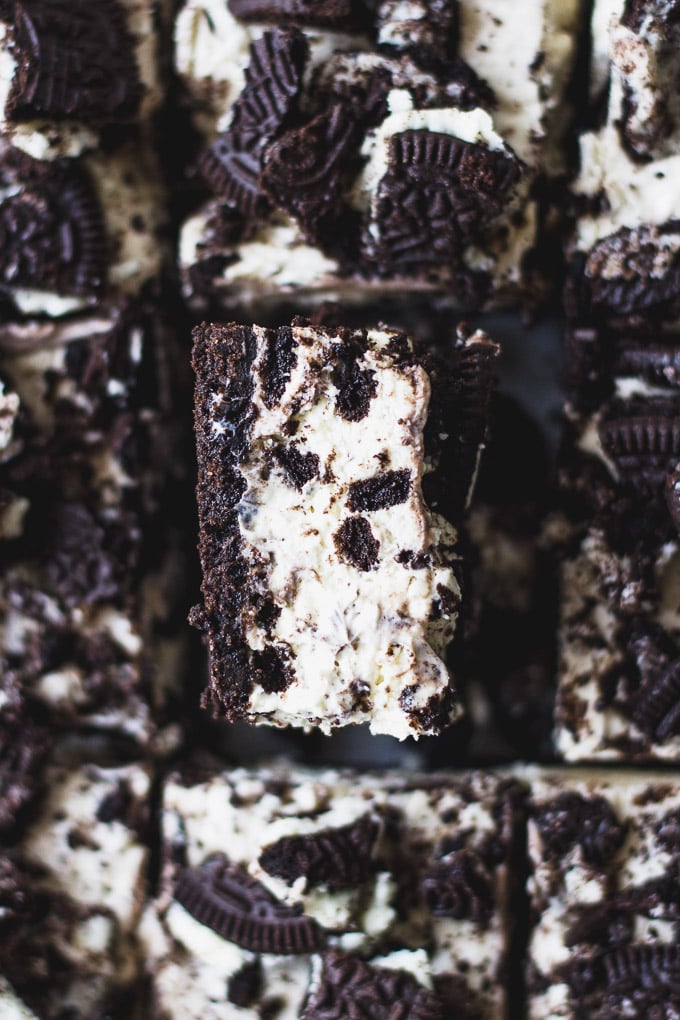
Make the Oreo Crust
Making an Oreo crust is super simple with just two ingredients! First, melt the butter in a microwave-safe dish.
Then, pulse about half of the Oreos in a food processor until a crumb forms. Then, while continuing to pulse, drizzle in the butter until fine crumb forms and they are all moist. Use a spoon to combine the crumbs and butter if they’re sticking to the bottom of the food processor bowl.
Pour the buttered crumbs into a 9×9 baking square baking dish (you can also use 8×8) and press them into an even layer. You want to press them into a firm layer, but not too hard or you will have a difficult time cutting the bars.
Use the back of a measuring spoon to help you evenly press the crust.
Pop the pan in the fridge to help the crust set up while you move on to making the filling.
Prepare the Filling
There are two steps to preparing the filling: making the whipped cream and then fluffing the cream cheese.
Place a metal bowl in the fridge. This will be your whipped cream bowl, and chilling it beforehand helps the whipped cream set up faster and keeps it cold.
With that out of the way, it’s time to whip the cream cheese. Use a hand or stand mixer to whip the cream cheese with a little bit of sugar, until it is light and fluffy. Adding air into the cream cheese both helps with the finished texture of the filling, and makes it easier to combine into the whipped cream.
Speaking of…make the whipped cream next. In the chilled bowl, add the heavy cream, vanilla extract, and remaining sugar. Use the same hand or stand mixer and beat the cream until peaks form; this will take several minutes.
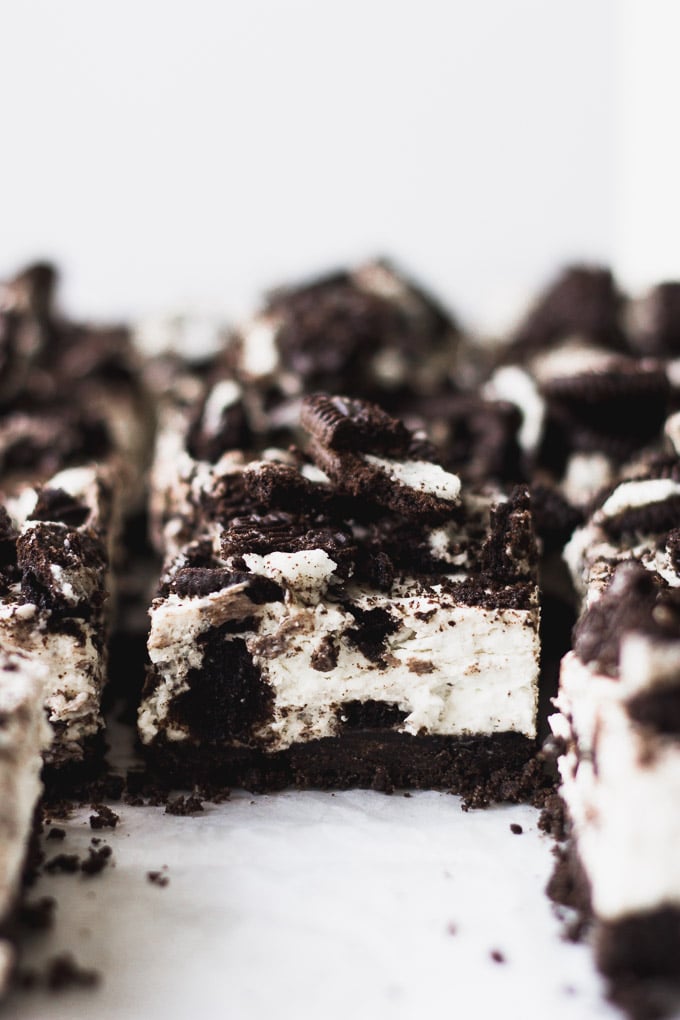
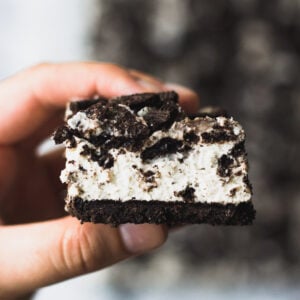
Fold the whipped cream into the cream cheese until the two are combined. Don’t work it too hard or fast, or you’ll deflate the whipped cream. Fold in the crushed Oreo cookies.
Spread the filling on top of the crust, then chill for at least an hour before cutting into the bars.
Top & Serve
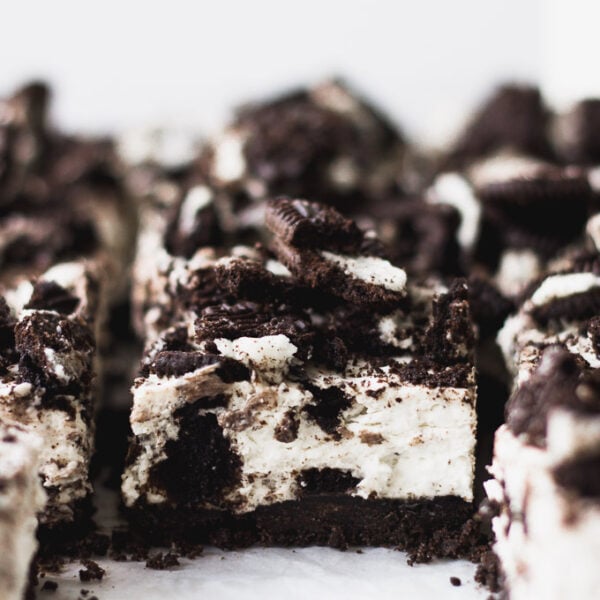
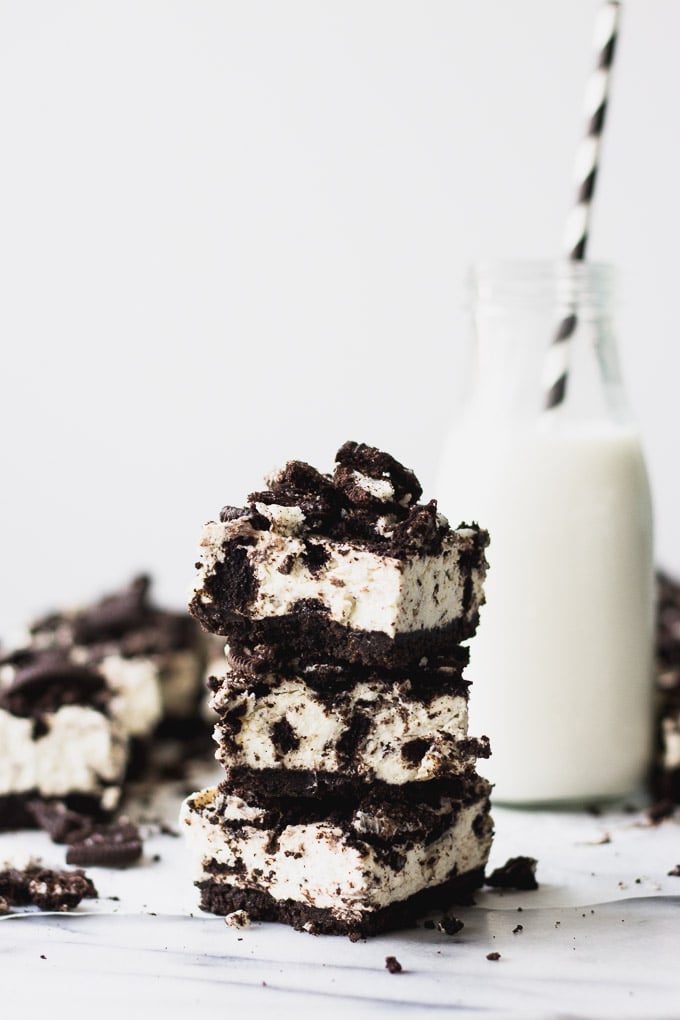
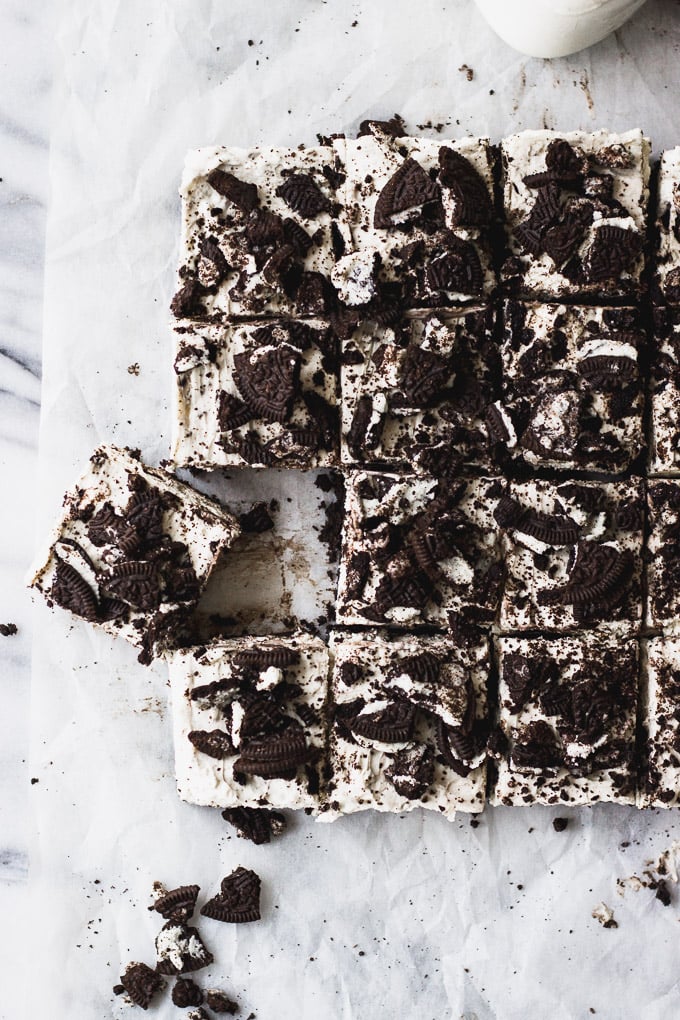
Once the bars have had a chance to set up and chill, top them with the remaining crushed Oreo cookies (measure with your heart here…), then slice the bars.
You can cut them into 9 gigantic-sized bars, or 16 smaller bars. I bet you can’t guess what I like to do…
Enjoy immediately, then store the remaining bars in the fridge.

How to Crush Oreo Cookies
If you’re wondering what the best way to break up Oreo cookies is, there are a few ways to do this efficiently.
- Use a plastic bag, add the cookies in it and seal it up, then use a spoon or rolling pin to crush the Oreos into the desired size.
- Pulse in a food processor, just be careful to not pulse too long, or you’ll end up with a fine crumb that we only want for the filling!
- Use a bowl or another container, add the Oreos, then use a spoon or fork to break apart the Oreos.
- Use your hands! The best kitchen tool…wash your hands then crush the cookies into chunks between your fingers.
What Else Can be Made with Oreos?
Obviously, these Oreo Cheesecake Bars are an excellent option when it comes to making desserts with Oreos, but luckily for us it doesn’t stop there. Here are a few more ideas:
- Chocolate Crunch Ice Cream Pie (or Cake)
- Easy Oreo Balls
- Oreo Stuffed Red Velvet Brownie Cheesecakes
Oreo Cheesecake Bars: Frequently Asked Questions
Store Oreo Cheesecake bars covered, or in an airtight container in the fridge for up to 3 days. When you’re not enjoying the bars, they should be in the fridge to retain their texture; the filling can melt quickly in the heat.
Yes! This recipe is a great option for making a day in advance because that allows the filling to be fully set up before serving. Just be sure to reserve the Oreos for the top and add them right before enjoying so they don’t become soggy in the fridge.
I haven’t actually tried freezing them myself, because we enjoy them too quickly! My instinct says that the filling won’t freeze well, but I’ll be sure to make them again asap (twist my arm) to test it. In the meantime, if you give it a try be sure to let us know in the comments!
Did you make this recipe? Please leave a star rating and review in the form below. I appreciate your feedback, and it helps others, too!
Get the Recipe No-Bake Oreo Cheesecake Bars
Ingredients
- 44 Oreo cookies, divided
- 5 Tablespoons unsalted butter, melted
- 16 ounces regular cream cheese, softened to room temperature
- 2 Tablespoons powdered sugar, divided
- 1 cup heavy cream
- 1/2 teaspoon vanilla extract
Equipment
- 8×8 Square Baking Pan or 9×9
Instructions
- Before starting, place a medium-sized metal mixing bowl in the fridge or freezer to chill (I like to use metal because it stays colder longer). Chilling the bowl helps the whipped cream set up faster.
- Meanwhile, in a food processor, add 28 Oreo cookies. Pulse until a coarse mixture forms. Add the melted butter and continue pulsing until fine crumbs form and mixture is wet. Transfer the crumbs into a 9×9 baking dish. Press down into an even layer, using the back of a measuring cup to help compact the crumbs. Place the crust in the fridge for at least 15 minutes while preparing the filling.5 Tablespoons unsalted butter
- In a large mixing bowl, cream together the room temperature cream cheese and 1 tablespoon powdered sugar. Whip for 2-4 minutes until light and fluffy. Set aside.16 ounces regular cream cheese
- Whipped Cream: in the chilled bowl, add the heavy cream, vanilla extract, and the remaining 1 TBSP sugar. Use a stand or hand mixer to beat on medium-high for approximately 2 minutes until firm peaks form.1 cup heavy cream, 1/2 teaspoon vanilla extract
- Make the Filling: Carefully fold the whipped cream into the whipped cream cheese. Crush 8 Oreos and fold them into the filling, then spread it evenly across the Oreo crust.
- Place the pan back in the fridge to chill for at least 1 hour before serving. Keep chilled as much as possible for the best results. When ready to serve, crush the remaining 8 Oreos and scatter them across the top of the bars. Then cut into 16 bars, or as many as desired.
Notes
- You can make the bars 1 day ahead of time (just reserve the topped Oreos until serving!).


The hubby & I spent a low key Fourth eating tacos & drinking margaritas at a restaurant down the street from us. It was the perfect way to escape the heat. The only thing that would have made it even more perfect was a couple of these delicious beauties. They look incredible & its hard to believe they are so easy to make.
That sounds like an amazing 4th, Lynn! And thank you – they’re too good if I do say so myself! 🙂
Ohhh my goodnesssss these DO look easy and delicious!! I’m totally down for anything with Oreos ?? We had a super low key Fourth of July this year with the babe, but it was filled with lots of yummy food, of course!
Can you freeze these bars ahead of time and add the cookies on top before serving?
I haven’t tried it, but I do know that cream cheese doesn’t freeze well. It has a grainy consistency once it thaws, which may be masked some by the whipped cream and cookies if you try to freeze it. If possible, I’d say your best bet is to store in the fridge if you make them a day or two in advance and add the cookies before serving.
Yum, yum, YUM! I made these for a Valentine’s Day dessert, and they were delicious! My husband and I had to try a bite an hour after being chilled in the fridge, but we found that they tasted even better the next day. I also appreciated how easy they were to make! I will keep these in mind for future potlucks and gatherings!
Thanks for the extra chilling tip, Cassie! Glad you enjoyed! 🙂
Made this for a Friendsgiving party and subbed gluten free Oreos! Huge hit and my son who is celiac absolutely loved them! Thank you😊
I’m so glad to hear! Thank you, Krystal!
I just made these bars. They are so easy to make. I tasted the filling and it is very delicious. It is chilling in the fridge until tomorrow when my oldest son comes by. It is a surprise treat for him and his family. Thank you for this recipe.
Awesome, what a fun treat for them. I hope everyone enjoys! Thanks so much, Sheryl!
Can this be made in a 9X13 pan?
If you double the recipe, yes! Otherwise, the bars will just be very very thin.
I made this today for my sons birthday. He is an oreoaholic! I made it once before and remembered that it wasn’t quite as sweet as we expected it would be. I added about 1/2 cup of powdered sugar to the cream cheese part and I did make it in a 9x 13 dish and they turned out nicely.
Thanks for sharing, Mandy! You’re right in that they’re not overly sweet, so I’m glad to hear you were able to adjust as needed. I hope he had a lovely birthday!
This recipe is delicious! I made a triple batch and made 2 large trays. It was a hit!
Awesome, so glad to hear it worked to make such a large batch. Thanks so much for taking the time to leave your review here, Samantha!
Not even close to enough sugar. I wish I would have compared to other recipes, as I just ruined my son’s birthday dessert.
I’m sorry they weren’t sweet enough for you and your son. I hope you were able to add additional sugar to the filling in order to remedy this, as it can easily be done.
Could we make them in cup cake paper for and individual servings?
Hi Marji – I think that’s a great idea, and suspect that it would work! Just be sure to press the crust well so it stays in tact. Let us know how it works out!