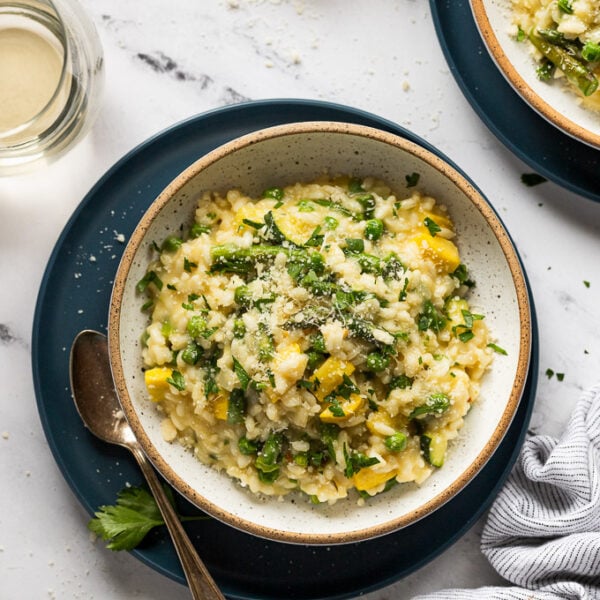

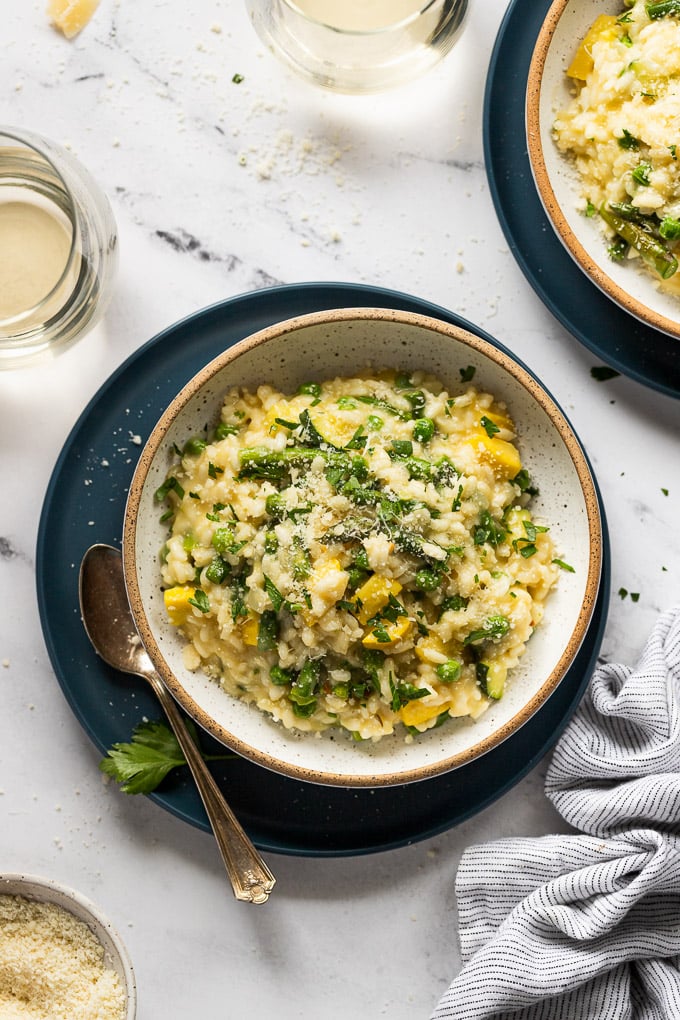
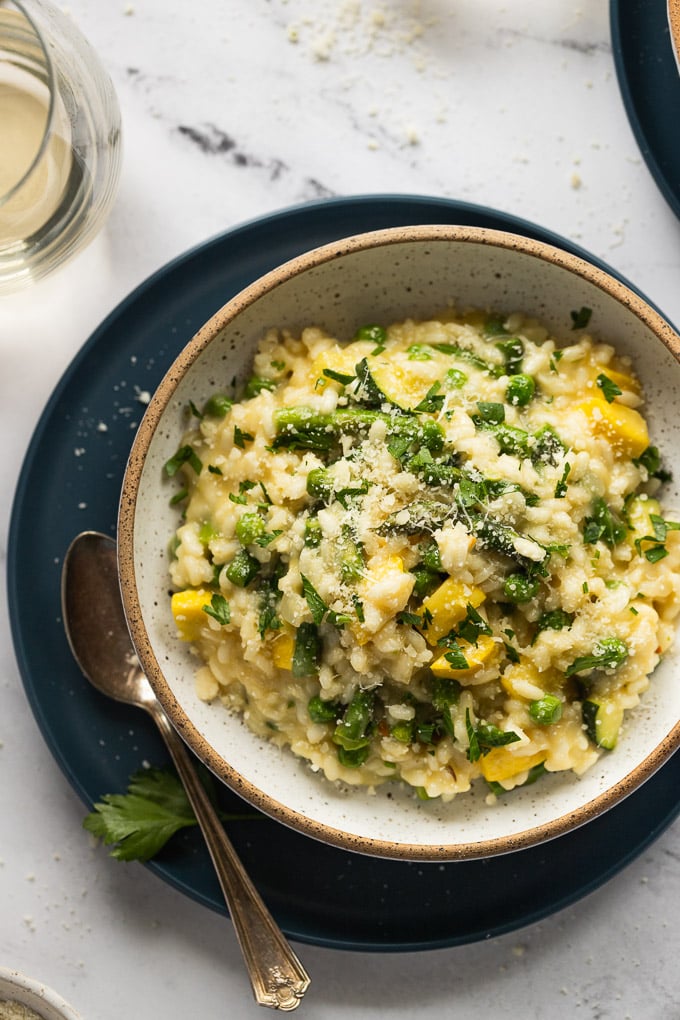
Spring Risotto is a luxurious combination of a creamy, buttery base, with your favorite fresh spring vegetable mix of asparagus, peas, yellow squash, zucchini, and al dente arborio rice. It’s hearty enough to stand alone as a meal, or pairs well with grilled proteins, fish, or extra veggies.
There’s really no better way to transition from winter into spring than with risotto. It’s cozy, comforting, rich, and indulgent, with lightened-up spring vegetables. It delivers all the comfort food vibes while the color and freshness of the veggies remind us that yes, spring is in fact coming. Something that is worth reminding here in Minnesota, when spring isn’t quite…springy.
While homemade risotto gets a bad rap because of the time and attention it takes to make, it’s really not that difficult, and with a glass of wine in one hand and the spoon, you’ll fall in love with the rhythmic process and the delicious outcome. It’s one of my favorite vegetarian dinners for so many reasons.
What is Spring Risotto?
Let’s start with the foundation: what is risotto? Risotto is a Northern Italian rice dish that is made with Arborio rice. It’s cooked by way of adding broth, or stock, in small amounts. As the rice absorbs the liquid, it results in an absolutely creamy consistency that’s unmatched.
Many risotto recipes start with a base of butter, onion, and white wine then finished with parmesan cheese. There are (basically) endless flavor combinations to make with risotto that range from vegetarian risotto to risottos with meat to seafood risotto.
Spring Vegetable Risotto is simply made with a typical risotto base and mixed with fresh vegetables that are quintessential to spring: asparagus, peas, zucchini, and yellow squash. The veggies add a whole lot of texture to the risotto and a fresh brightness that balances out the creamy, indulgent base.
What You’ll Need to Make Risotto With Vegetables
Oh how this spring risotto recipe comes together with the just-right combination of vegetables, butter, parmesan, and stock. Here’s a run down on the ingredients you’ll need:
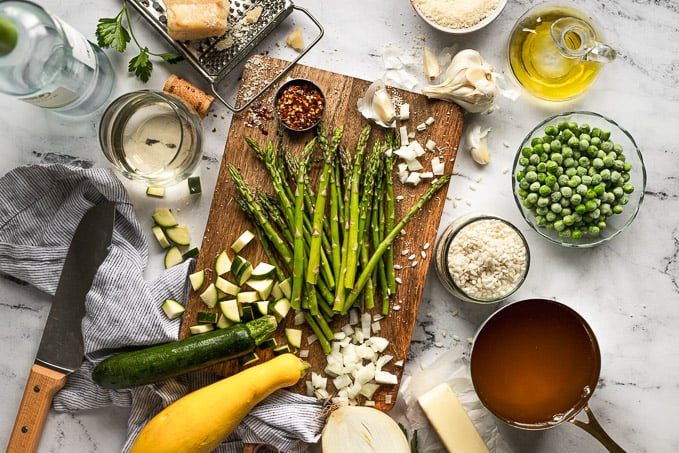
- Olive Oil – used to sauté the onion and garlic to start. You could easily substitute another neutral cooking oil if needed.
- Yellow Onion and Garlic – the aromatic base for the risotto. Sub a leek for the onion to mix it up.
- Red pepper flakes and salt – added as the beginning of layering in seasonings to the risotto. You can easily omit the red pepper flakes or swap in freshly ground black pepper in its place (I’m just a sucker for the chili flakes).
- Arborio Rice – short and fat rice grains that cook up into creamy risotto, with a similar texture to pasta. Find it in the rice aisle of your grocery store.
- Vegetable Stock – the vegetable stock is what the rice soaks up, giving the finished dish loads of extra flavor that wouldn’t be matched with water. If you’re not vegetarian, you could also use chicken stock here.
- The veggies! This recipe uses a mix of fresh asparagus, diced zucchini and yellow squash, and frozen peas. Easily substitute or omit any of the veggies if you need to.
- Butter – added at the end of the cooking process, butter takes the creamy level over the top! It’s luscious and absolutely indulgent in the best way possible.
How to Make Risotto
I mentioned that risotto requires frequent stirring, and while that is true, the stirring is nothing to fret over. Take a deep breath, turn on your kitchen dance party playlist, and enjoy the process!
Start by heating olive oil and adding onion, salt, and red pepper flakes in a large Dutch oven (photo 1). The garlic will go in too because we simply cannot miss an opportunity to add garlic. Let them soften a bit, and then add the Arborio rice (photo 2). Let the rice toast up and absorb any excess oil that remains in the pan (photo 3). When it seems as though most of the oil and excess liquid has been absorbed, deglaze the pan with white wine (photo 4).
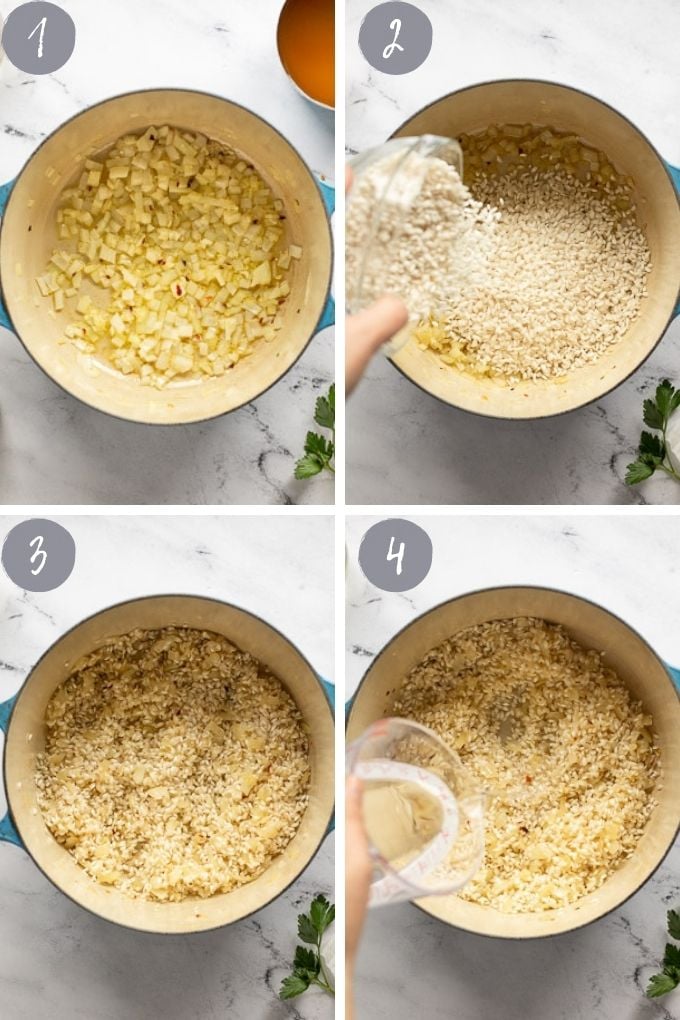
Risotto is often made with white wine, giving it an added depth of flavor and it also is an excellent deglazing liquid. If you don’t want to use white wine, simply substitute additional vegetable stock.
Now comes the stirring you often hear referred to when making risotto. It’s not so bad like I said, and becomes quite relaxing. Stirring risotto is what helps release the starch off of the grains and creates the sought-after creamy risotto texture.
In a small saucepan, warm the vegetable broth and keep it nearby. Take a measuring cup and add in approximately 1/2 cup of broth at a time (step 5). This does not need to be exact. Stir the risotto quite consistently, it needs a lot of TLC to release the starches and arrive at the right consistency (photo 6). Wait for the broth to be absorbed each time before adding more. Once the first addition is absorbed, continue with the process, adding about 1/2 cup of broth at a time, letting it absorb, then adding more.
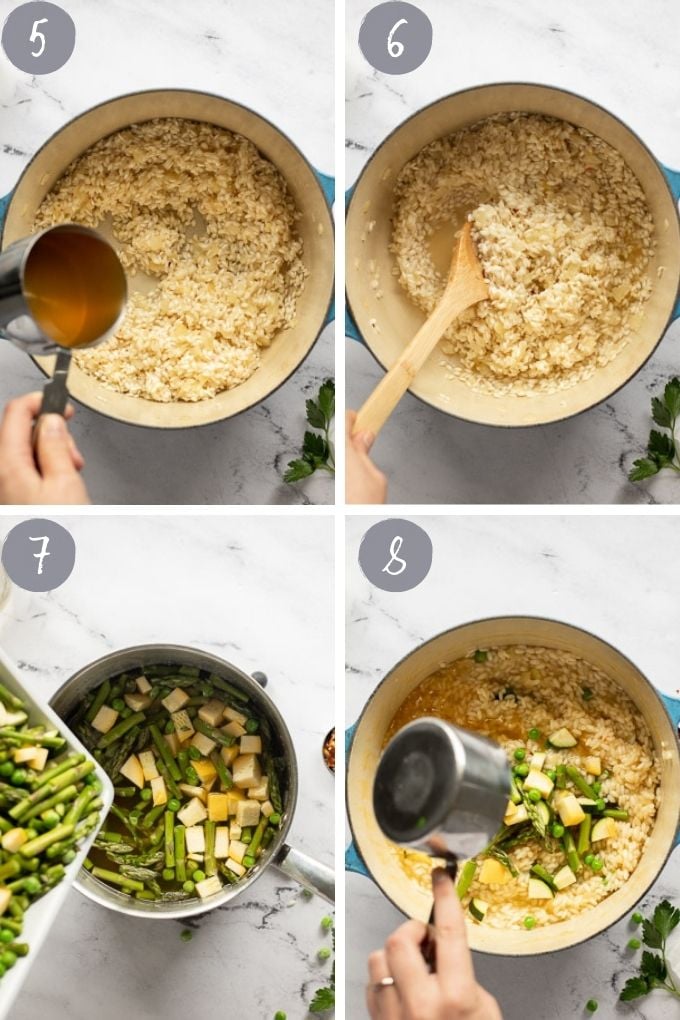
Once you’ve added approximately 4 cups of broth, add the vegetables to the remaining liquid to heat through and become tender (photo 7). As you continue to add broth to cook the risotto, scoop up a generous amount of vegetables each time, too. They will cook both in the broth and finish in the risotto (photo 8).
It’s so important to taste test the risotto so you know where you’re at in the cooking process!
How to Know when Risotto is Done
You will instantly be able to tell if the rice needs more time, as it will be crunchy. Depending on how much of a crunch you get, you’ll figure out how much longer you need to go. A lot of crunch? Quite a ways to go. A tiny bit of crunch (opposed to an al dente bite), you’re getting close, so keep adding the broth bit by bit.
P.S. As you taste test, check the salt levels too. But remember, the parmesan addition is going to contribute to the overall salt level, too.
Add the remaining vegetables to the risotto if the rice is done and they all haven’t transferred yet. However, if the risotto texture is spot on and ready, don’t add any more broth! You want the broth to be completely absorbed once you’re finished. Again, taste test, and if it’s done, stop adding liquid!
Once the risotto is done according to your taste test, stop adding liquid. You may have some leftover vegetable stock; just save it for later!
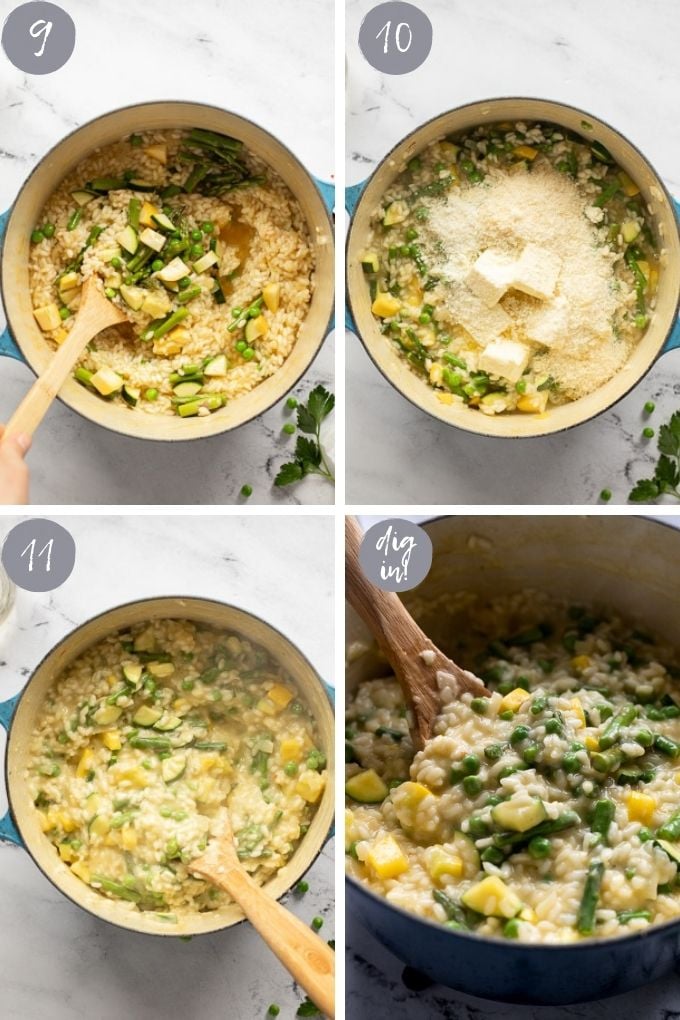
Now that the risotto is at the perfect consistency, it’s time to remove it from the heat (or just turn off the stove) and add the butter and parmesan (photos 9-10). I will be the first to admit that this is the most indulgent part to me. If you’re not feeling quite as indulgent, you can adjust the amount of butter and parmesan to your preference. Many risotto recipes omit extra butter at the end. However, here at Fork in the Kitchen, there is no shortage of butter going on.
Let the butter and parmesan melt into the risotto, stirring to combine (photo 11). Then you’re ready for the best part: time to eat!
What to Serve with Risotto
Vegetable Risotto is hands down a meal in itself in my book, loaded with vegetables, cheese, and rice, what more could you need? But hey, there are definitely times where risotto is the perfect side dish at dinner (ok, more often than not) and there are so many wonderful things to serve along side of it.
- For the meat-eaters, serve it with steak or grilled chicken.
- For the seafood lovers, pan-sear scallops, serve it with grilled shrimp or add in a fish with an easy baked salmon or crispy Parmesan Rosemary Crusted Fish.
- Roasted broccolini makes a delicious side for added veggies!
- White wine is a match made in heaven with this light, springy risotto!
- A bright spring vegetable salad would balance it out beautifully.
Frequently Asked Questions when Making Risotto
You either added too much liquid and didn’t let it fully absorb into the risotto, or added too much after the risotto had reached its max-absorption point. Once you add any stock, let the risotto completely absorb it before adding more. Risotto shouldn’t necessarily be soupy, and it shouldn’t be thick like sticky rice, the goal is to get it somewhere in between.
Be sure to taste test the rice to see how done it is for starters. Then, while stirring, when you scrape the spoon down the middle of the risotto, check to see how long the risotto takes to fill the space. It should slowly seep back, and that’s when you know you likely don’t need to add any more liquid (again, check the rice, too!).
Because you’re not done yet! Keep adding the liquid in small amounts, stirring consistently, and continue to taste test for doneness. Otherwise, it could mean that you burnt the rice instead of toasting it in the beginning, be sure to keep stirring even then and don’t let the rice burn!
Did you continue to stir it? Stirring releases the starch in the risotto as the grains rub against each other, resulting in a creamy risotto dish. Keep stirring, and have patience.
Nope, absolutely not! You’ve got to use Arborio rice. Regular long or short grain rice will not produce the creamy texture that Arborio rice does.
Yes, sauté the vegetables in approximately 2 teaspoons of olive oil in the Dutch oven for 3-5 minutes. Then, remove them and set aside. Once the risotto is almost finished, add the vegetables in and stir to combine.
Yes, you can briefly stop stirring the risotto without harm, just get back to it as soon as you can. Even if it’s just a few quick stirs until you can again fully return to the pot. If you need to step away for more than a couple of minutes, turn the heat down to low to be sure it won’t burn. Then hurry back!
Eeeek, trick question. Because risotto is undoubtedly best when fresh. Take this tip from Fine Cooking about preparing risotto ahead of time. Par-cook the risotto, let it cool completely, then when you’re ready to serve return it to the pot, and continue adding liquid until it’s ready. If you make it completely, you run the risk of overcooked and mushy risotto.
Did you make this recipe? Please leave a star rating and review in the form below. I appreciate your feedback, and it helps others, too!

Get the Recipe Spring Vegetable Risotto
Ingredients
- 6 cups vegetable stock
- 1/4 cup olive oil
- 1 cup yellow onion, diced
- 2 garlic cloves, minced
- Salt, to taste
- Dash red pepper flakes, optional
- 2 cups Arborio rice
- 1/2 cup dry white wine
- 1/2 lb asparagus spears, cut into 1-inch pieces
- 1 cup zucchini, diced (1 small zucchini)
- 1 cup yellow squash, diced (1 small squash)
- 1 cup frozen or fresh peas
- 6 Tablespoon unsalted butter
- 1 cup parmesan cheese, freshly shredded or grated, more for garnish
- Optional: Parsley, chopped for garnish
- Optional Squeeze of fresh lemon juice, for garnish
Equipment
Instructions
- In a medium saucepan, add the vegetable stock and bring to a simmer. Then, reduce heat and keep warm over low heat for the duration of the cooking process. You can't add cold liquid to make risotto.
- Heat a large stock pan or Dutch oven over medium to medium-high heat. Add the olive oil, then, once it's warm add the onions with a generous pinch of salt and red pepper flakes, if using. Saute for a minute, then add the garlic, cooking for an additional 2 minutes.
- Add the Arborio rice to the onion mixture, stirring to coat the rice completely. Cook it for approximately 1 minute until toasted and any additional oil is mostly absorbed.
- Deglaze the pan with the white wine, slowly pouring it in and stirring at the same time. Continue gently stirring and allow for the rice to absorb the wine.
- Once the wine is absorbed, add about 1/2 cup of the warm broth (I use a measuring cup and simply dip it in, then pour it into the risotto pan). Stir the risotto consistently, until the broth is absorbed.
- Continue the process of adding 1/2 cup broth, then stirring until it's completely absorbed until you've added approximately 4 cups of the broth (just do your best to keep track). At this point, add the vegetables to the broth to begin cooking.
- Continue adding broth to the risotto in the same way (1/2 cup, stir until absorbed, etc.), but this time transfer a whole lot of the veggies over with you in the process. The vegetables will cook both in the broth and as the risotto finishes.
- Begin testing the rice for doneness. If it is still crunchy, you will need more time. Continue adding broth 1/2 cup at a time, and stirring until it is all absorbed. I recommend taste testing after each addition at this point to really get a feel for where the rice is at. Once the risotto is creamy, the bite is firm but not crunchy (think al dente pasta), and the last addition of broth is absorbed, turn off the heat.
- Add the butter and parmesan cheese, stirring to combine and allowing both to melt. Serve the risotto immediately with chopped parsley as desired and additional parmesan cheese. Enjoy!
Notes
This post was originally published in April 2015. The text and photos were updated in April of 2021.


I like how you include the necessary technique of stirring with one hand and holding a glass of wine with the other. Absolutely essential for championship risotto!
Exactly! I’m glad you agree!
I was nervous about the recipe as I was cooking it, but it turned out amazing! Patience is key. 😉 I love the vegetable bits throughout the dish, and the parmesan cheese was exactly what it needed. I hope to make this again soon!
Yes, patience is TOTALLY key! I’m so glad you gave it a try. Thanks so much, Cassie!
In all honesty, I didn’t make this, my son made it while I was making the rest of the dinner (seared black cod with roasted peppers, olives, and capers ). We opted to steam the asparagus on the side since it would have been a shame to cut fresh young asparagus. This was a wonderful pairing and delicious. And of course, any time you can cook with your kids it’s extra special.
That sounds SO special, Anita, and like a delicious dinner! Thank you so much for commenting!
This recipe was my first homemade risotto, I made a vegetarian version with veggie stock, asparagus, carrots, peas and corn, it was AMAZING! So rich and flavorful, your instructions gave me the confidence to try a favorite dish at home. Thank you! 💕🥰
Yay! I’m so glad to hear all of this! Thanks so much, Anita!